Set up billing with pods in Verily Workbench
Purpose: This document describes how Verily Workbench admins can create pods for Workbench billing purposes.
Introduction
Verily Workbench enables users to take advantage of public cloud platforms for storage, compute, and other services. An important step in user setup is to enable Workbench to create resources and perform cloud operations that have cloud costs associated with them, with flexibility on who is billed. This document describes the steps to enable and manage the association between user profiles and how cloud services are paid for.
For more information about what Workbench operations lead to cloud charges and how to manage cloud costs, see Cloud cost management.
What is a pod?
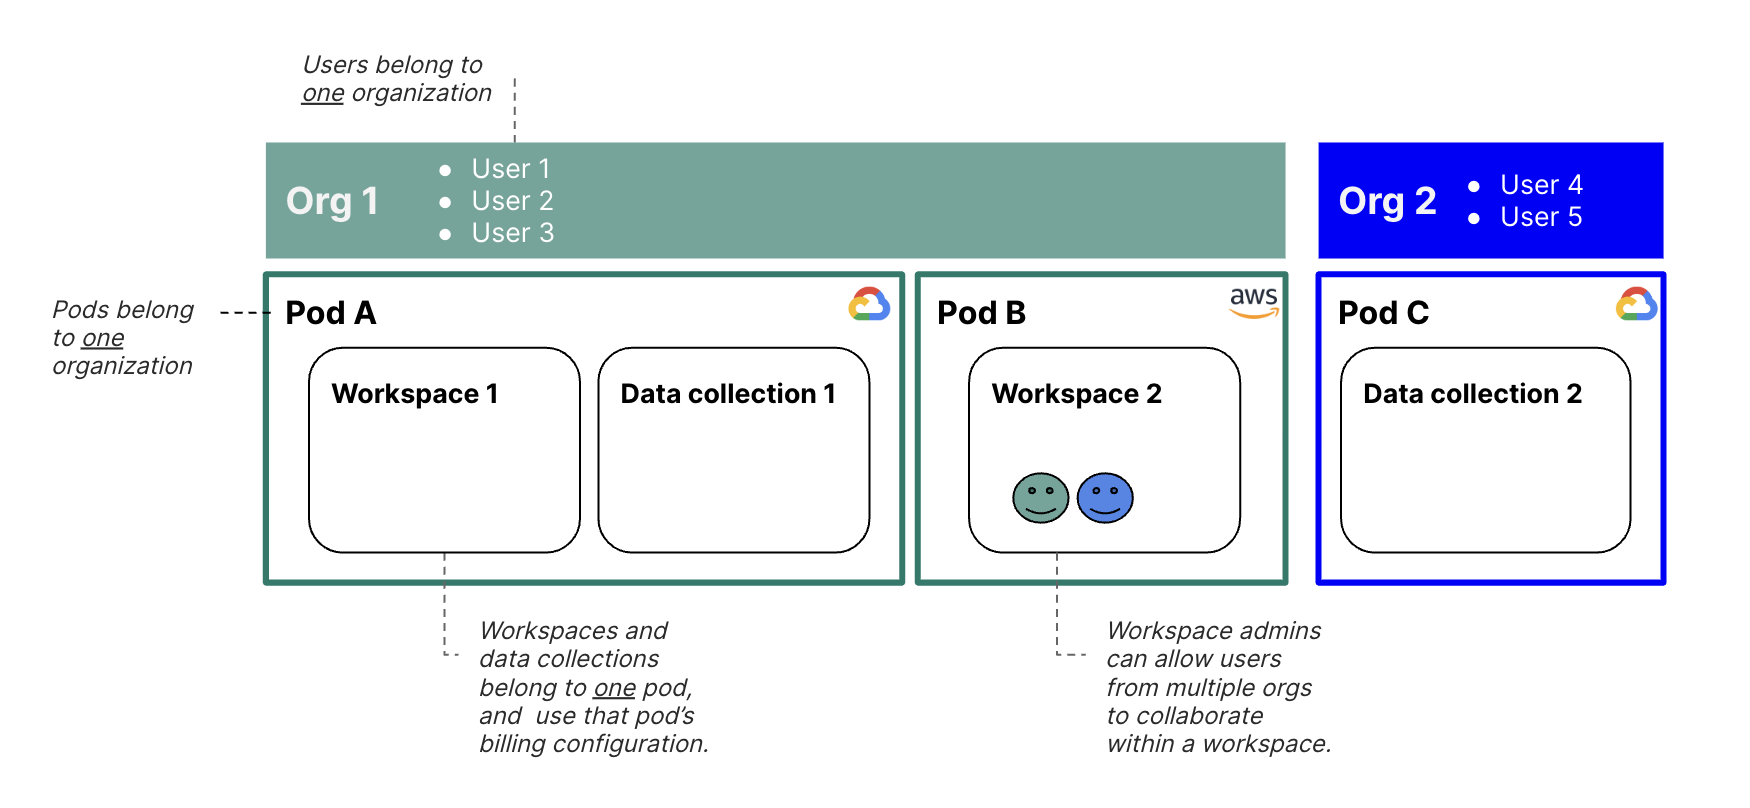
Institutions can use pods to connect people and workspaces to cloud infrastructure and billing.
A pod organizes resources within an organization so that they share the same cloud platform and billing. With billing controls at a pod level, users within one organization can choose to use multiple billing accounts, and users across organizations can be allowed to collaborate in a given pod.
How pods work
Each pod is linked to a cloud account, which is used for billing. One pod can be used for many workspaces. Since pods are linked to cloud accounts, the pod specified upon workspace or data collection creation determines which cloud platform the workspace or data collection belongs to.
Pods are administered by organizations (“orgs”).
In order to create a pod a user must have the Organization Admin or Pod Manager role. For more information on organization level roles and permissions, see Organization roles and permissions.
When a Pod Manager creates a pod they are then able to administer it by automatically being granted the Pod Admin role on that pod. Pod Admins can grant permission to other users or groups to use the pod. Users can be granted permission to access as many pods as needed.
When a user creates a workspace or data collection, they pick the pod in which to allocate the workspace or data collection, chosen from the pods they have permission to access. (As with pods, workspaces can be shared with users from other organizations.)
Using Workbench without belonging to a pod
You don’t need to be a pod member to use some Workbench features. For example, you can:
- Browse read-only any workspaces to which you have been granted Reader
- Work read-write in any workspace to which you have been granted Owner or Writer
For more information about workspace permissions, see Access control and sharing.
Pod roles and permissions
The set of roles and permissions at the pod level is as follows in the table below. Note that Pod Manager is not on this list because it is an organization-level role.
| Role | Description | Permissions |
| Pod Admin | An end user of Workbench who is an administrator of a given pod. When a user creates a pod they are automatically granted this role. |
|
| Pod User | An end user of Workbench who can create workspaces and resources in a given pod. |
|
| Workbench Support | A Workbench-wide role. Generally assumed by the Workbench Support and Operations teams. | Pod Admin privileges as well as permission to create pods. |
How to create a pod
Step 1: Create a Cloud Billing account
Note
The information in this section is specific to Google Cloud.If you don’t already have a Google Cloud Billing account set up that you want to use for this purpose, you'll need to create one, as described below.
You may first want to talk to your institutional IT department or administration to determine if your organization has an existing account or a preferred account setup method with Google.
If you want to use an existing Cloud Billing account, your Google Cloud account will need to have access to the Billing account that you use, as the setup process will check that you have access permissions.
Otherwise, if you want to set up billing for yourself, you can follow Google's instructions to create a new self-serve Cloud Billing account. Note that while you'll need to set up some billing method, you may also be eligible for $300 in free credits from Google. Information and instructions for usage can be found at Free cloud features and trial offer.
Step 2: Grant permission to Workbench to use the Billing account
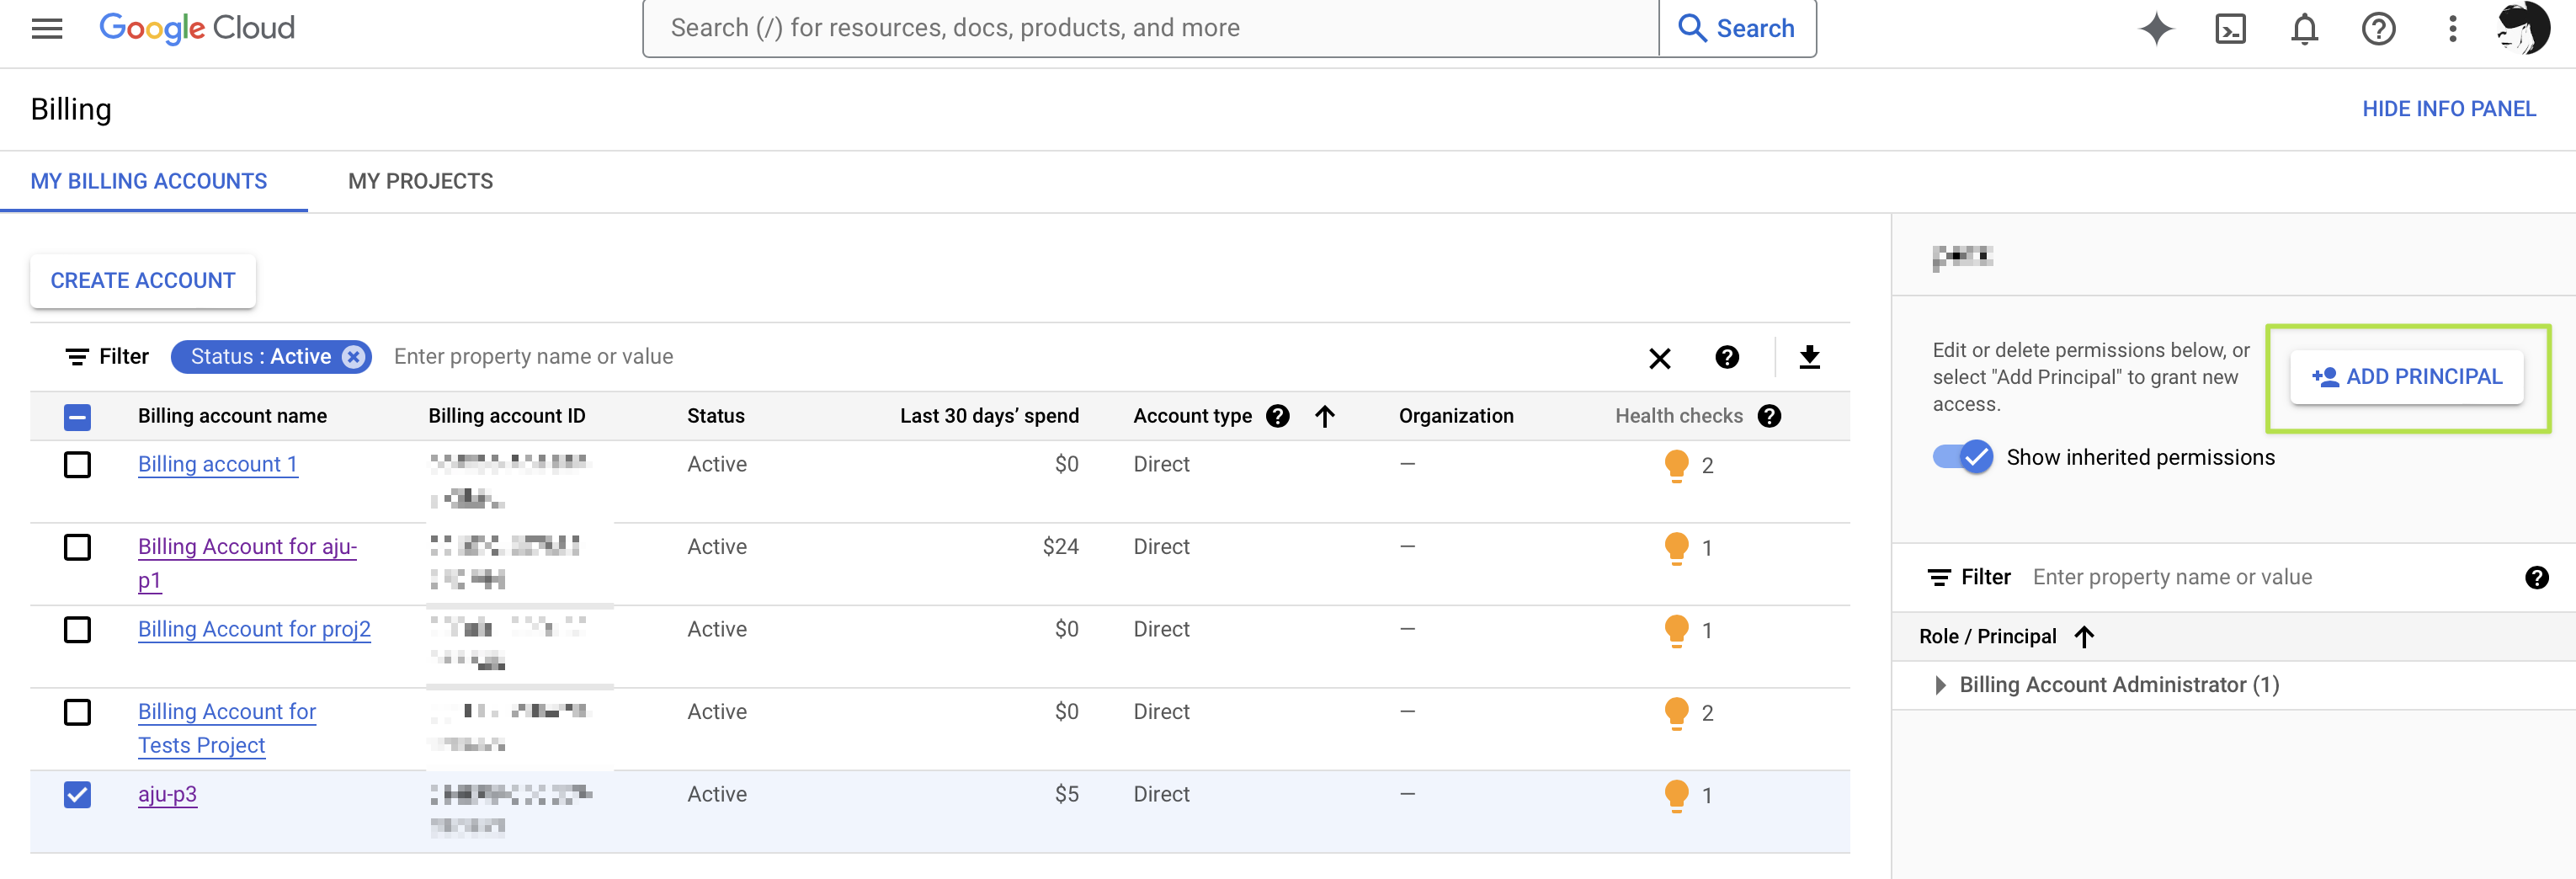
Sign in to the billing accounts management page in the Google Cloud console at: https://console.cloud.google.com/billing. Check the box for the relevant account and click **SHOW INFO PANEL**.

Troubleshooting
If you see the message "You don't have permission to edit the permissions of the selected resource" when you select a billing account, you should contact the billing account owner so they can grant you the necessary permissions.You should see an info panel. Click the **ADD PRINCIPAL** button.
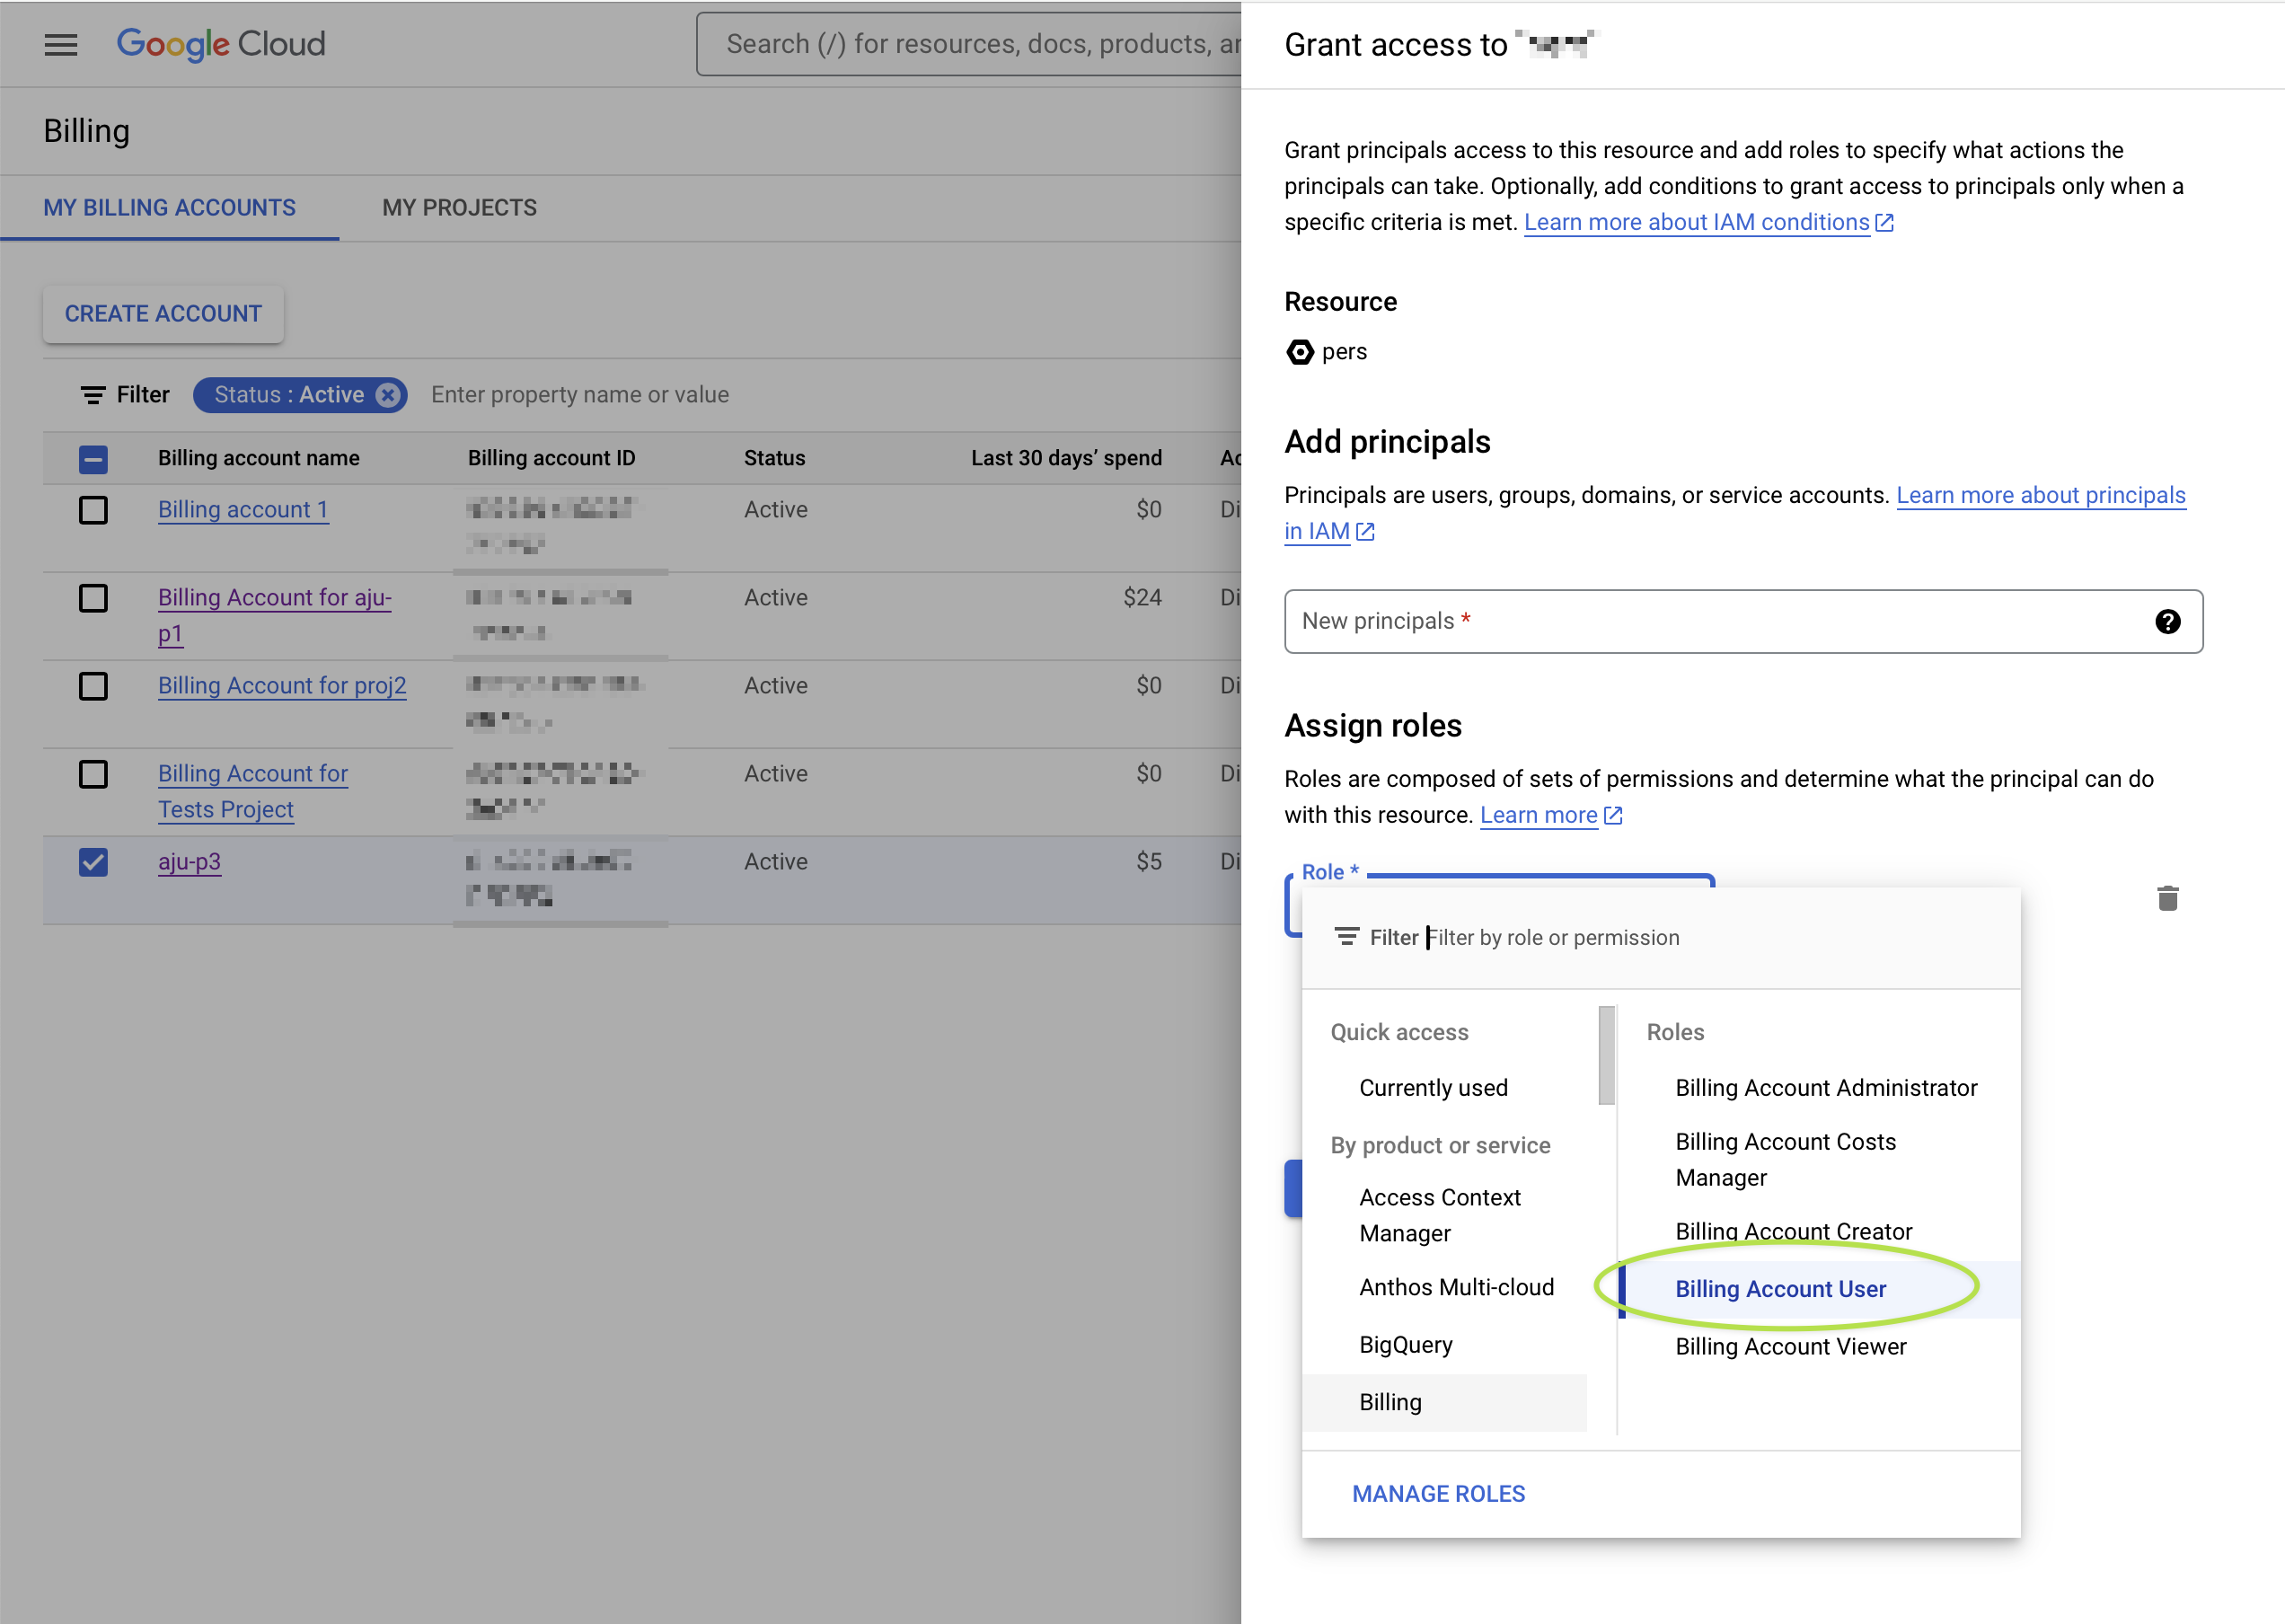
Then assign the role to **Billing Account User**.
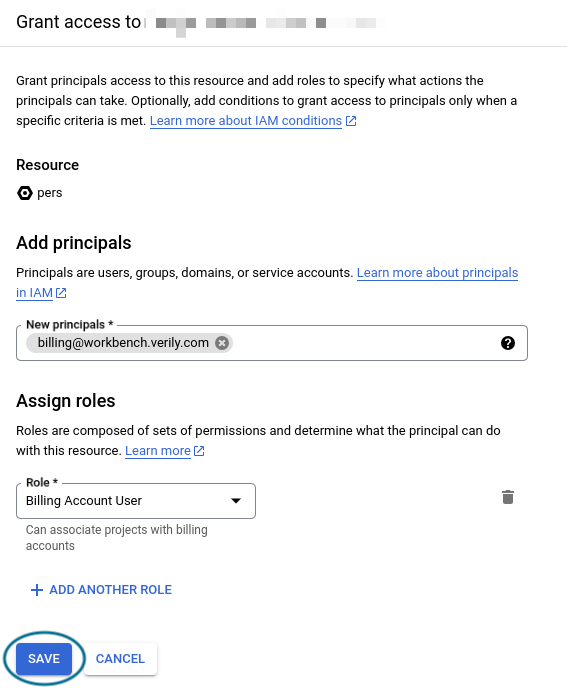
Add billing@workbench.verily.com to **New principals**. Click **SAVE**.
Step 3: Allow Workbench to confirm your access to the Billing account
It's also necessary to allow Workbench to confirm your account's access to a given Google Cloud Billing account. This allows Workbench to check that you have authority to use a billing account ID for a pod. You can do this via the Workbench web UI.
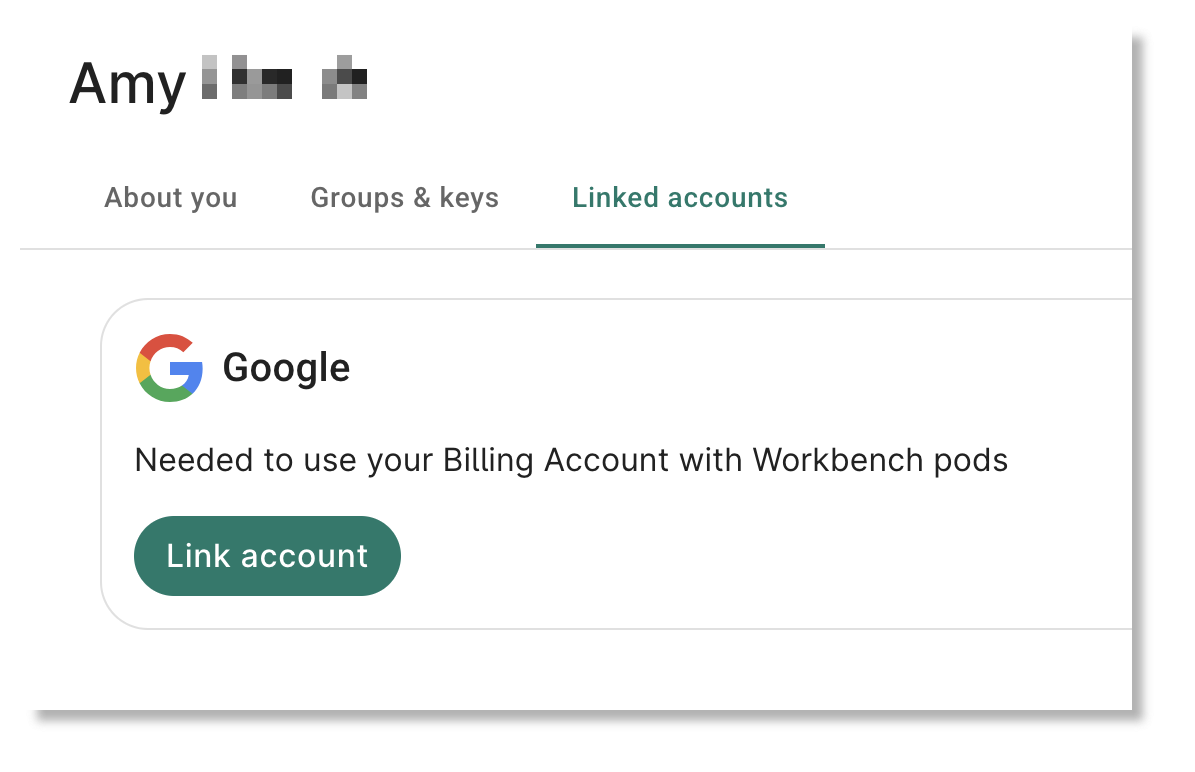
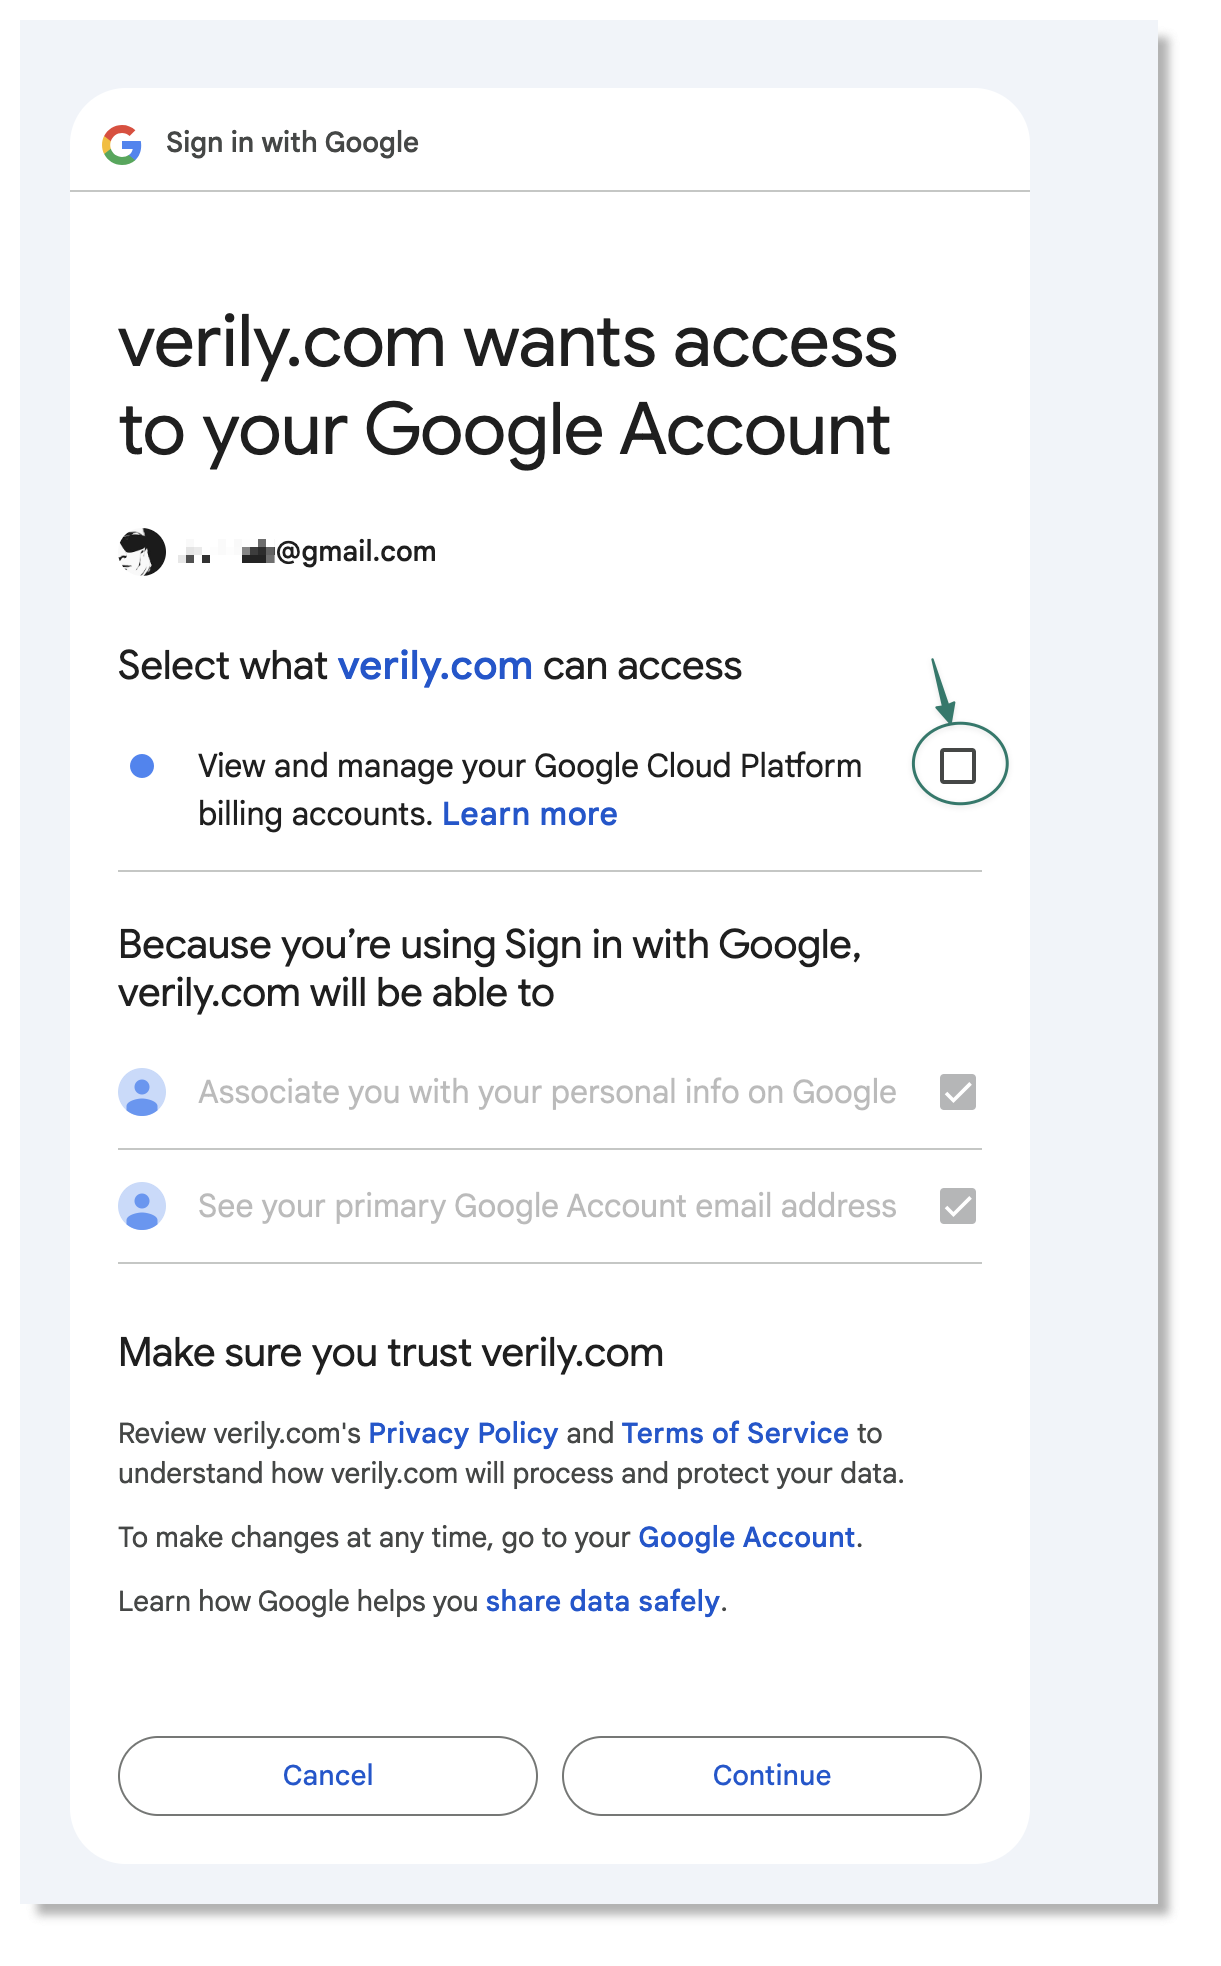
Clicking on "Link Account" will bring up an OAuth dialog window. You'll need to check the "View and manage your Google Cloud Platform billing accounts" box.
To later unlink your account, you can click the Disconnect button.
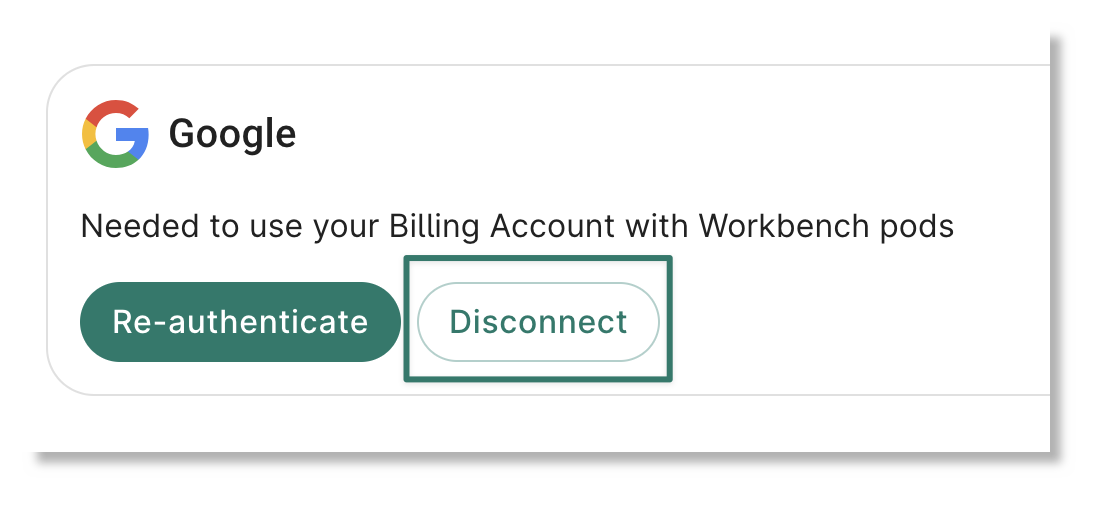
Note
If you want to disconnect your linked account directly, visit https://myaccount.google.com/connections and select "Verily Workbench".Step 4: (CLI-only) Install the Workbench CLI (command-line interface) and set its credentials
Note
You can skip this step if you will create a pod using the Workbench web UI.You can use the Workbench command-line tool to create and manage pods. You can access the CLI in several ways. If you're already a member of an existing pod, or have Writer/Owner access to a Workbench workspace, you can create a Workbench workspace app, where the Workbench CLI is automatically installed, and run the commands there.
You can also install the CLI on your own workstation, or you may find it convenient to install the Workbench CLI in a Google Cloud Shell. For a first-time user, Google Cloud Shell may be a smoother experience, as you will not need to install the required dependencies.
To open a Cloud Shell, click the Activate Cloud Shell icon
(![]() )
at the top of the Google Cloud console. Then follow the
instructions for Installing and running the Workbench CLI
.
)
at the top of the Google Cloud console. Then follow the
instructions for Installing and running the Workbench CLI
.
Step 4.1: Provide credentials to the Workbench CLI
Creating a Workbench pod for Google Cloud via the CLI requires being logged in with Google Application Default Credentials. This allows Workbench to check whether you have access to the billing account information that you will provide. Run the following command in order to create credentials that will be used by the Workbench CLI in the next step.
Note
If running on Cloud Shell, you will be presented with a warning that this command is not necessary and could expose your credentials to other users on the VM. You can safely proceed in spite of this warning. The Cloud Shell runs on a Compute Engine Virtual Machine that is not a shared instance. Per How Cloud Shell works: "Cloud Shell instances are provisioned on a per-user, per-session basis."gcloud auth application-default login
Next, authorize the Workbench CLI using your application-default credentials:
wb auth login --mode=APP_DEFAULT_CREDENTIALS
Step 5: Create a pod
Reminder
Only Org Admins and Pod Managers can create pods.You can create a pod via the Workbench web UI or via the CLI. If you are using the CLI, ensure that you've completed Step 3 above. In either case, you'll need to know the 18-character Google Billing account ID that you want to use. You can find this information at https://console.cloud.google.com/billing.
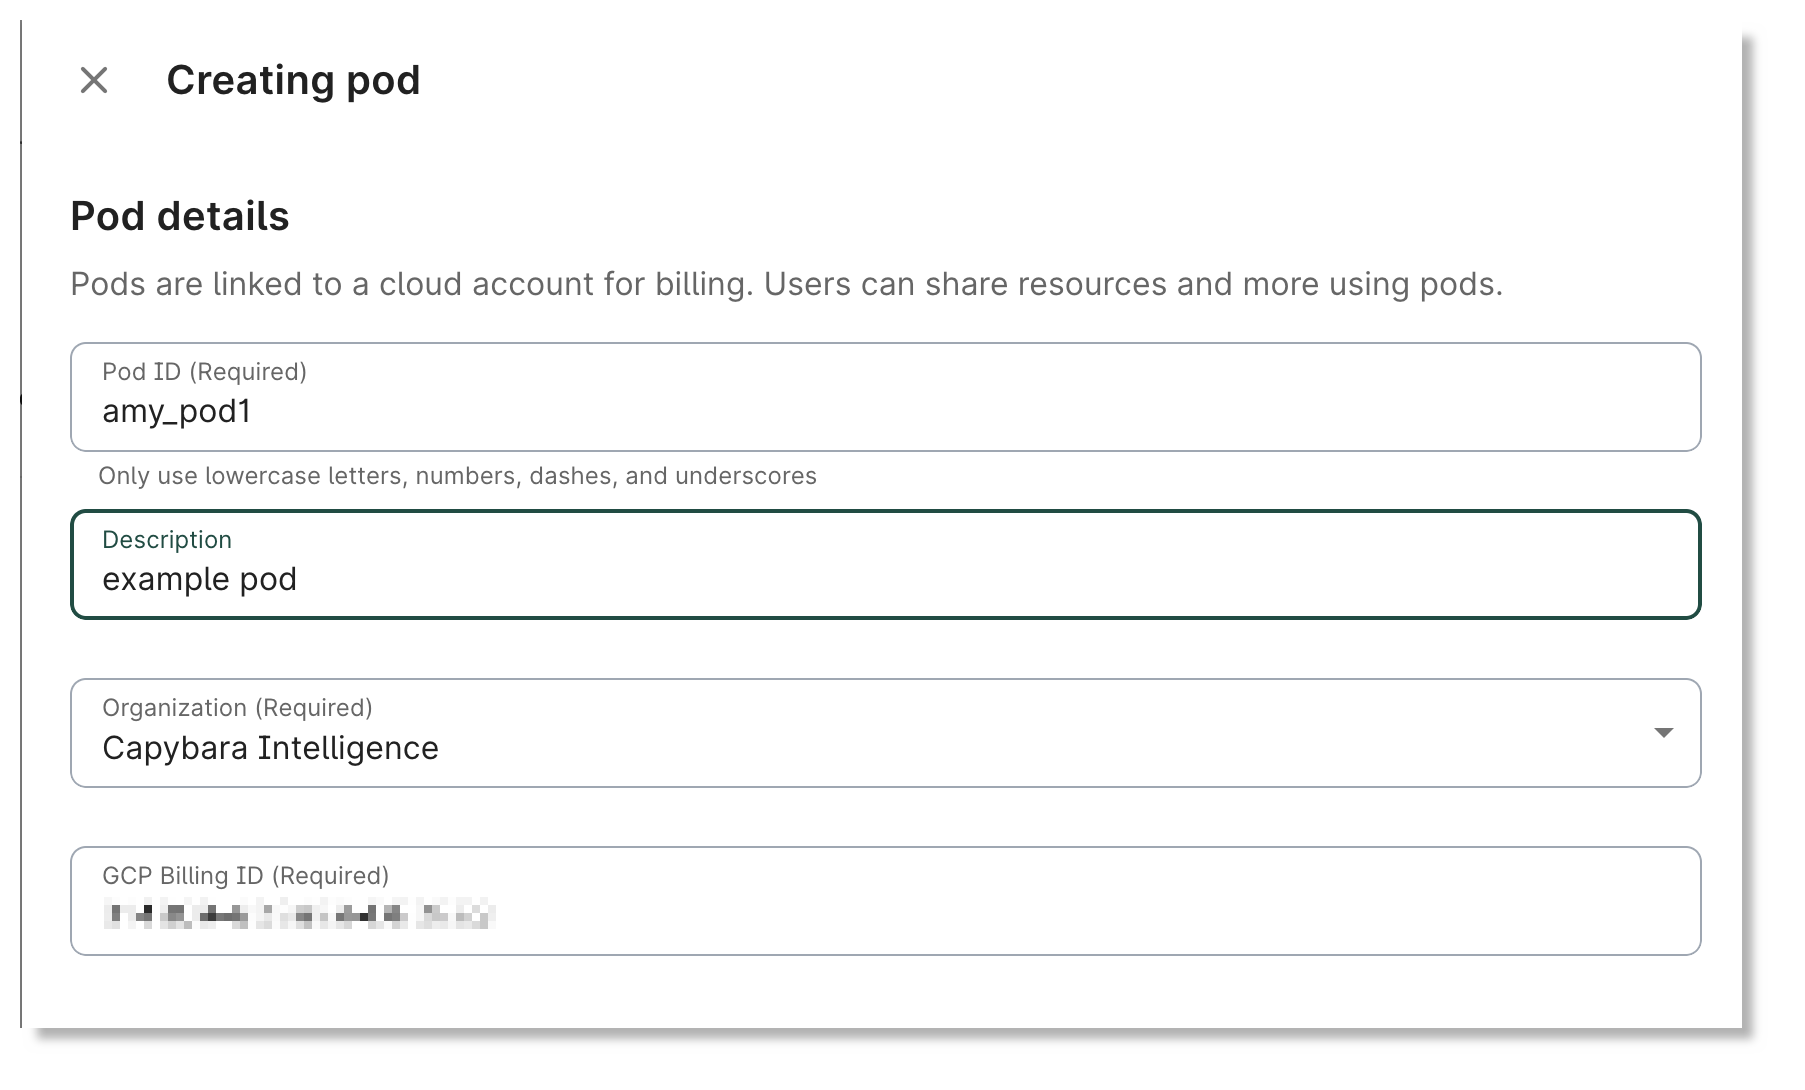
If you have been granted permission to create a pod, then click on the New Pod button in the Pods page of the Workbench UI. If you have not already done so, you'll be prompted to first link a GCP billing account, as described in Step 2.
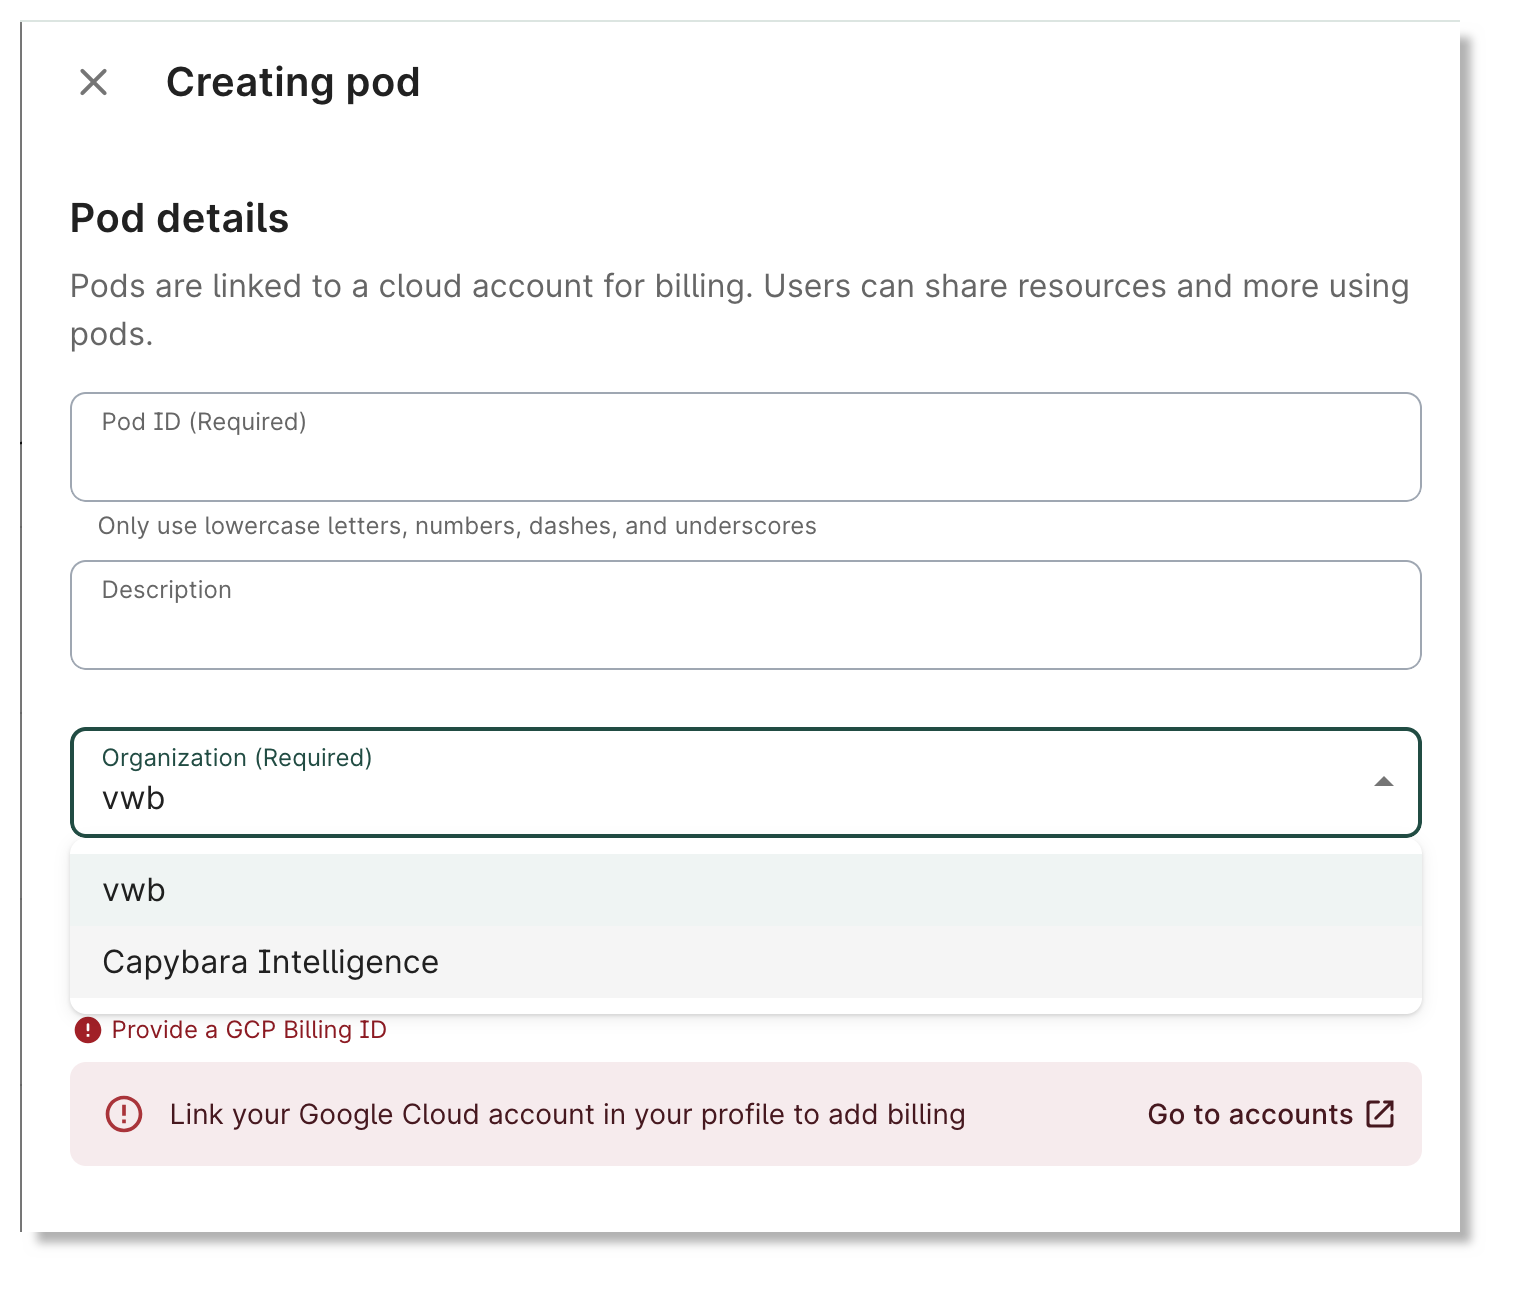
After you've linked your account, create the new pod. You'll need to know the 18-character Google Billing account ID of the GCP account that you want to use.
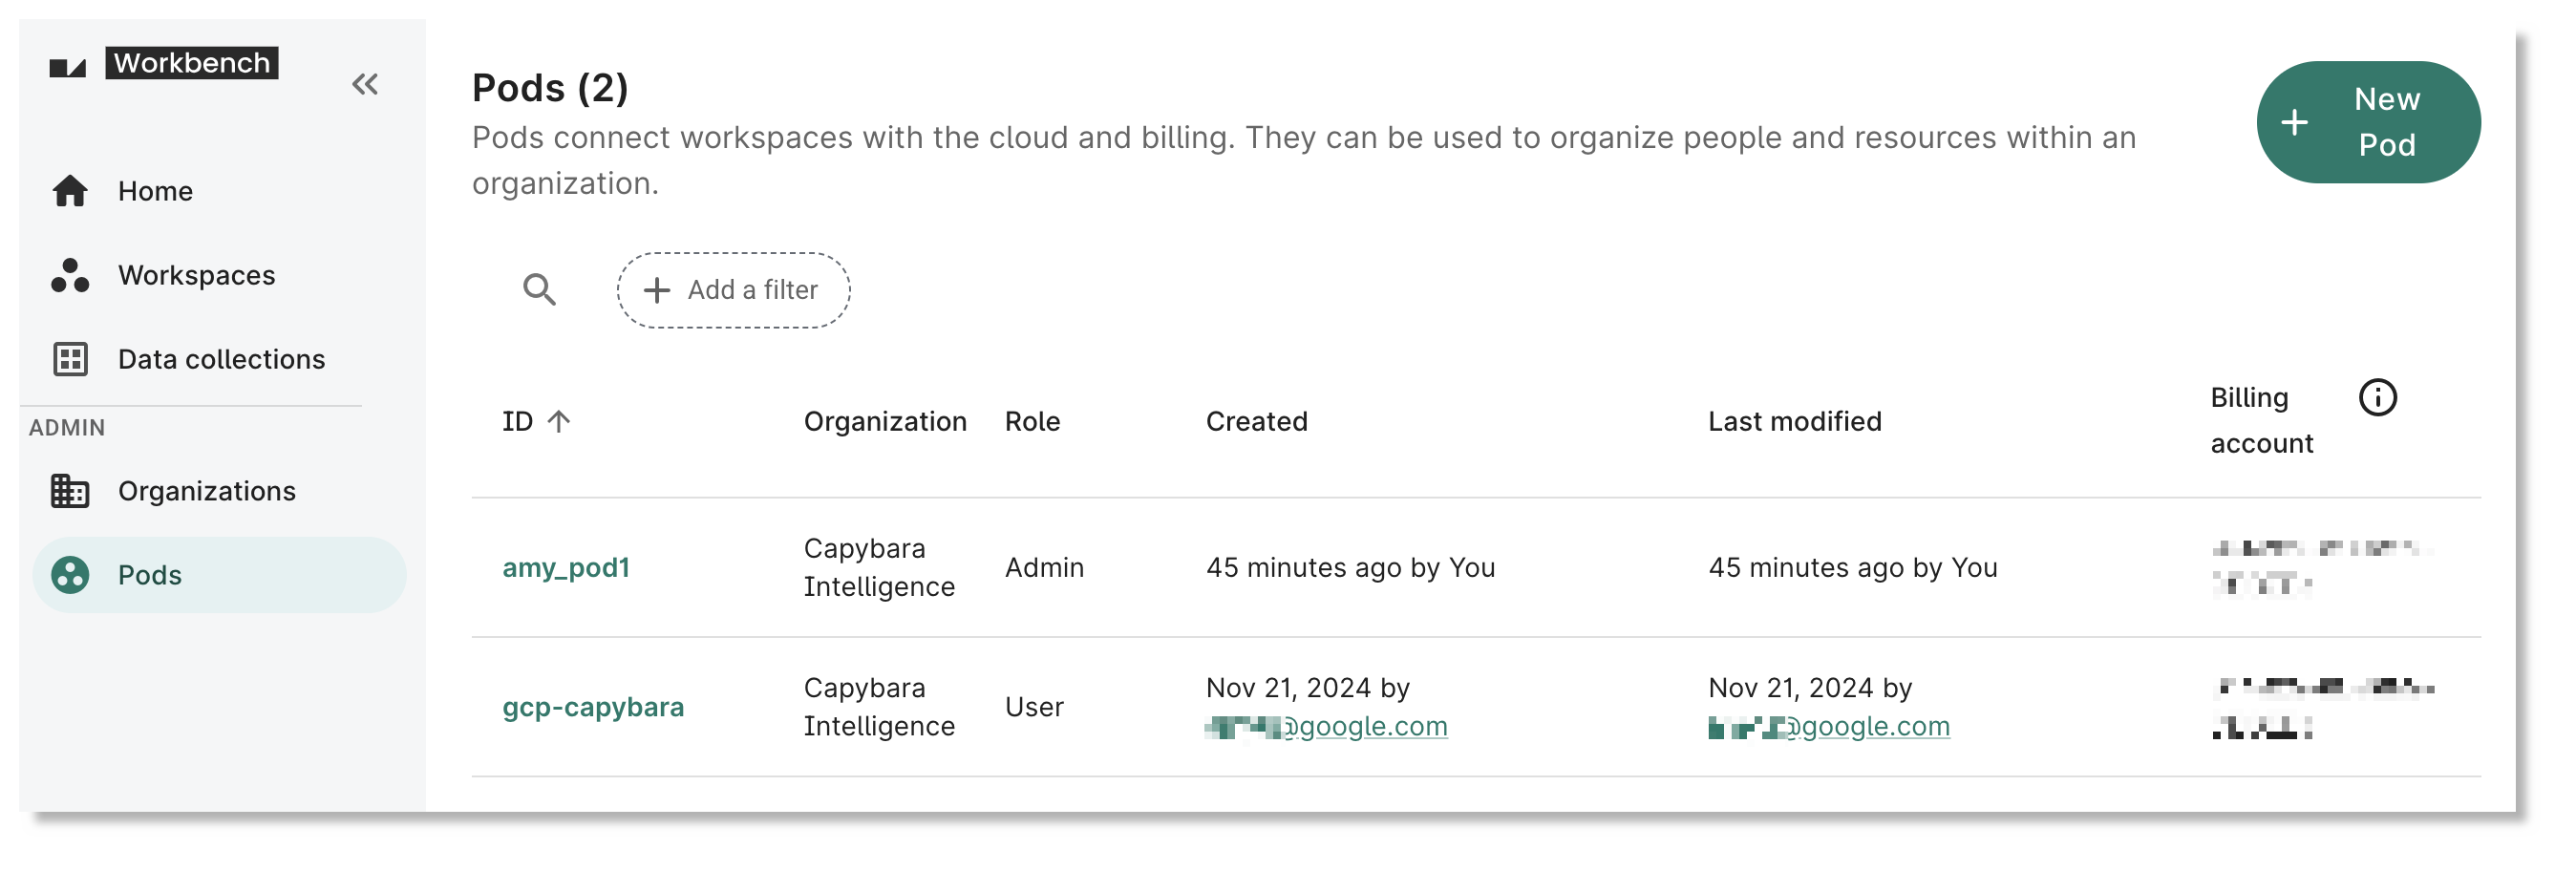
After creation, you can view your new pod in the list, which shows both the pods that you have created, and those to which others have granted you access.
Determine the Org ID for the pod:
wb org list
Create a pod:
wb pod create gcp \
  --id ID \
  --description DESCRIPTION \
  --billing-account-id YOUR-BILLING-ACCOUNT-ID \
  --org YOUR-ORG-ID
Where:
IDis an identifier that you choose. The pod ID must be globally unique.- Tip: Choose an ID that will make sense to others you add to the pod. When you create workspaces, you can see the pods you’re a part of. It could be the name of your team, department, program, or something meaningful to you and others you work with.
DESCRIPTIONis a description of the pod. It should be something meaningful to you.YOUR-BILLING-ACCOUNT-IDis your 18-character Google Billing account ID.YOUR-ORG-IDis the identifier for the organization under which you want to place the new pod.
You can now use the pod when creating new workspaces and data collections. See below for more details.
How to update a pod (for pod admins)
Grant or revoke users’ access to and permissions on a pod
A pod admin may grant use of the pod to other Workbench users, or revoke that access.
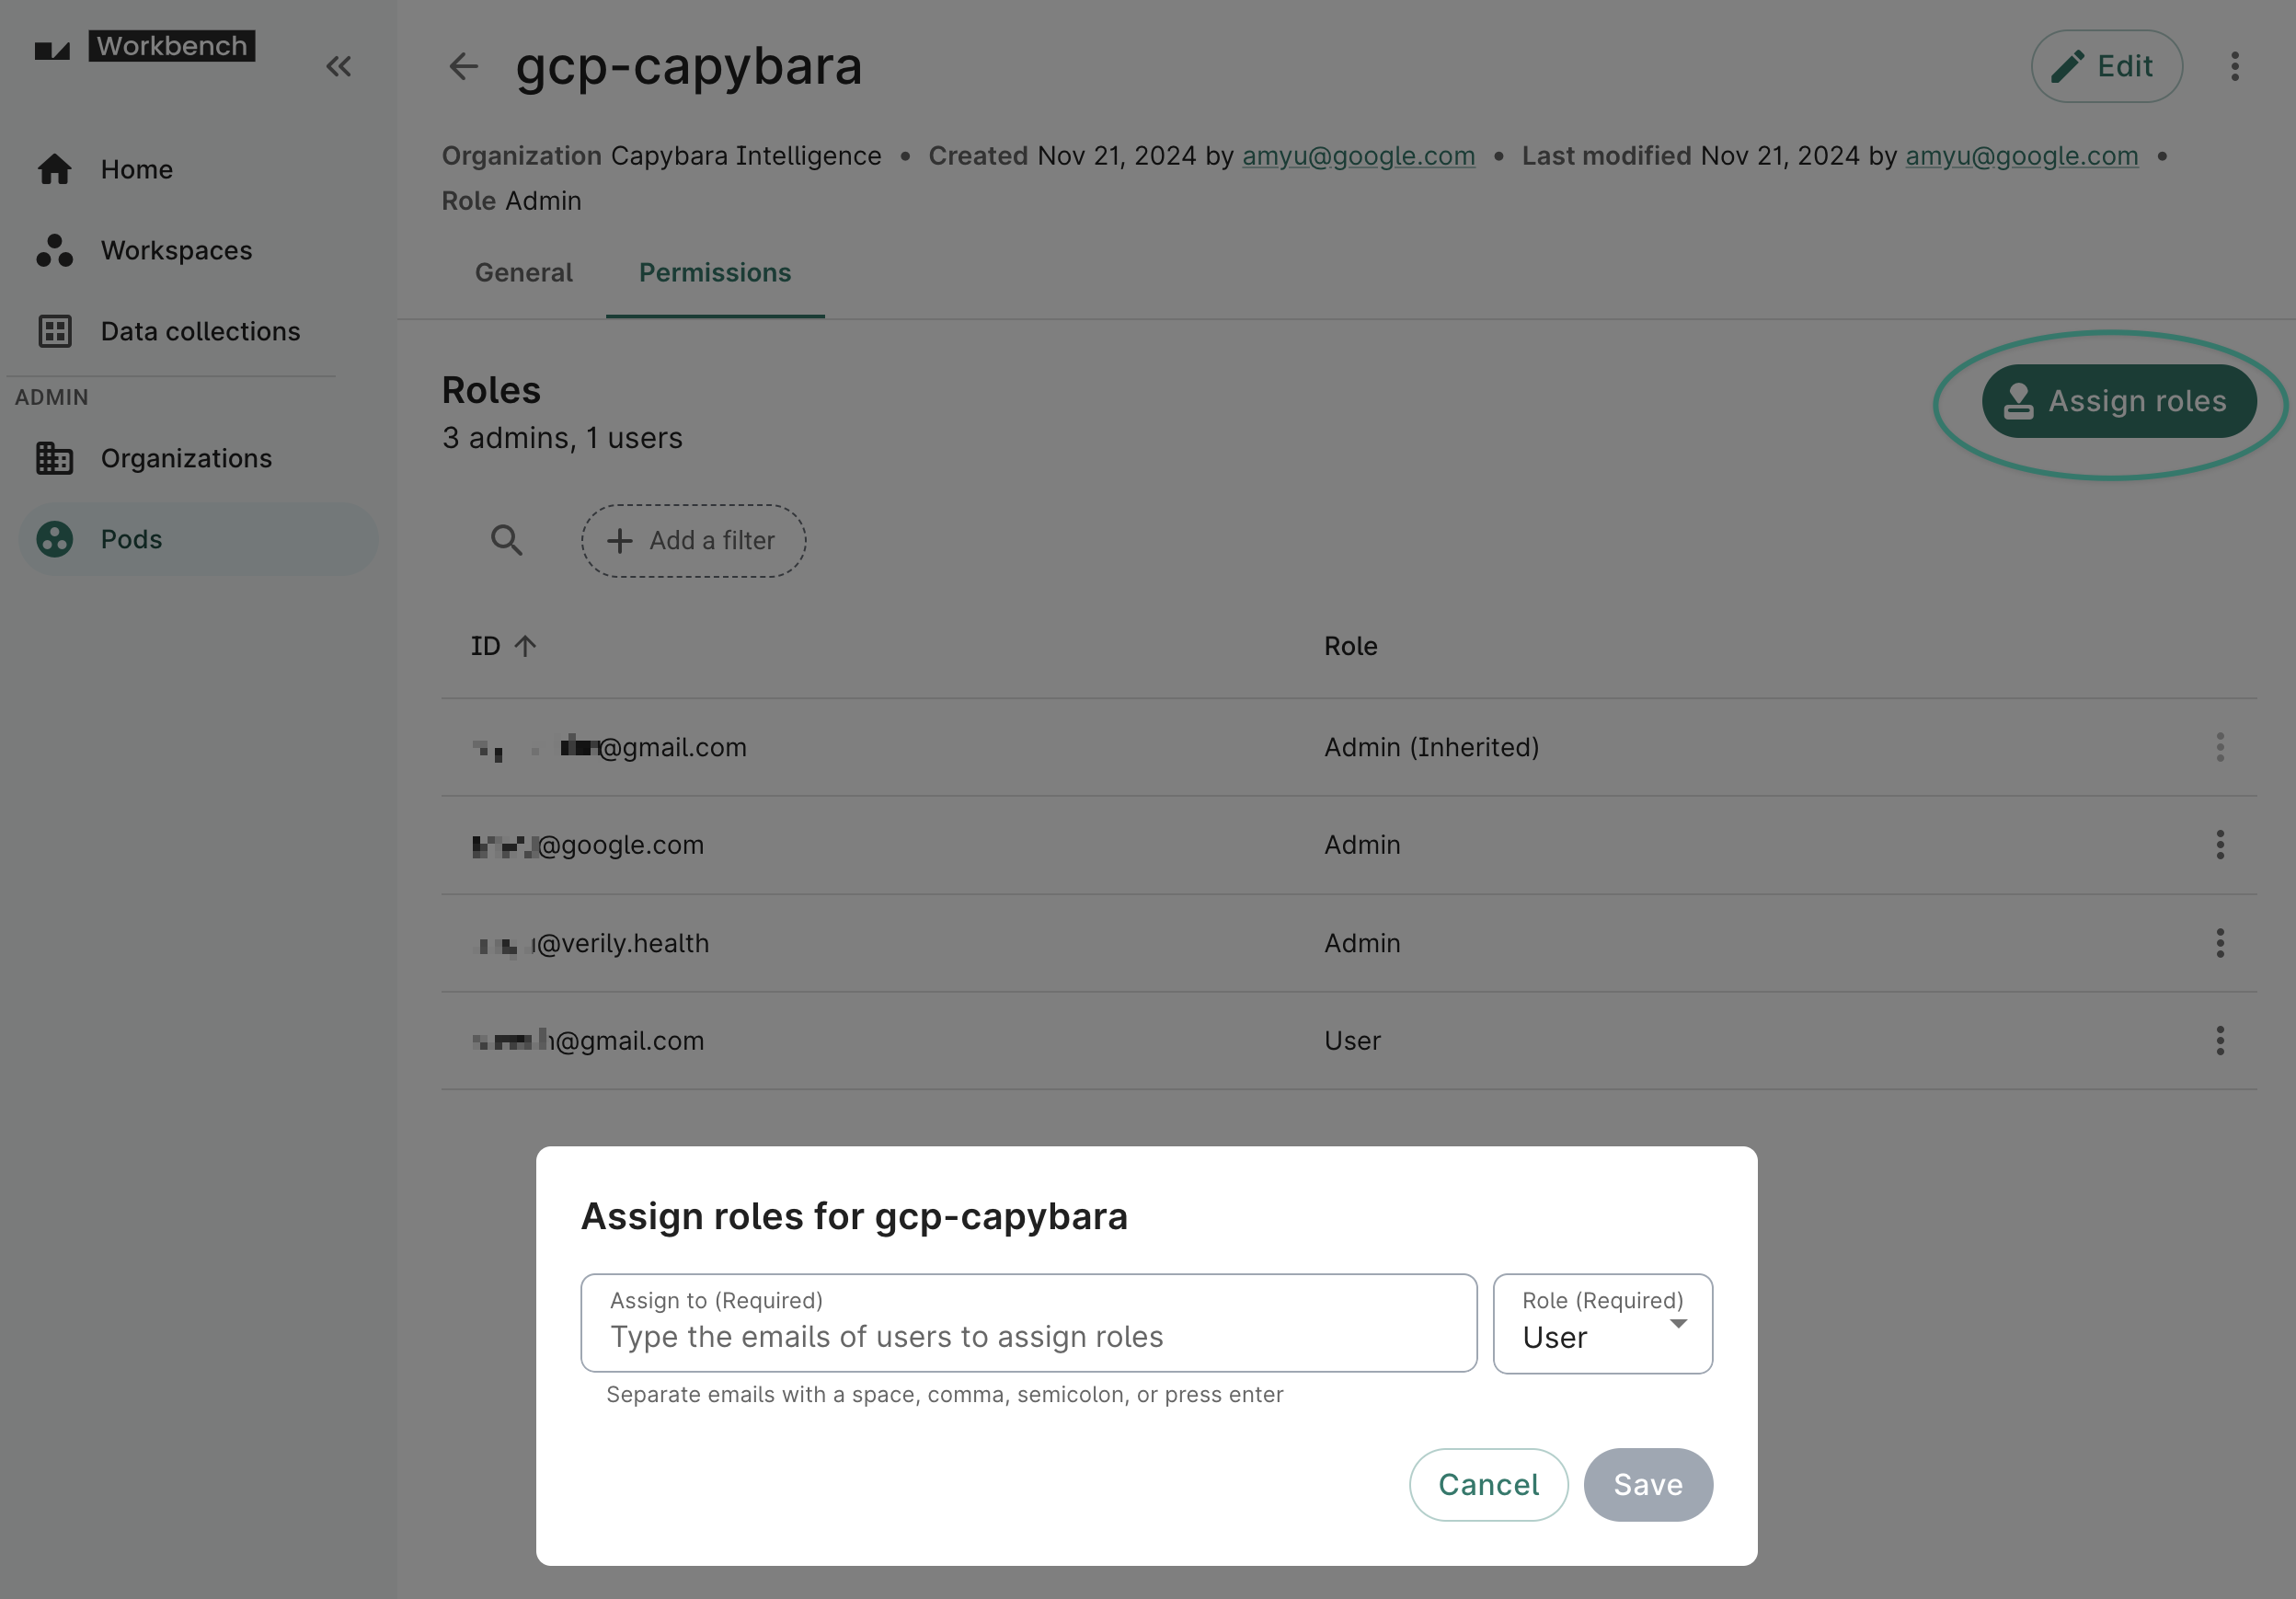
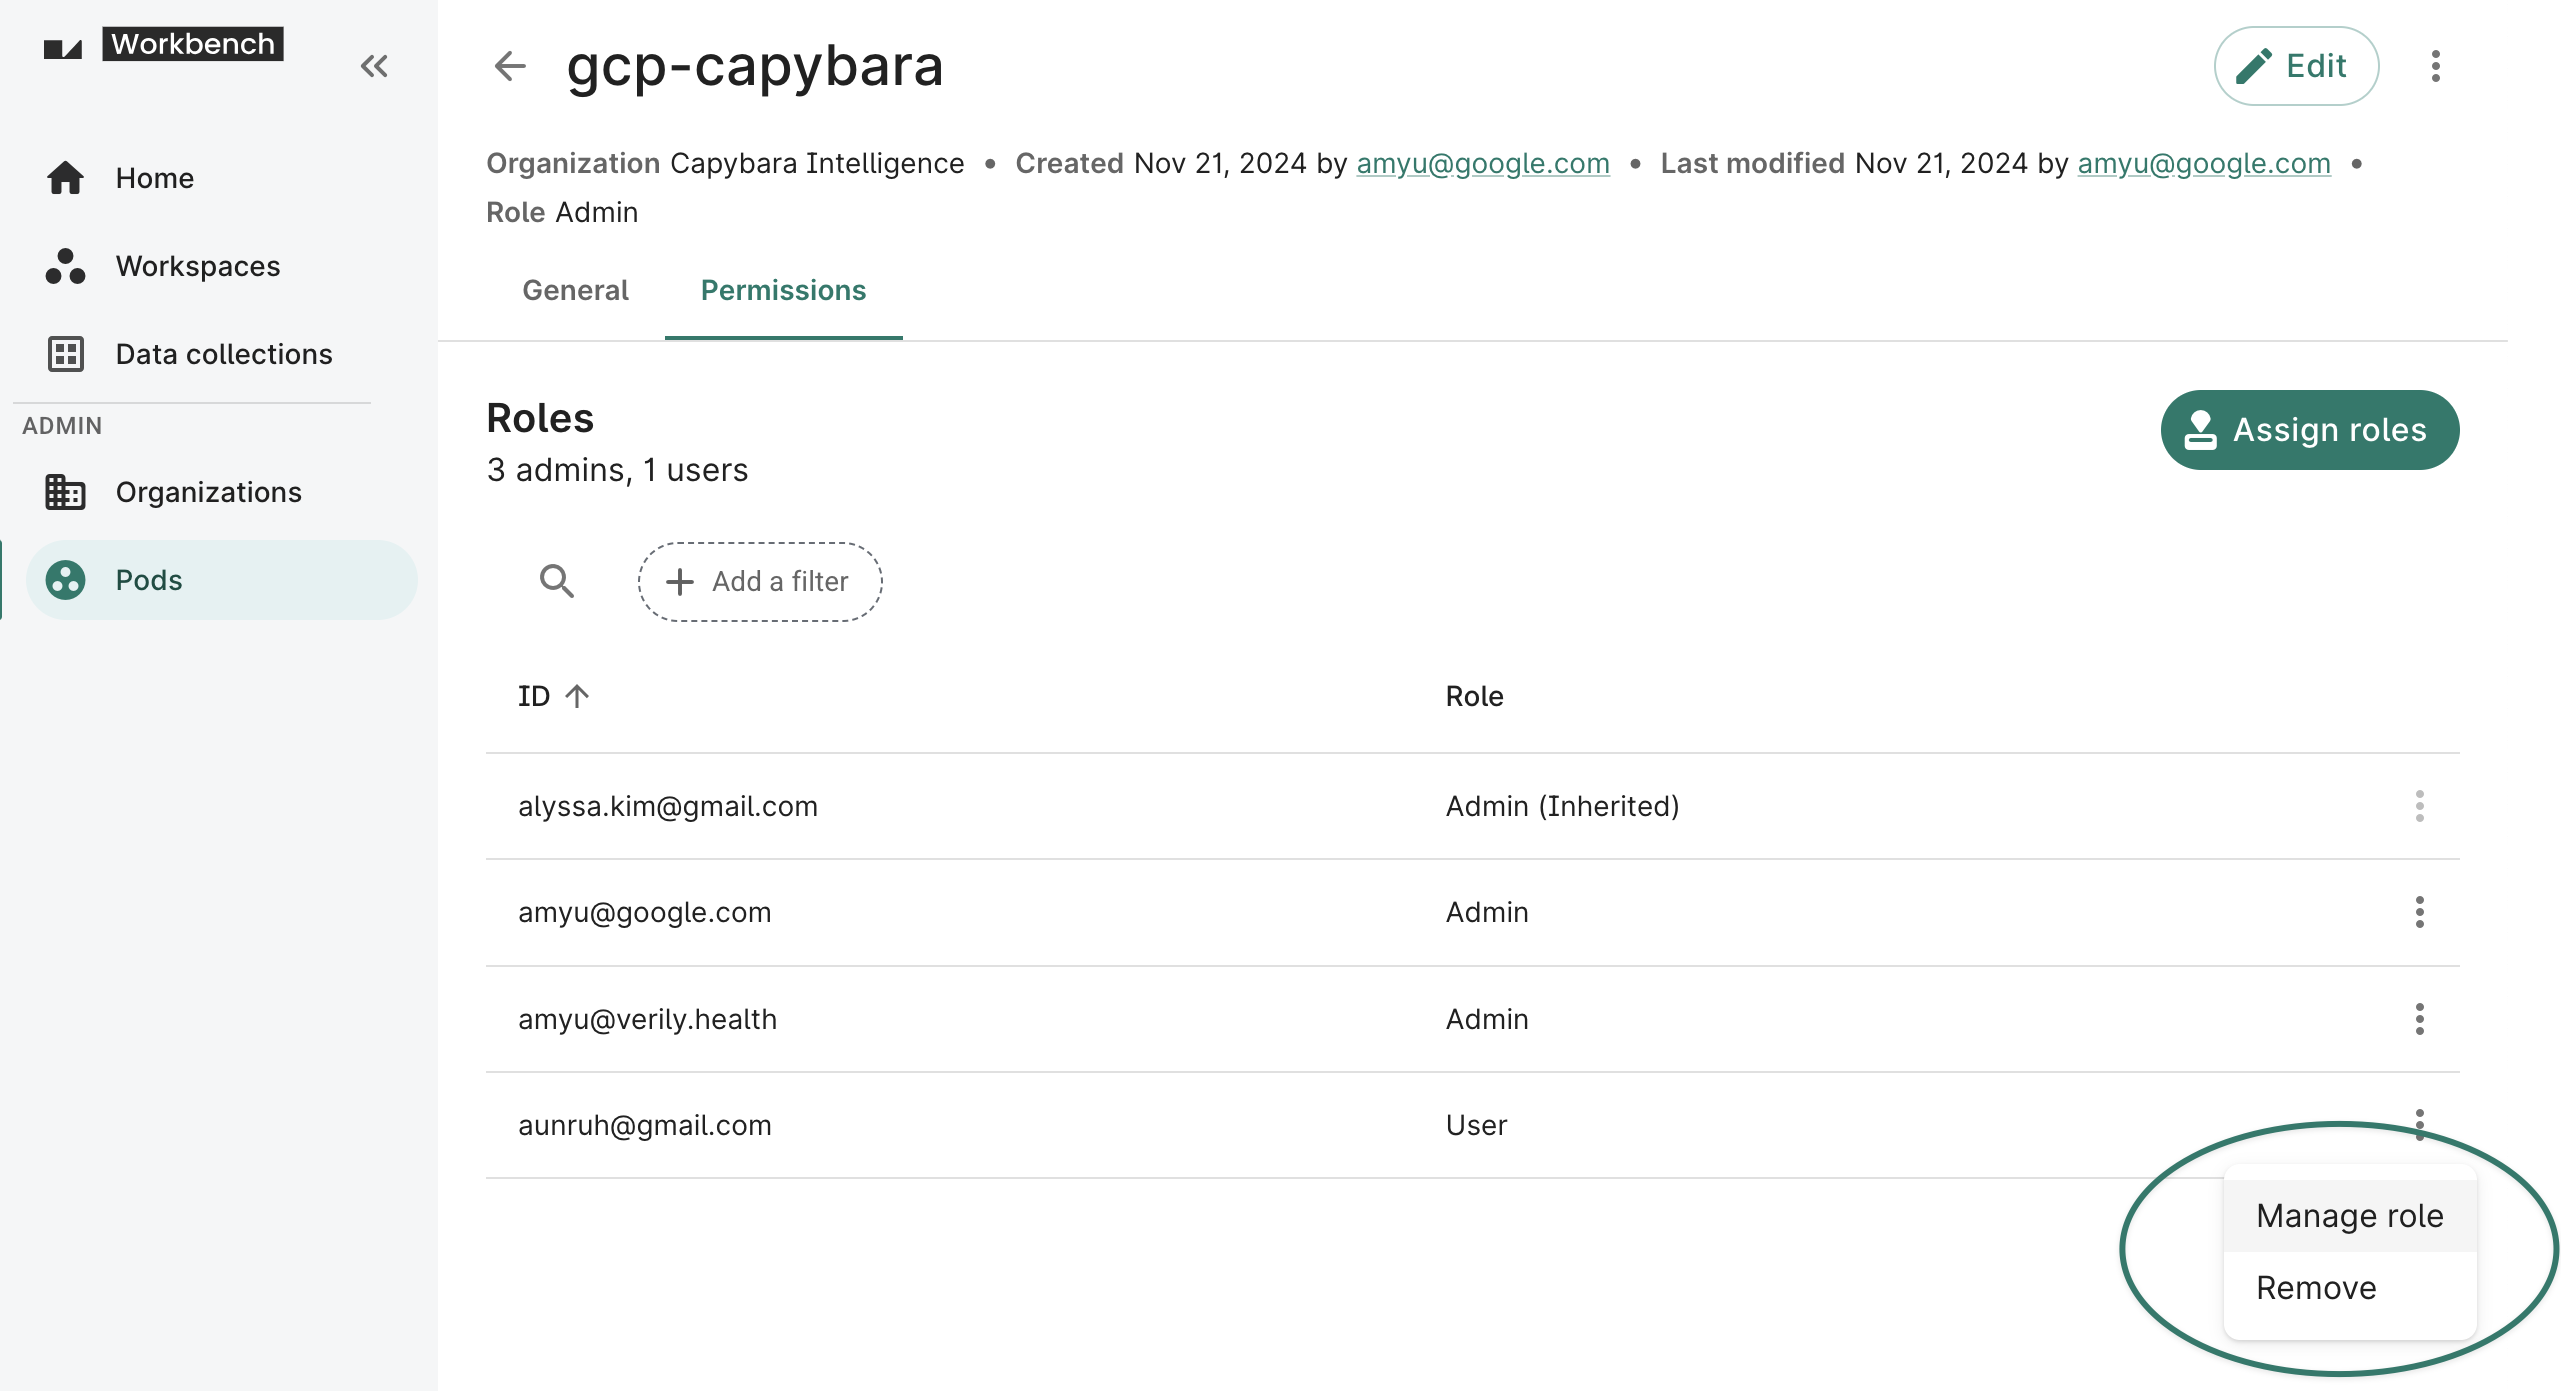
From the Pods listing, click the link for a pod. From that page, you can grant users access to the pod, or manage the role for a given user.
wb pod role grant --email=<email> --org=<id> --pod=<id> --role=<role>
wb pod role revoke --email=<email> --org=<id> --pod=<id> --role=<role>
The valid --role values are ADMIN or USER.
Note
The user you add must be already onboarded to Workbench and may be from another Workbench org — that is, they don't need to be members of the pod’s parent org.Update a pod's billing information or description
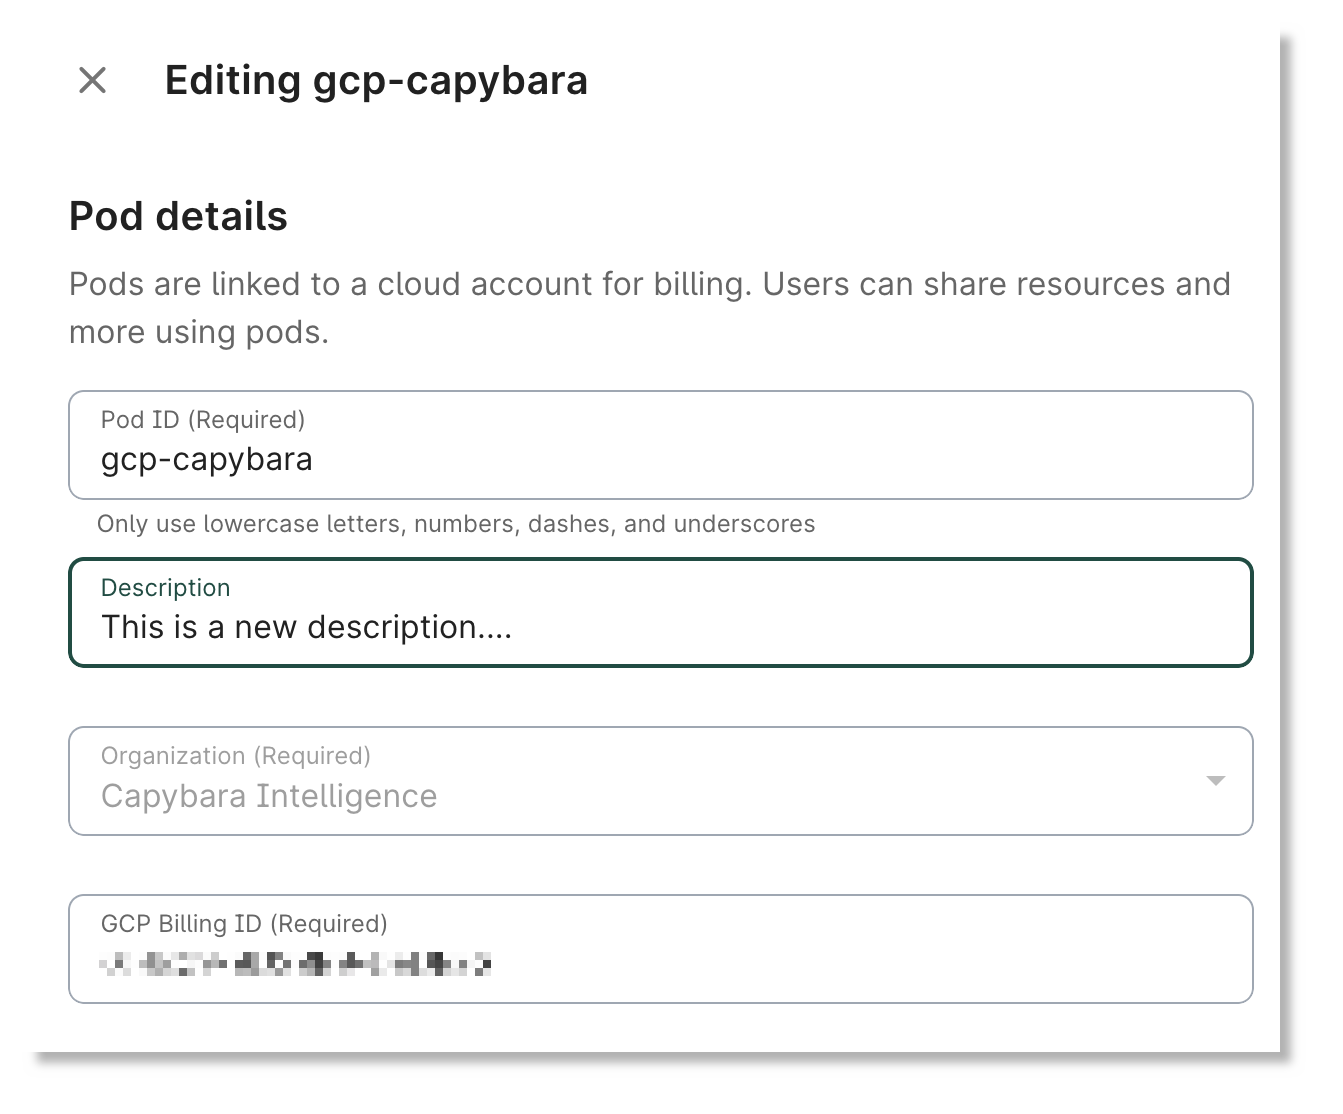
You can update a pod's description, billing account ID, and pod ID (must be unique). You may not modify the organization with which the pod is associated.
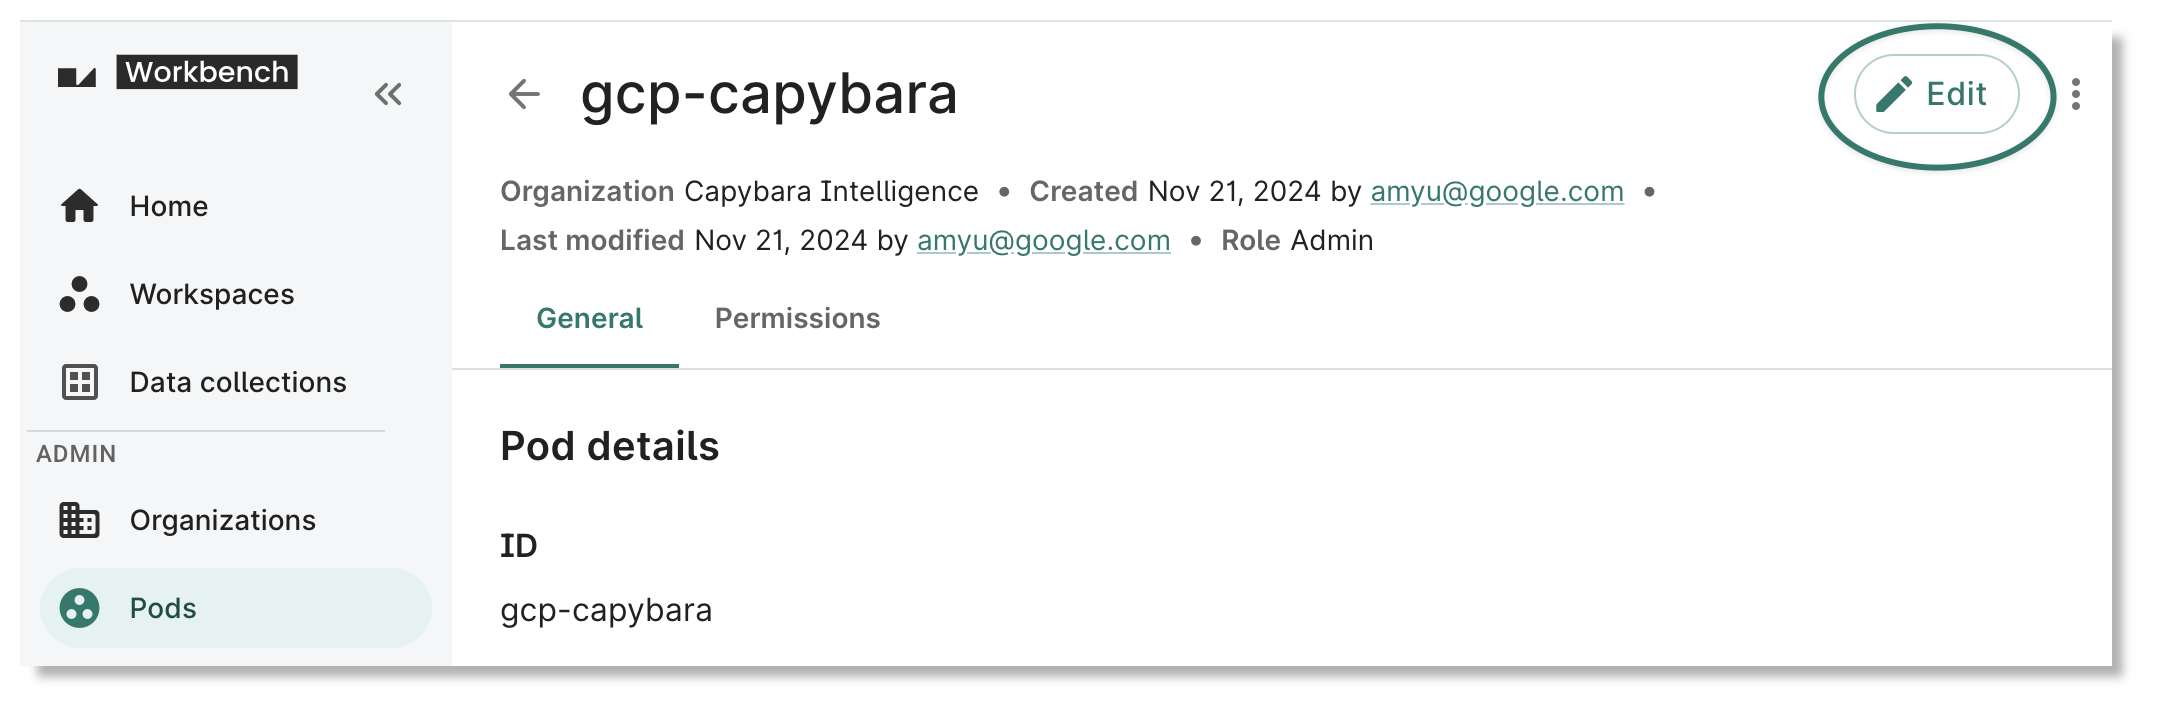
Click on the Edit button at the top right of a pod's details page to edit it.
This will allow you to edit a pod's description or billing account ID as well as the Pod ID.
Use wb pod update gcp to update a pod's
description, billing account, or pod ID.
Delete a pod that you administer
Note: You cannot delete a pod if it holds any workspaces; workspaces must be deleted first.
Click on the "three-dot" menu at the top right of a pod's details page. This directs you to Workbench Support for assistance.
(Note that it is possible to delete a pod directly via the CLI. See the "Using the CLI" tab.)

wb pod delete --org=<id> --pod=<id>
The deletion operation will fail if there are workspaces that using that pod. You'll need to delete the workspaces first.
Additional pod operations
See the wb pod reference documentation for a list of the
available operations on pods, including:
- List the pods that you are a member of, which you can use for new workspace creation
(
wb pod list) - Describe a pod
(
wb pod describe --org=<id> --pod=<id>)
Obtaining admin access to a pod
As noted above, only Workbench Org Admins or Pod Managers may initially create a pod. After the pod has been created, the Org Admin can grant any user the admin role, even if the user is not in the same org. Users with the admin role can then perform pod update actions, including renaming the pod ID, changing the pod’s billing account, and adding additional users.
If you know who your Org Admins are, you can contact them and request to be added as a pod admin.
If you don't know who your Org Admins are, please contact Workbench support for help.
Note
An Org Admin inherits the Pod Admin role on all pods of the org.Using a pod when creating resources
When you create a new workspace or data collection, you can select which pod — and thus billing account — that you want to use for that resource.
Via the UI, select the pod from a dropdown in the workspace or data collection dialog:
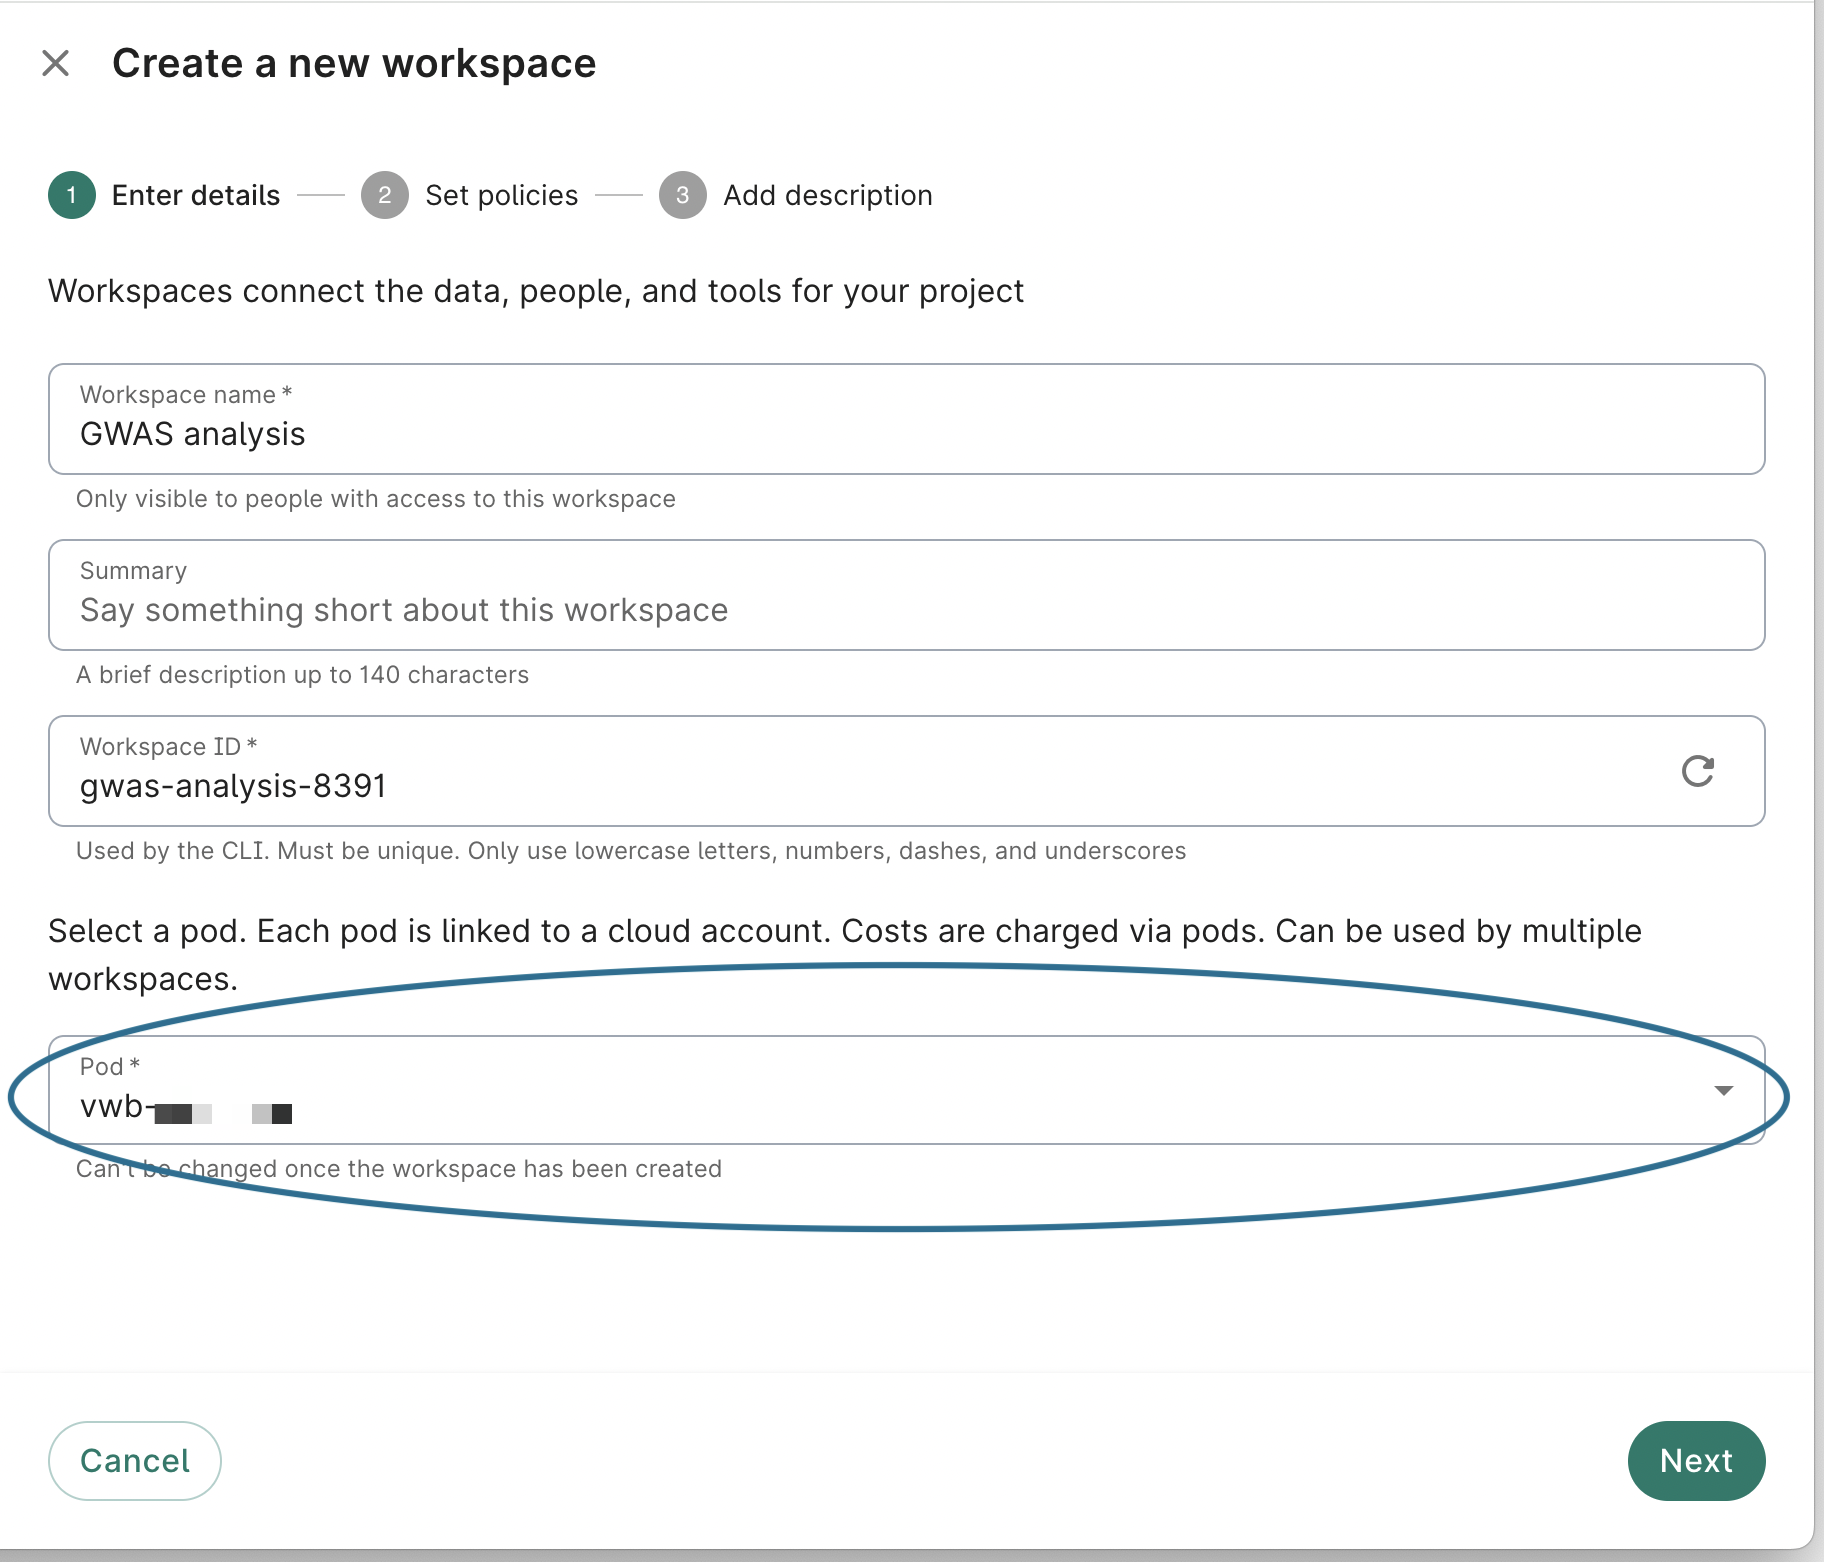
Be aware
The selected pod cannot be changed once the workspace is created.You can also specify the pod for a new workspace via the Workbench CLI:
wb workspace create \
...
  [--org=<id>] [--pod=<id>]
Troubleshooting
If you've not been granted use of any pod, or have not been granted permission to create a pod, and believe you should have been, please contact your Org Admin if you know who they are, or Workbench support for assistance.
Last Modified: 17 January 2025