Purpose:This document provides detailed instructions for performing operations on data
resources through the Workbench UI.
Note:These instructions assume that you have already opened a workspace in the
Workbench UI and navigated to the Resources tab.
All of the operations described below can also be performed via the Workbench CLI
(command-line interface). See the CLI reference for details.
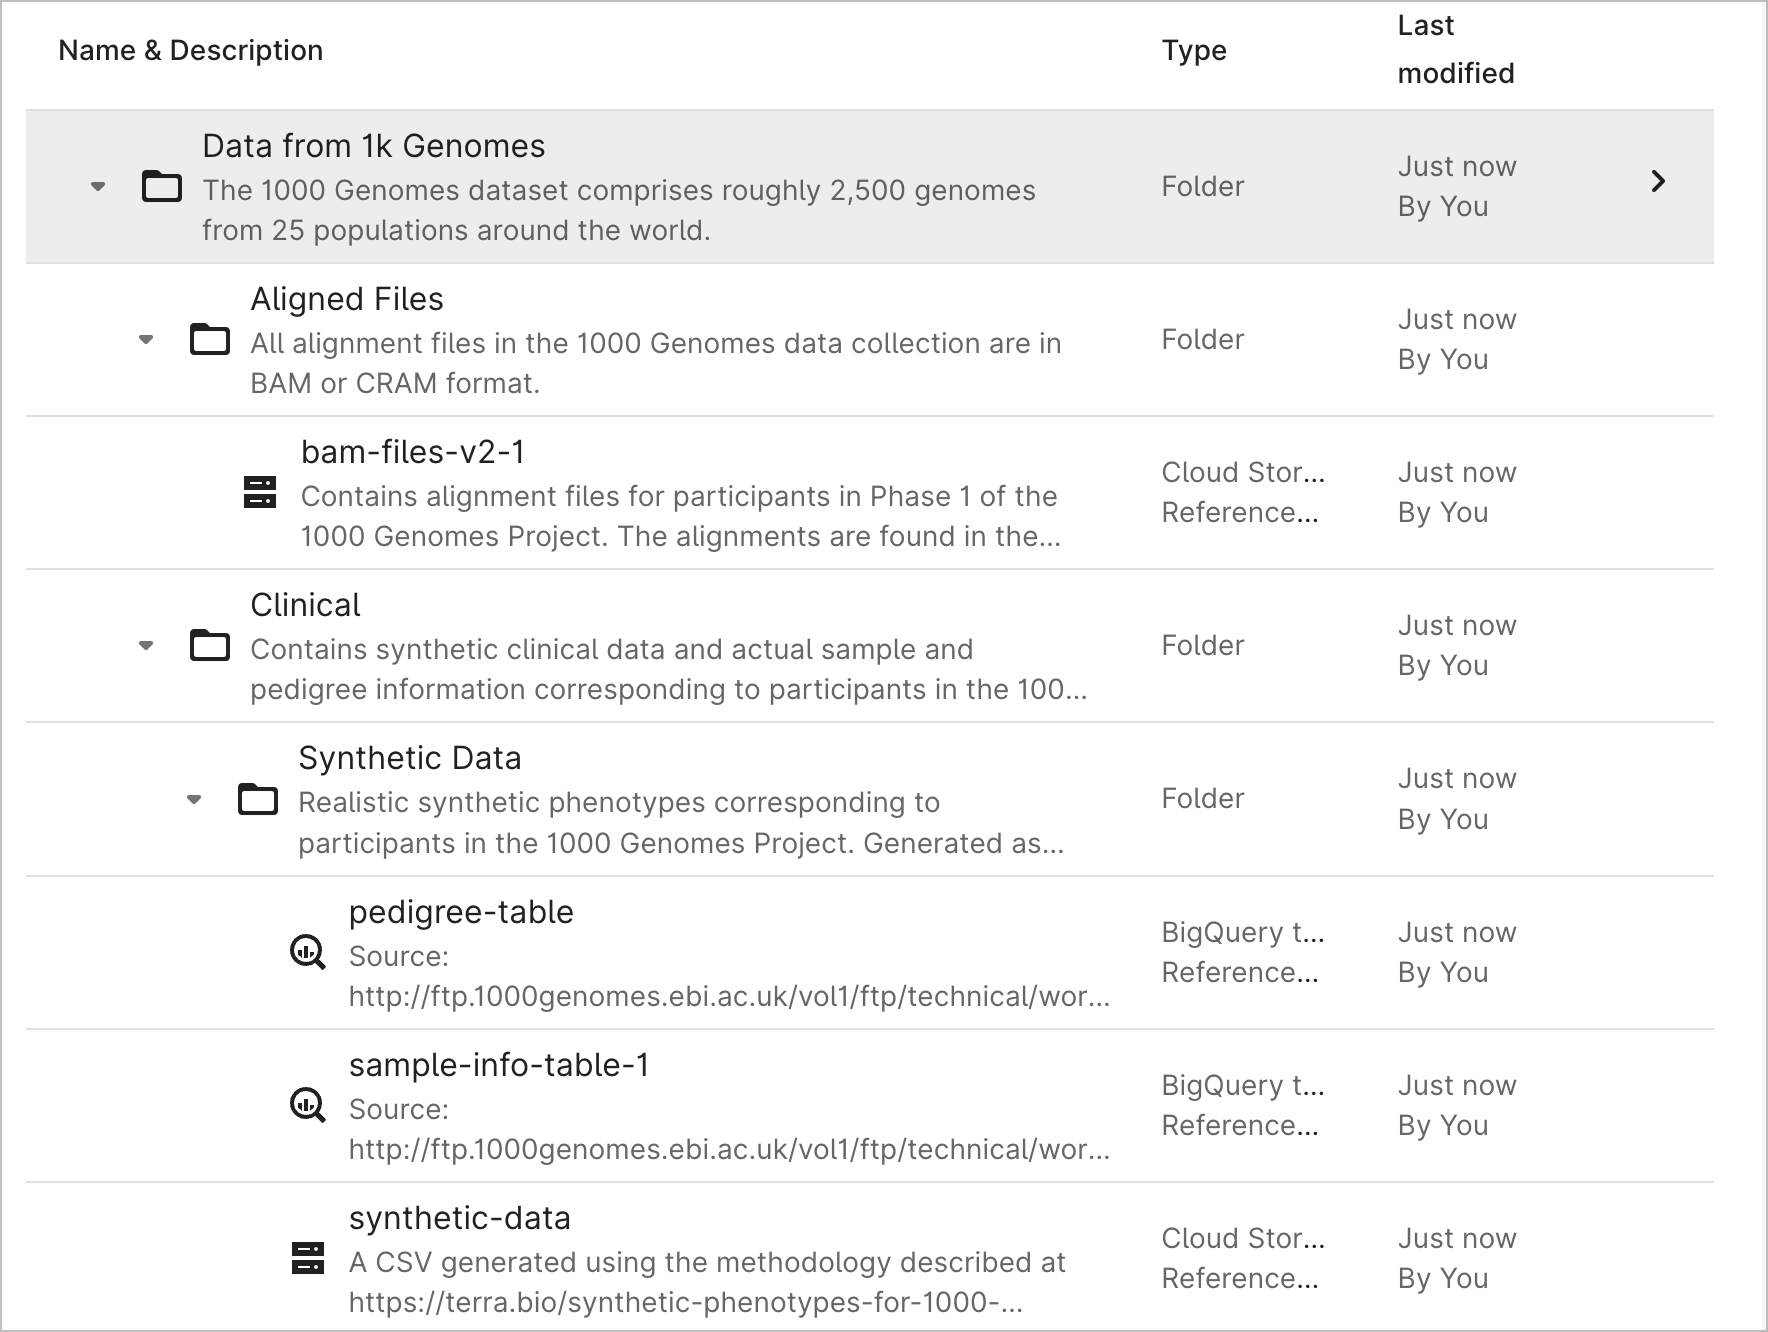
List your data resources
Your data resources are listed in the
Resources tab of the workspace. If your
resources are organized in folders, the folders may be displayed as collapsed by default. Click on
the triangle to the left of the folder name to expand or collapse the view.
You can create empty storage buckets and
BigQuery datasets directly from the
Workbench UI. Any resource created in this way will be treated as a
controlled resource, meaning that
access to the resource is controlled by Workbench. This is in contrast to a
referenced resource (see below).
Note that controlled data resources are tightly associated with the
workspace where they are created. They are
automatically shared with any collaborators who have been granted access to the workspace, and their
data lifecycle matches that of the workspace. If the workspace is deleted, its controlled data
resources are also deleted. If the workspace is cloned, its controlled data resources are also
cloned.
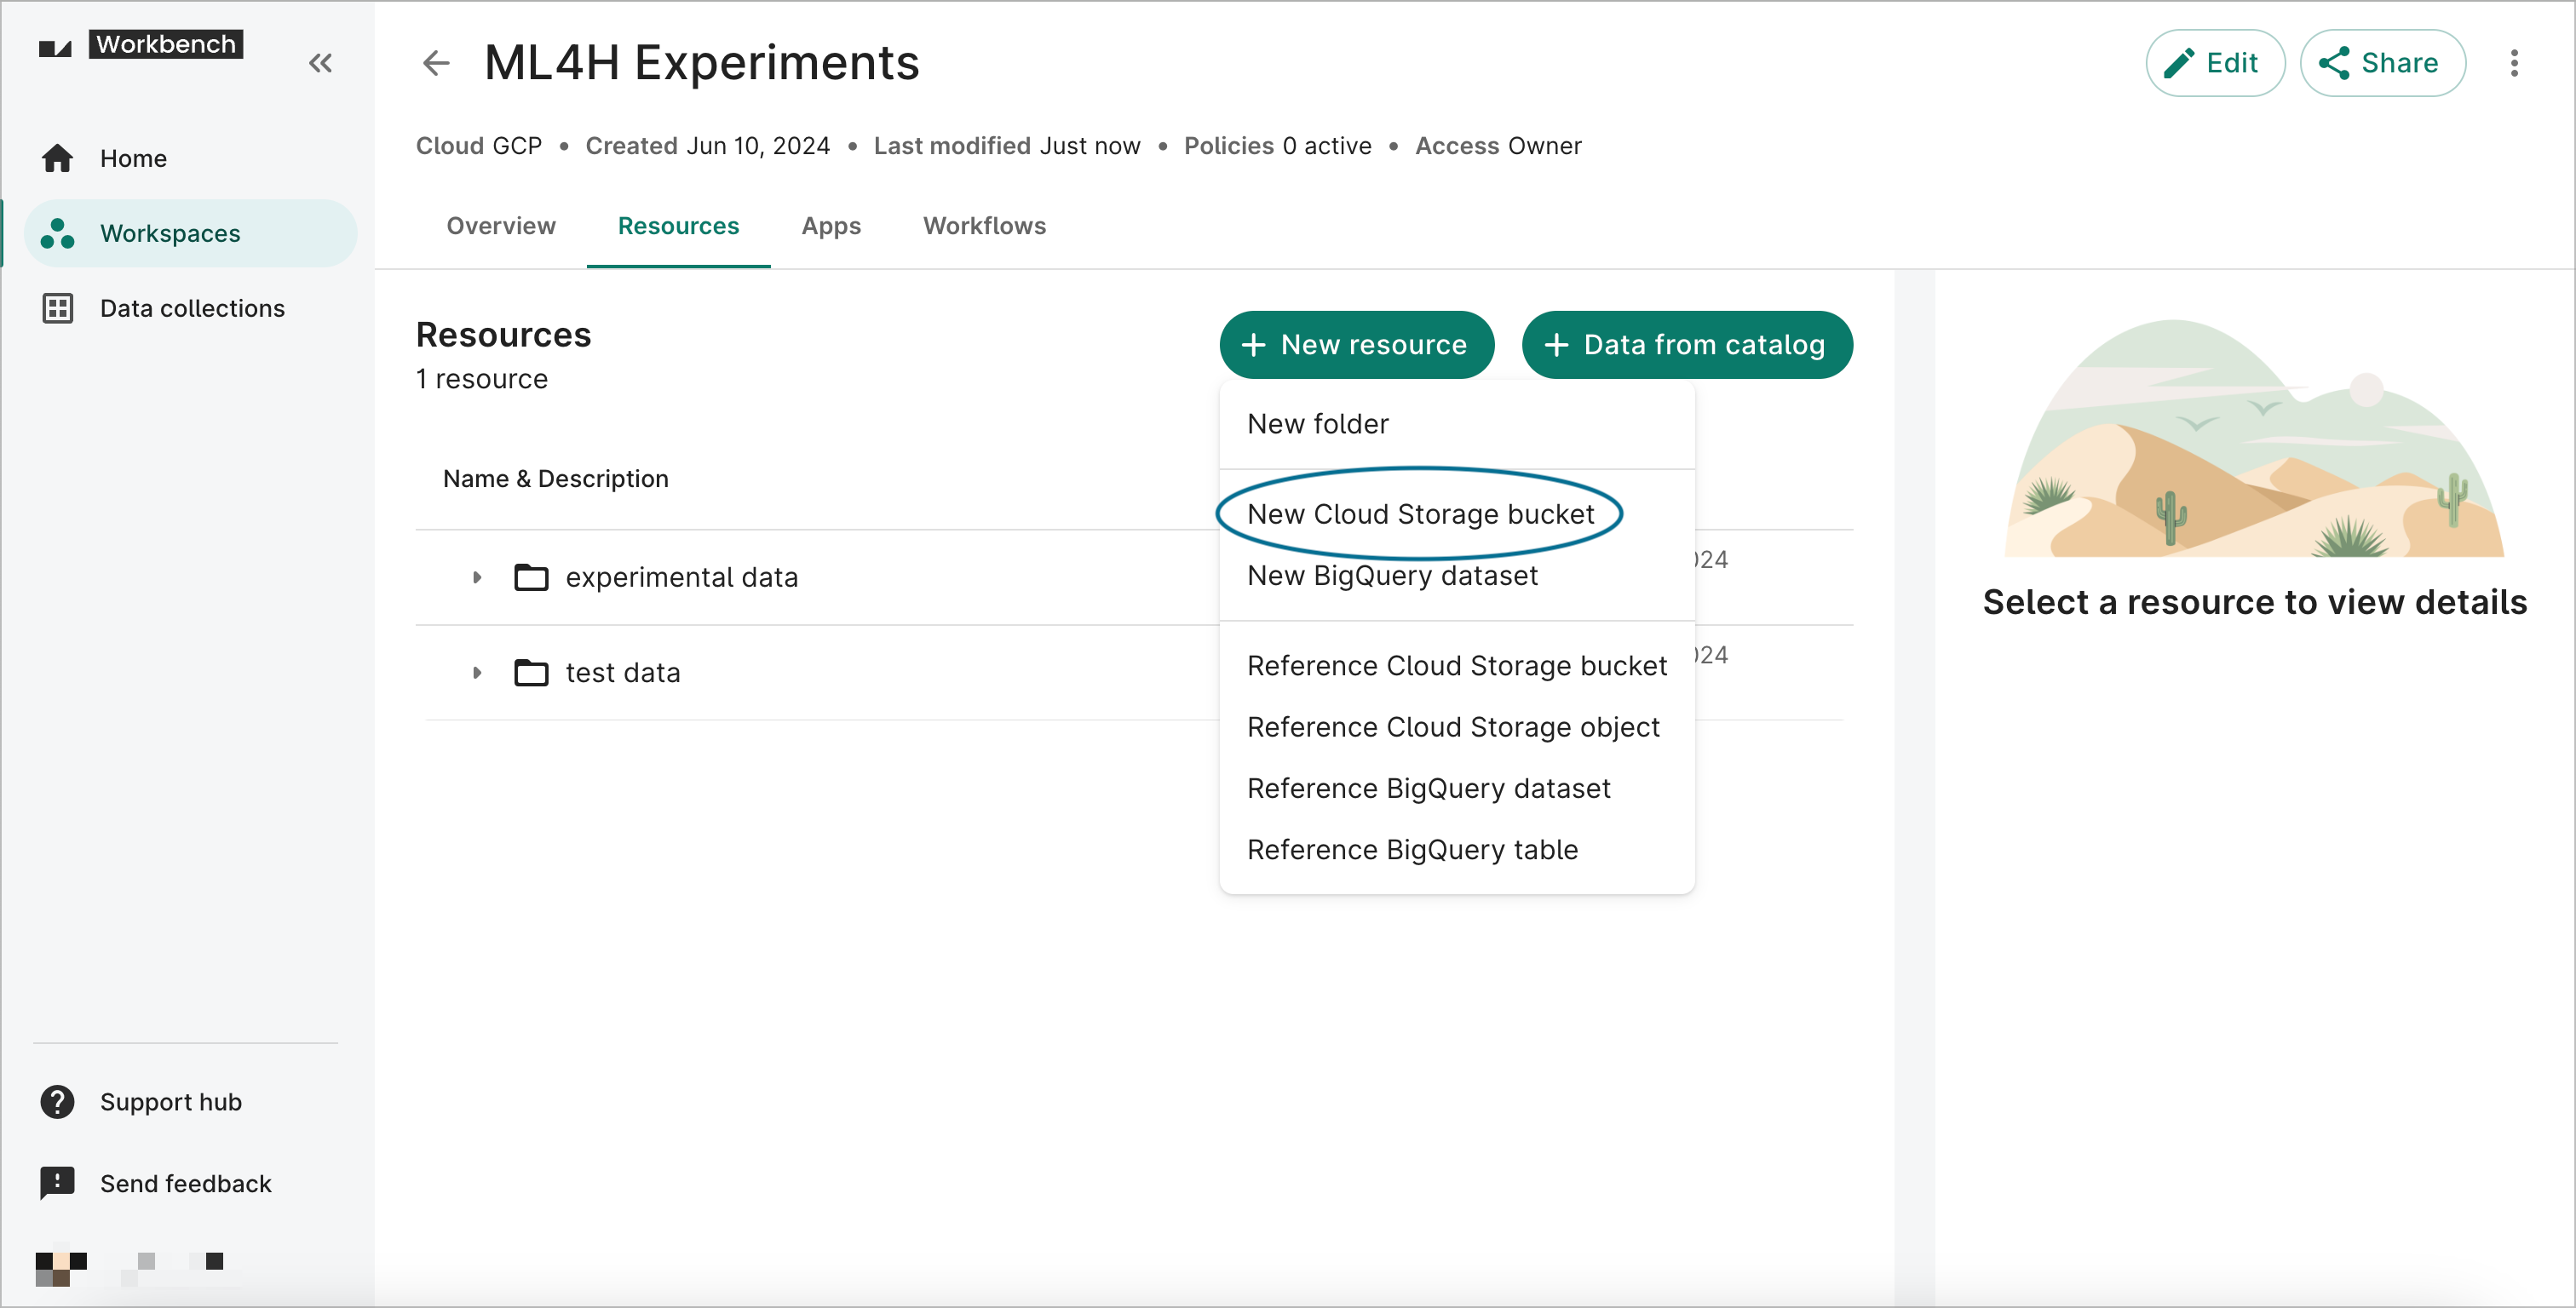
Create a storage bucket
To create a new storage bucket via the Workbench UI, click the + New resource button in
the Resources pane and select New Cloud Storage bucket. This will open a resource creation
dialog; fill it out as detailed below.
Creating a controlled storage bucket.
Enter an ID for your new resource. This will be the ID displayed when you list your resources in
Workbench. The resource ID must be unique within the workspace.
Use the Folder path dropdown menu to select a folder. You'll be able to move the bucket to a
different folder after creation if desired.
Provide a brief description of the resource. This is optional but highly recommended.
The system will suggest a bucket name, generated automatically based on the resource ID and the
Google Project associated with the workspace. The bucket name will be the name of the bucket as
listed in Google Cloud (displayed in the Resource details in Workbench). You can modify or
replace the suggested bucket name in the creation dialog, but note that the bucket name must be
globally unique across all of Google Cloud. You will not be able to edit the bucket name once
it has been created (though you may change the resource ID if you like). Click the Create
bucket button.
Creating a controlled storage bucket. Here, the resource will be added
under the experimental data folder.
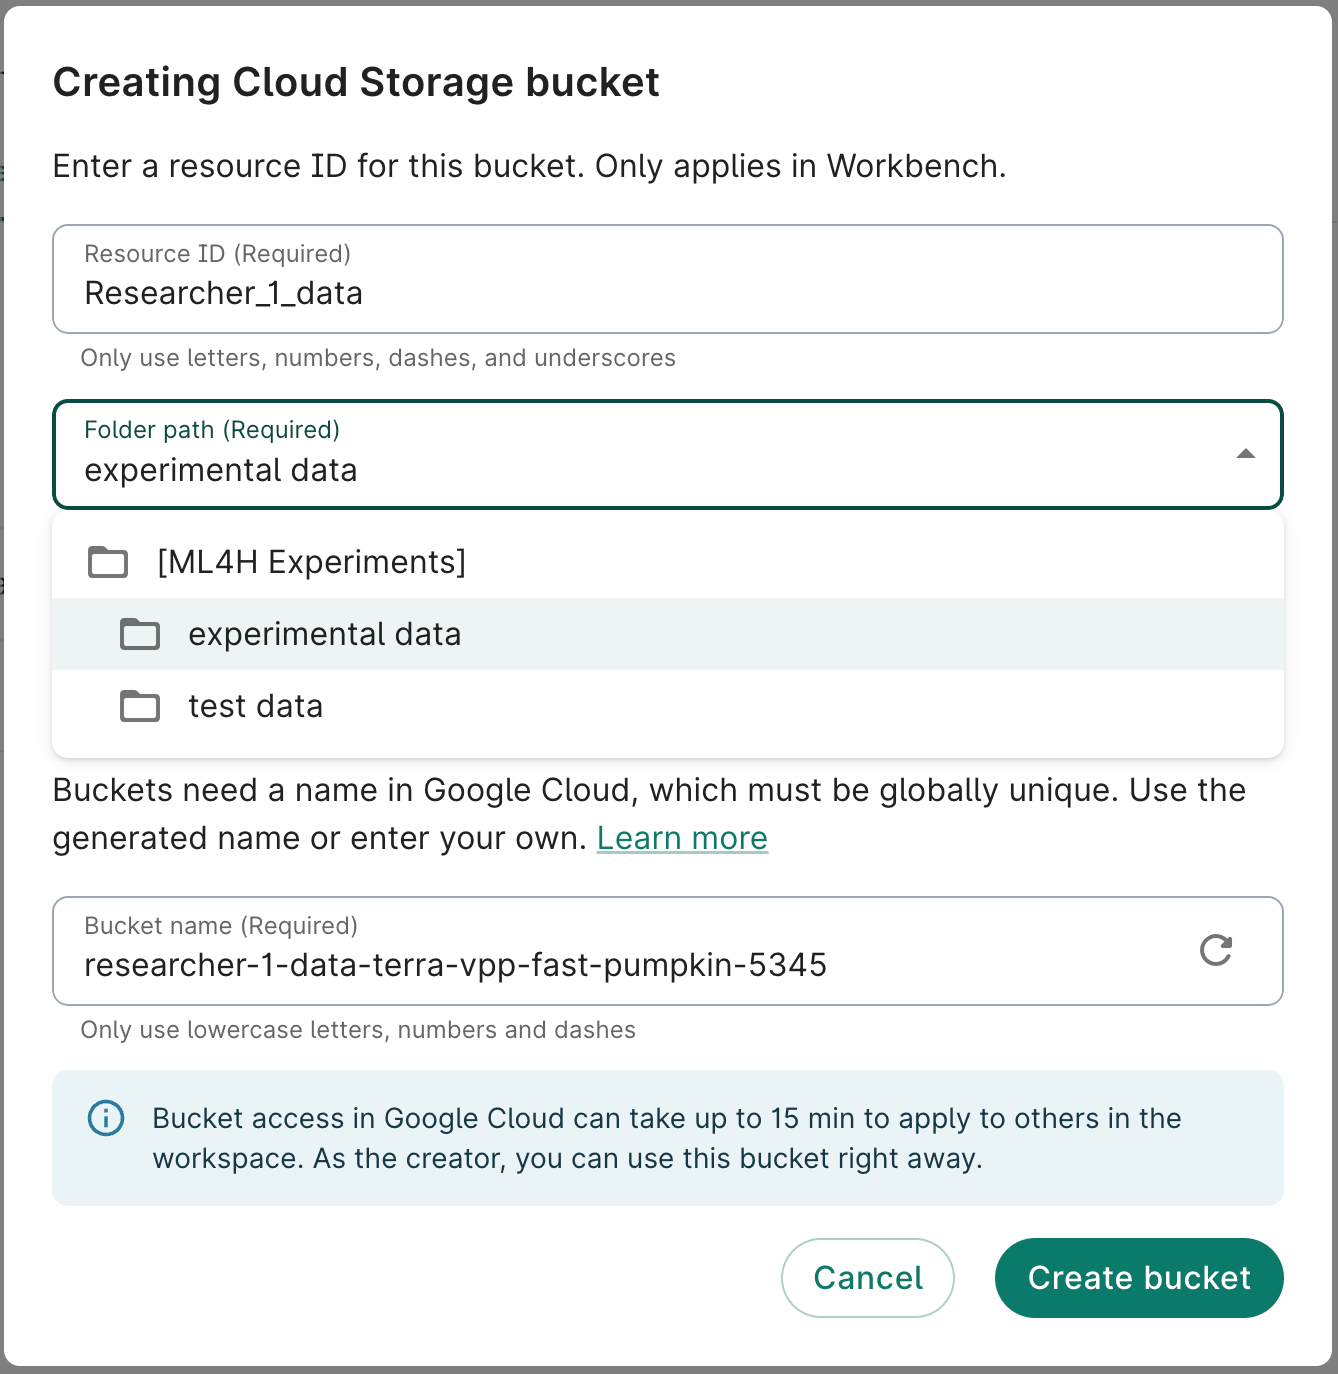
Create a BigQuery dataset
To create a new BigQuery dataset via the Workbench UI, select the + New resource button
in the Resources pane and select New BigQuery dataset. This will open a resource creation
dialog; fill it out as detailed below.
Creating a controlled BigQuery dataset.
Enter an ID for your new resource. This will be the ID displayed when you list your resources in
Workbench. The resource ID must be unique within the workspace.
Use the Folder path dropdown menu to select a folder. You'll be able to move the dataset to a
different folder after creation if desired.
Provide a brief description of the resource. This is optional but highly recommended.
The system will suggest a dataset ID, generated automatically based on the resource ID. The
dataset ID will be the name of the dataset as listed in Google Cloud (displayed in the Resource
details in Workbench). You can modify or replace the suggested dataset ID in the creation
dialog, but note that the dataset ID must be unique within your Google Cloud project (but not
across all of Google Cloud). You will not be able to edit the dataset ID once it has been
created.
Creating a controlled BigQuery dataset. This resource will be stored in the
test data folder.
Create a cohort
Workbench's integration with Data Explorer lets you create a cohort from a data
collection. Learn more about Data Explorer and
see Get started with Data Explorer to build a
cohort from your workspace.
Add a reference to an existing resource
You can reference existing storage buckets and
files as well as existing
BigQuery datasets and
tables based on their Google Cloud
identifiers. Any resource added in this way will be treated as a
referenced resource, meaning that
access to the resource is not controlled by Workbench. This is in contrast to a
controlled resource (see above).
Note that as a result, access to referenced data resources is not automatically granted to
collaborators who have been granted access to the
workspace. For information about sharing a
referenced data resource with collaborators, visit Access levels and
privileges.
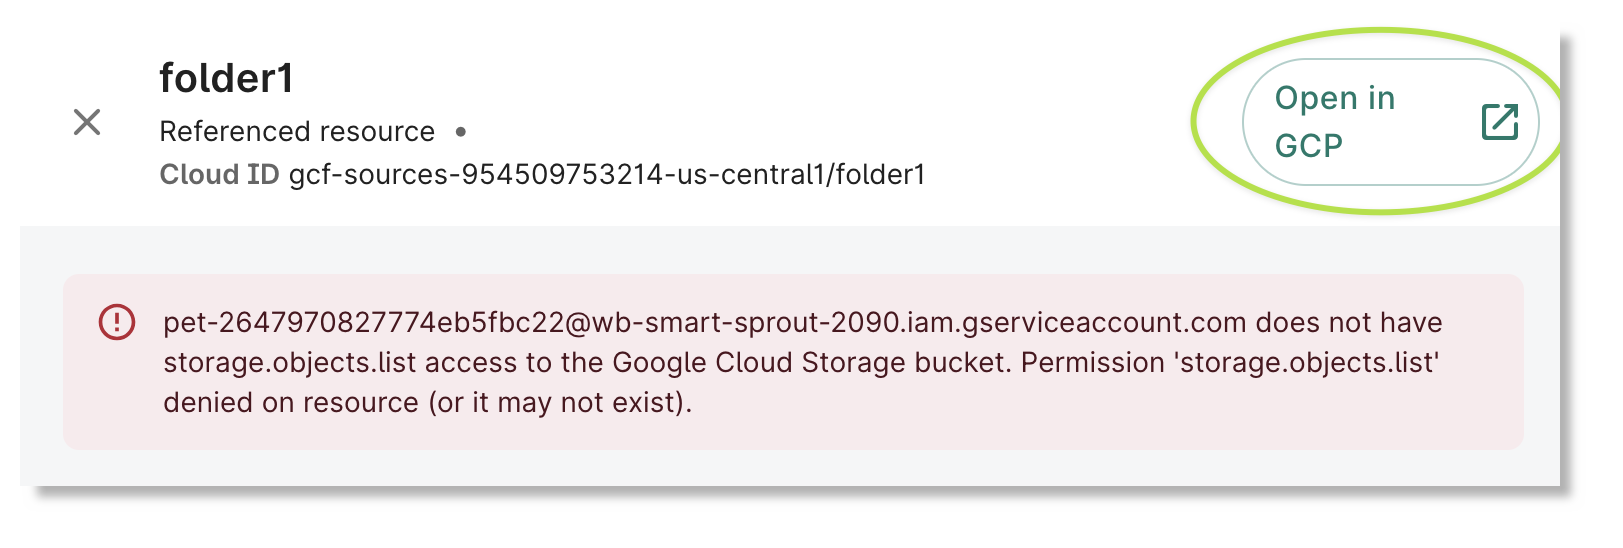
Access a resource in the Google Cloud console
If you need the name or ID of a referenced resource, you can access it through the Google Cloud
console. To do so, select the resource in the Resources list and click on the Open in GCP button
in the information pane on the right. This will open a new tab or window in your web browser.
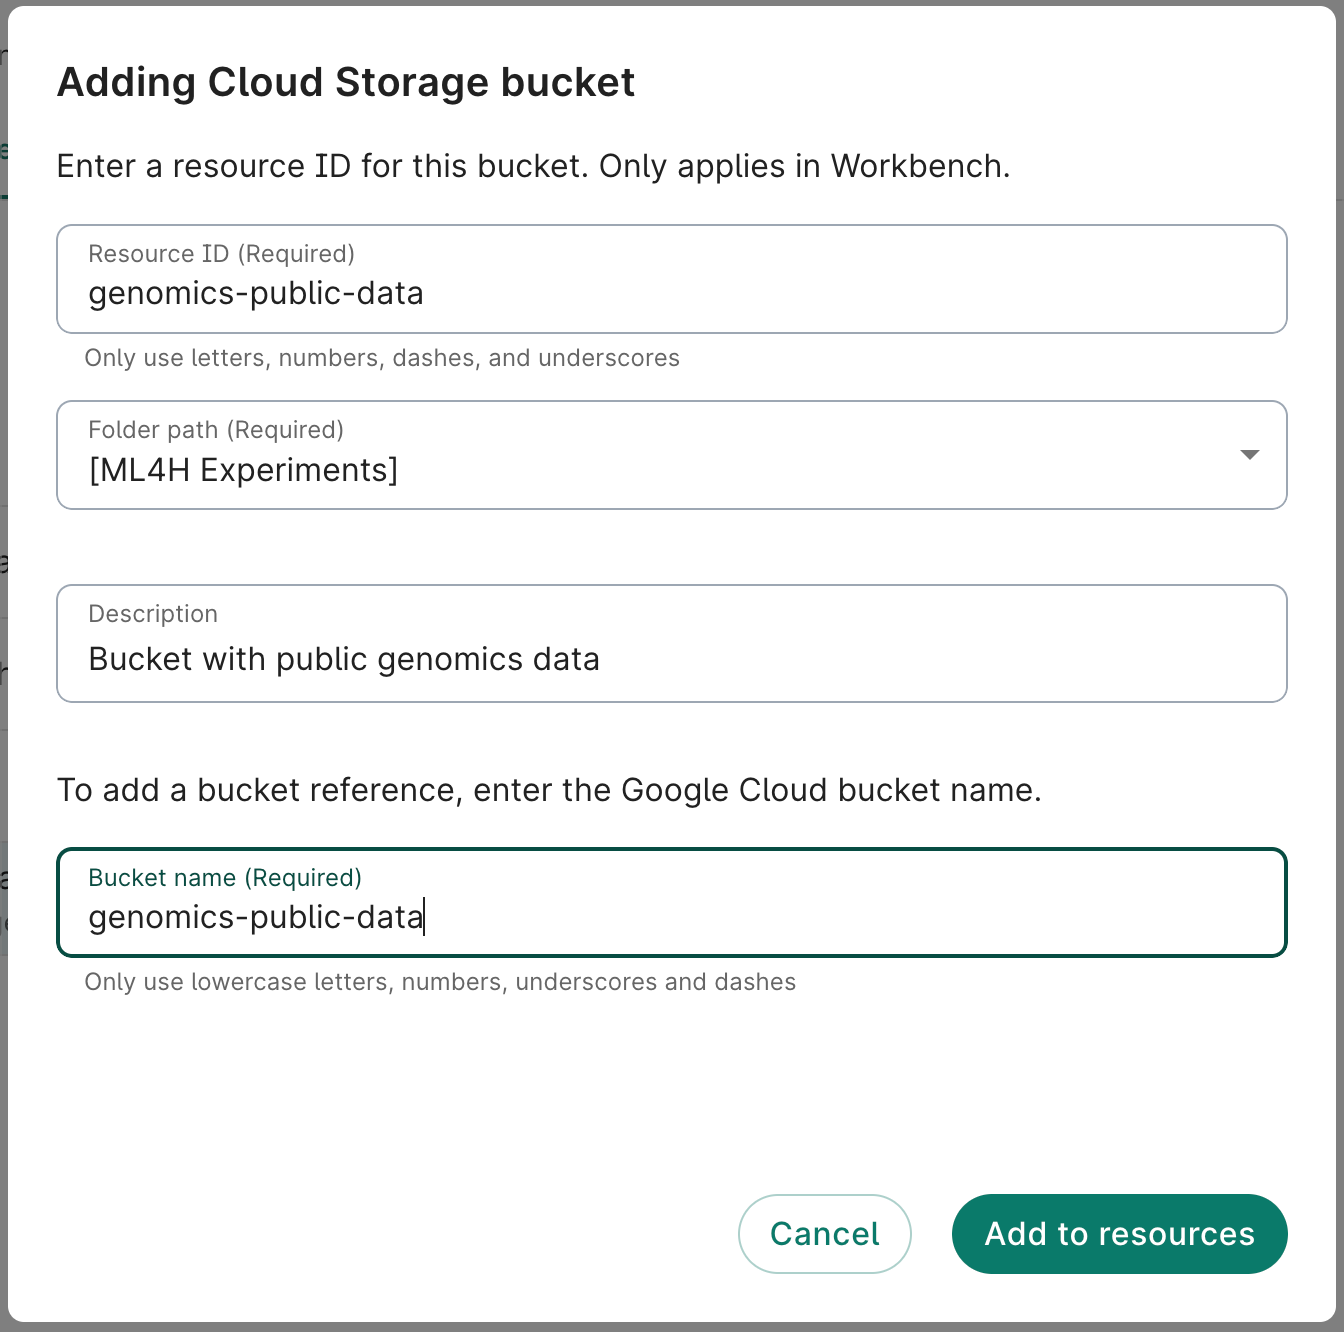
Reference a storage bucket
To reference an existing storage bucket via the Workbench UI, click the + New resource
button in the Resources pane and select Reference Cloud Storage bucket. This will open a
resource addition dialog; fill it out as detailed below.
Enter an ID for your resource. This will be the ID displayed when you list your resources in
Workbench. The resource ID must be unique across all of Workbench (but not across all
of Google Cloud).
Use the Folder path dropdown menu to select a folder. You'll be able to move the bucket to a
different folder after creation if desired.
Provide a brief description of the resource. This is optional but highly recommended.
Enter the name of the bucket you want to reference. You can find this information in the Google
Cloud console. Do not include the gs:// prefix.
Creating a Cloud Storage bucket reference.
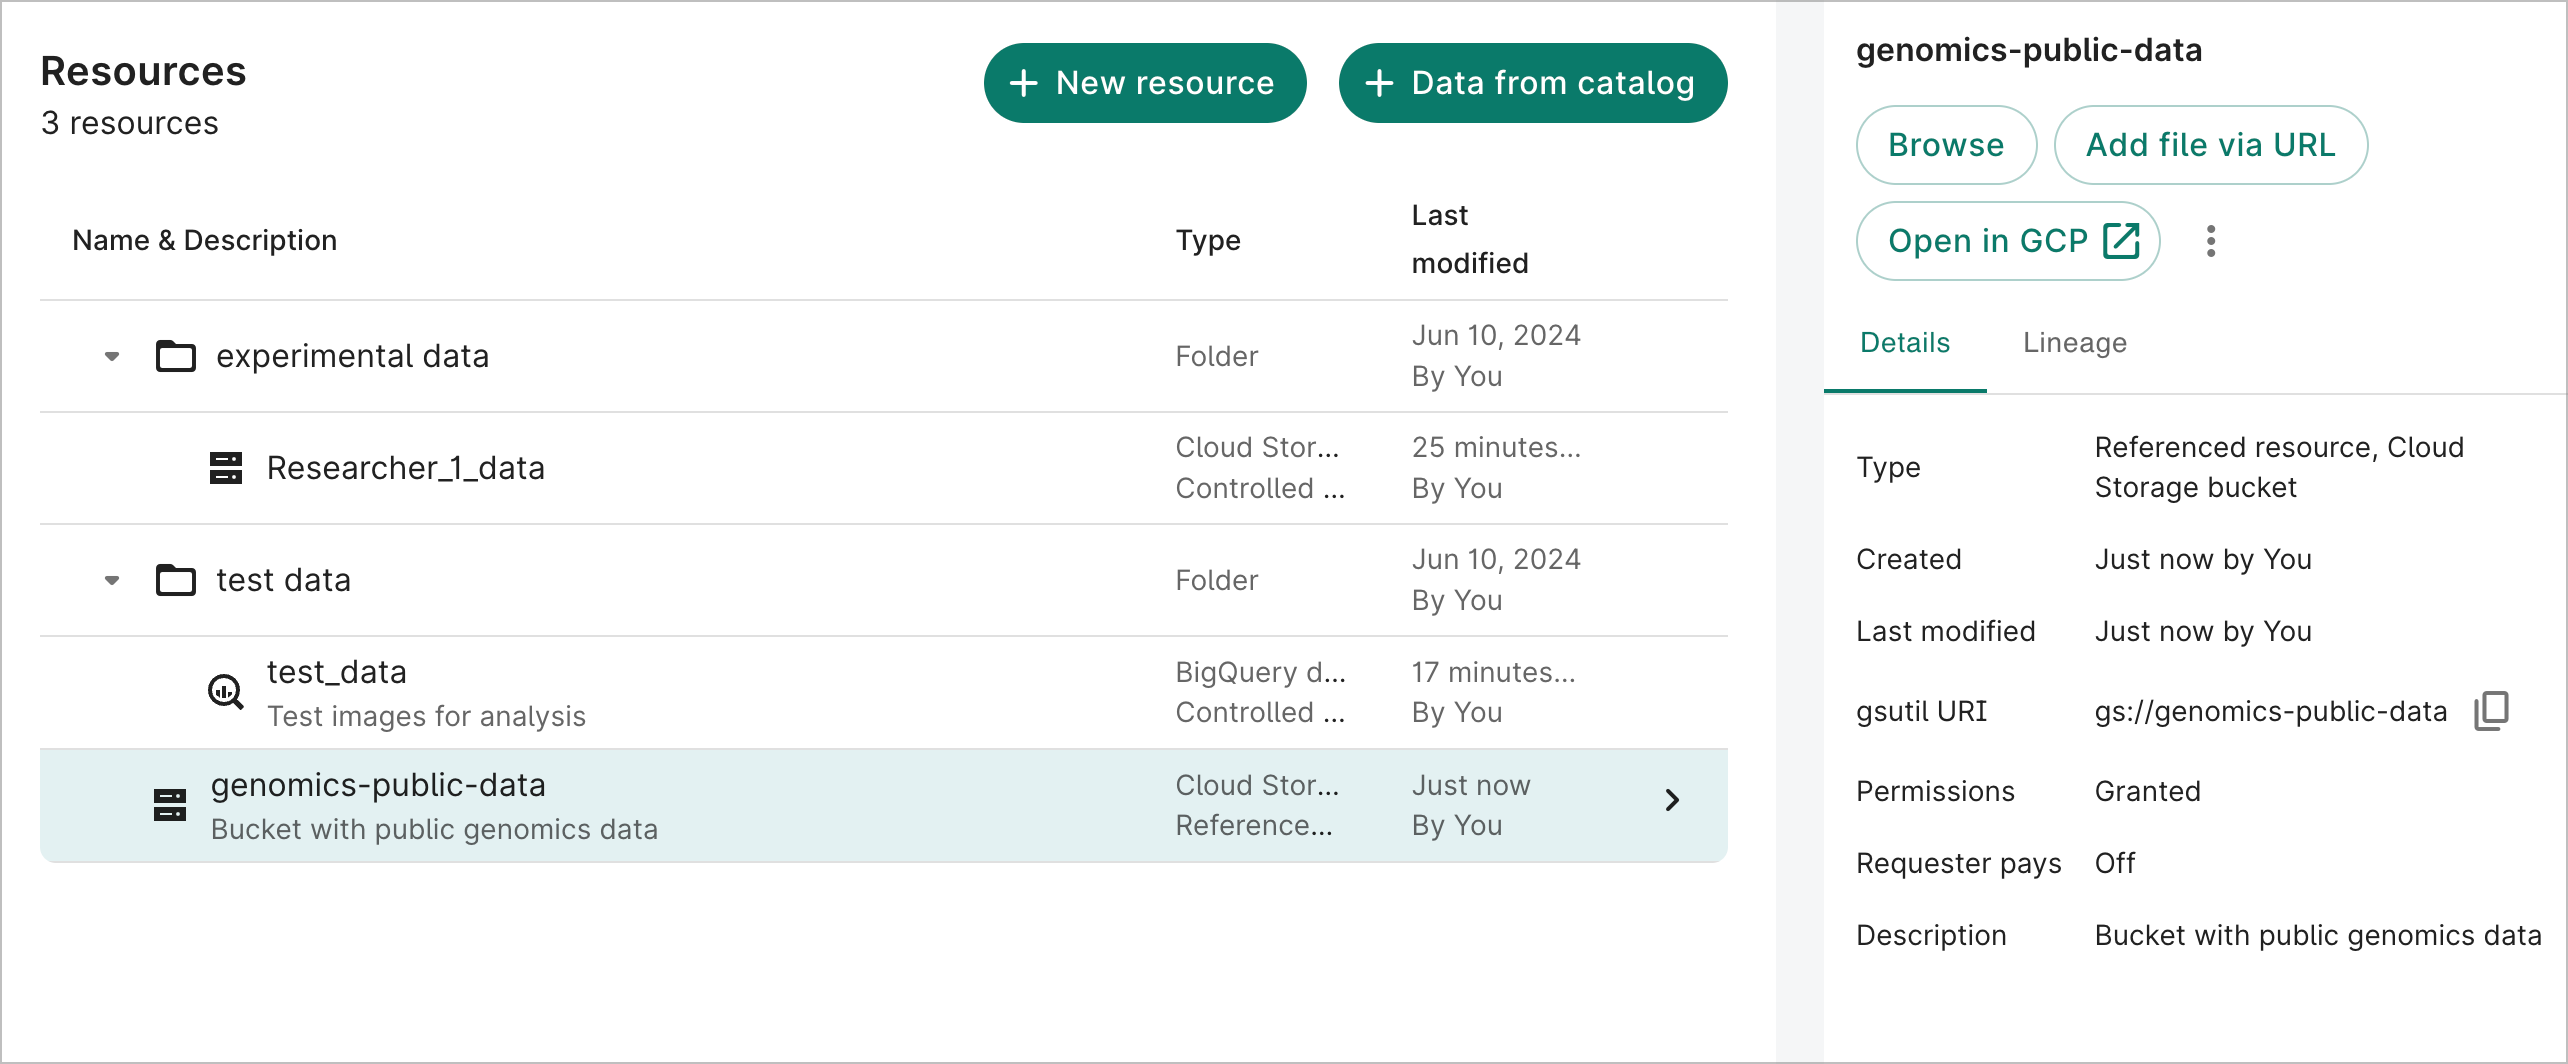
Once created, the resource should look similar to the following:
A Cloud Storage bucket reference.
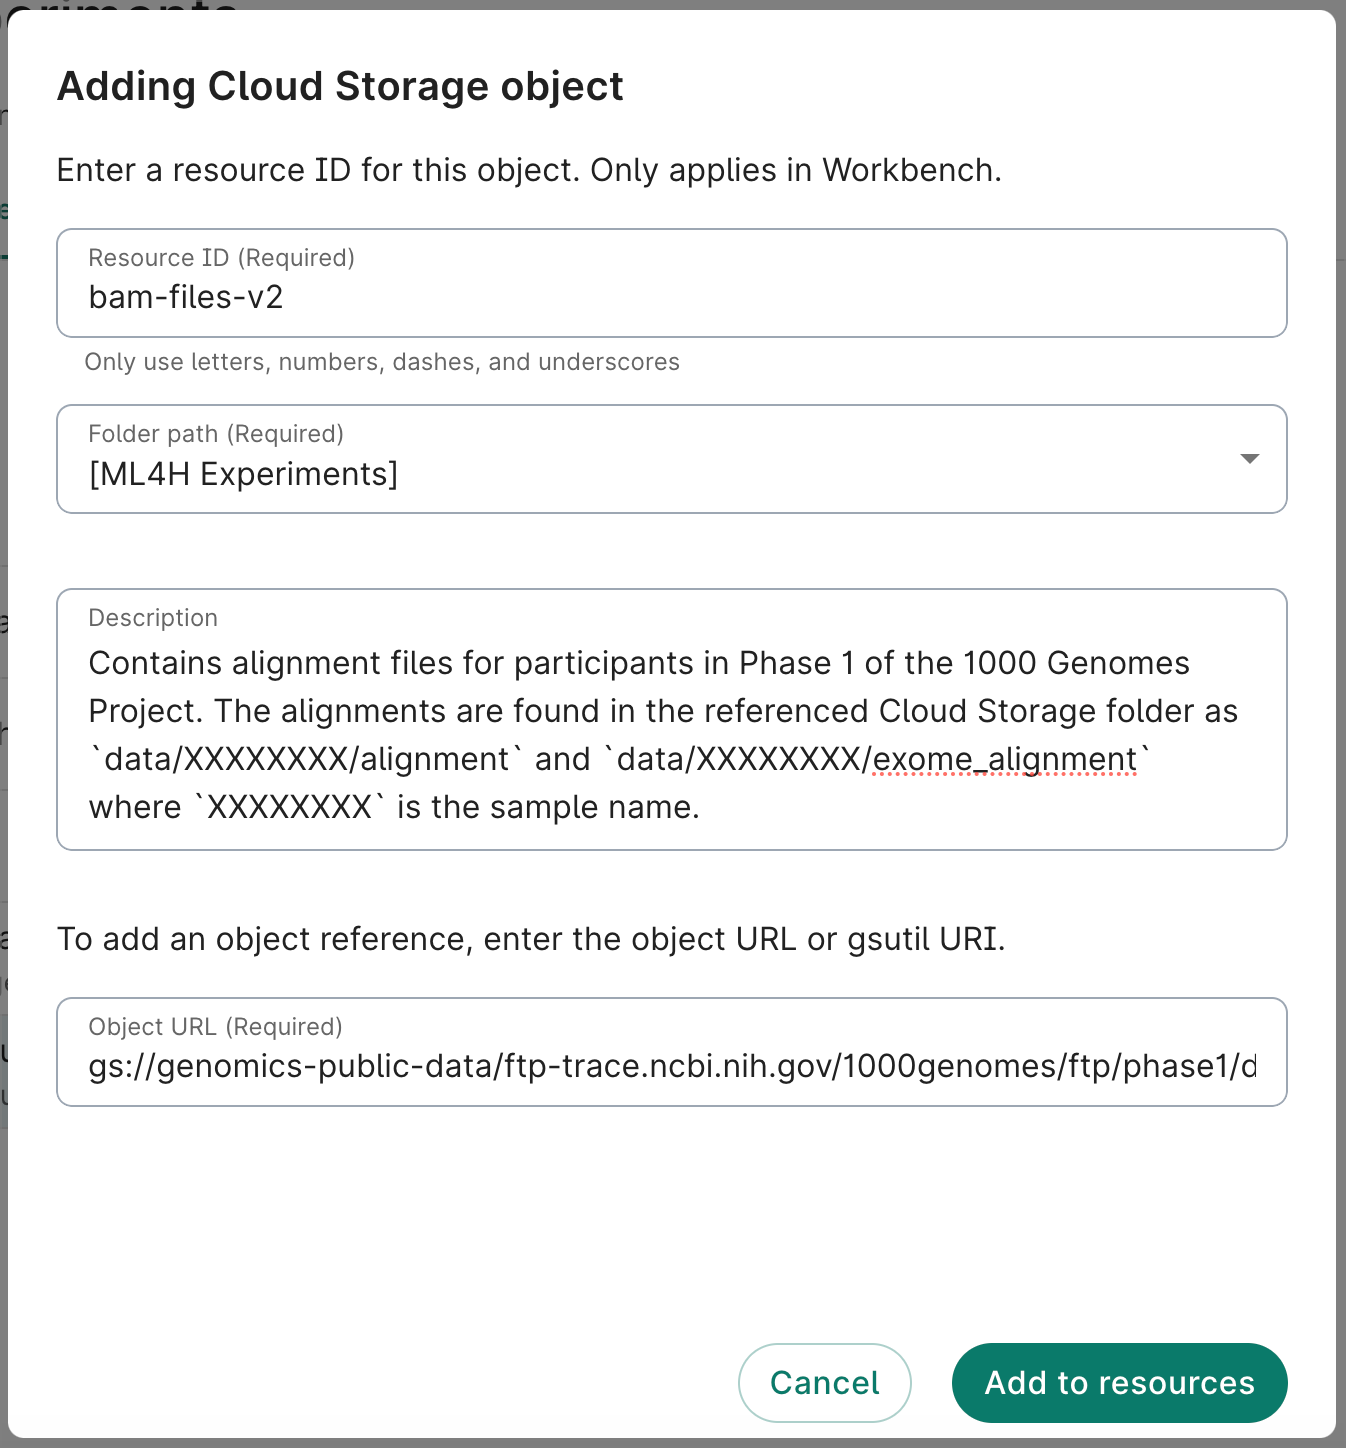
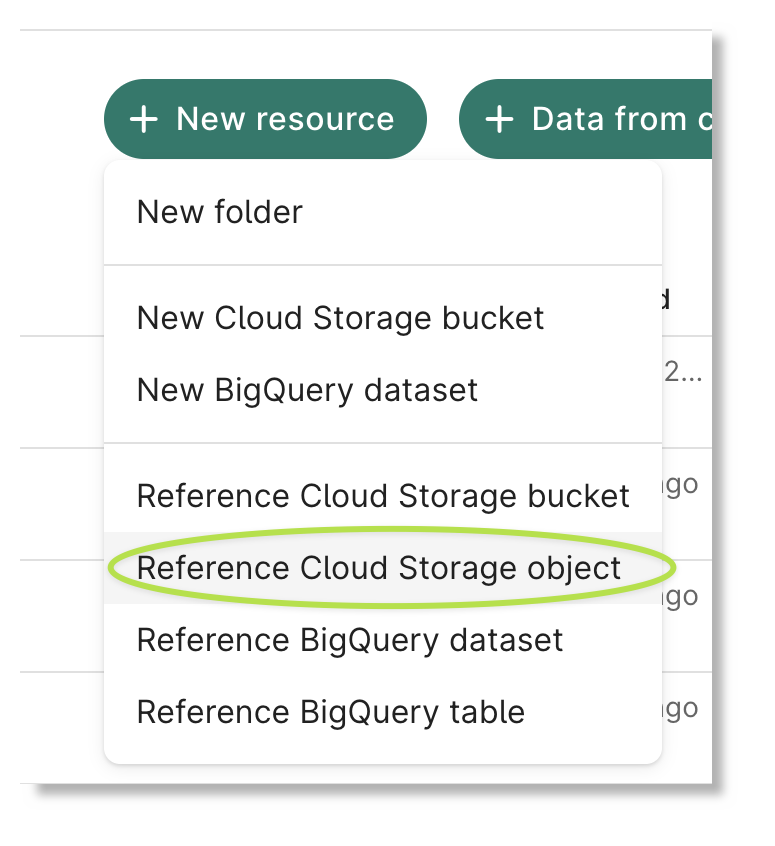
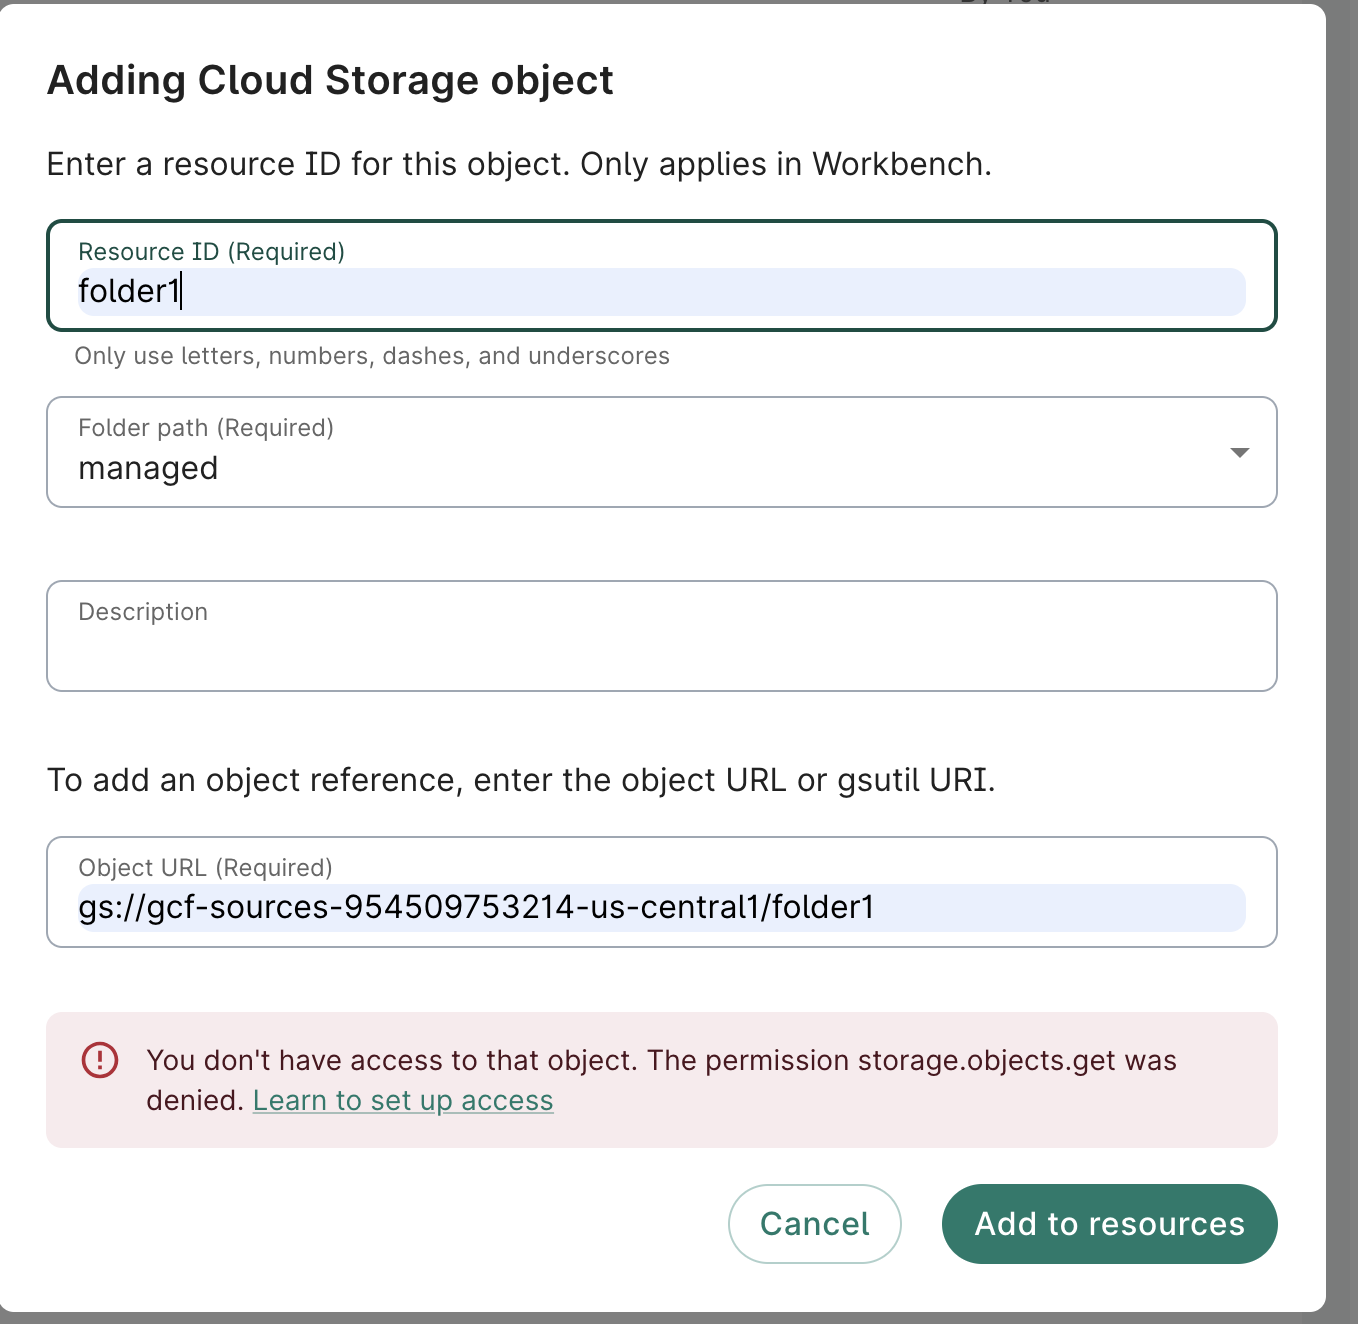
Reference a file or a folder in a bucket
To reference an existing file or folder in a storage
bucket via the Workbench UI, click the +
New resource button in the Resources pane and select Reference Cloud Storage object. This
will open a resource addition dialog; fill it out as detailed above under
Reference a storage bucket for steps 1-3, then as detailed below.
Enter the gs:// URI of the file or folder you want to reference. You can find this information
in the Google Cloud console (or in the Details panel for Workbench workspace
resources). Click Add to resources.
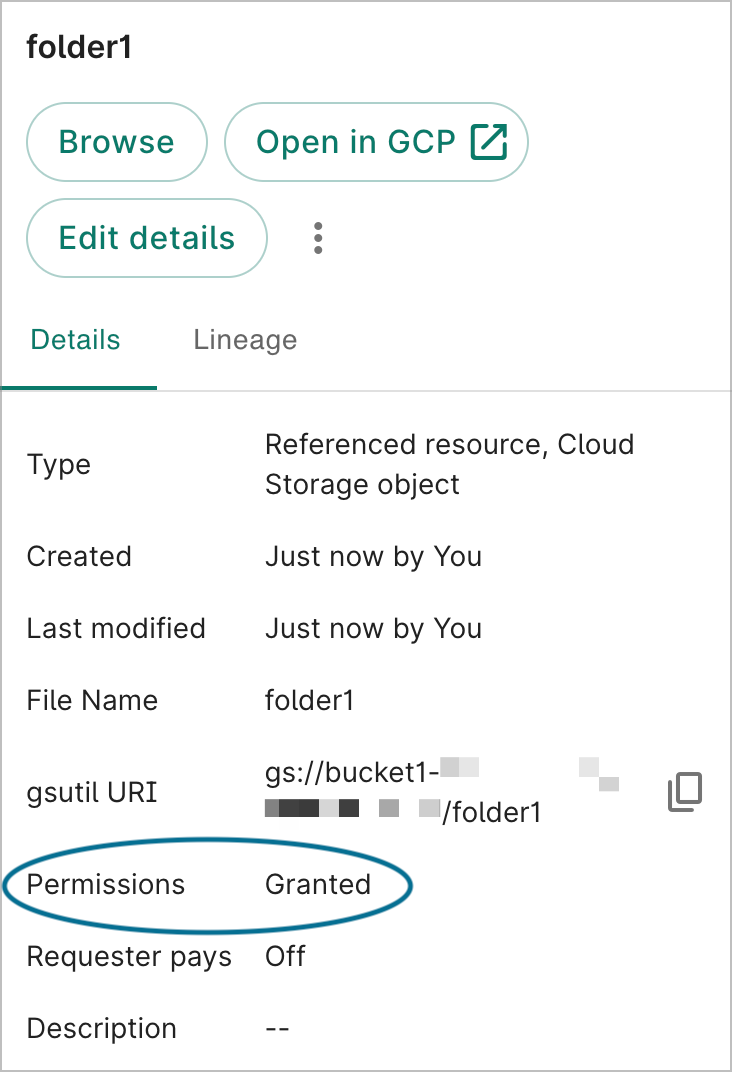
Creating a Cloud Storage bucket folder reference.
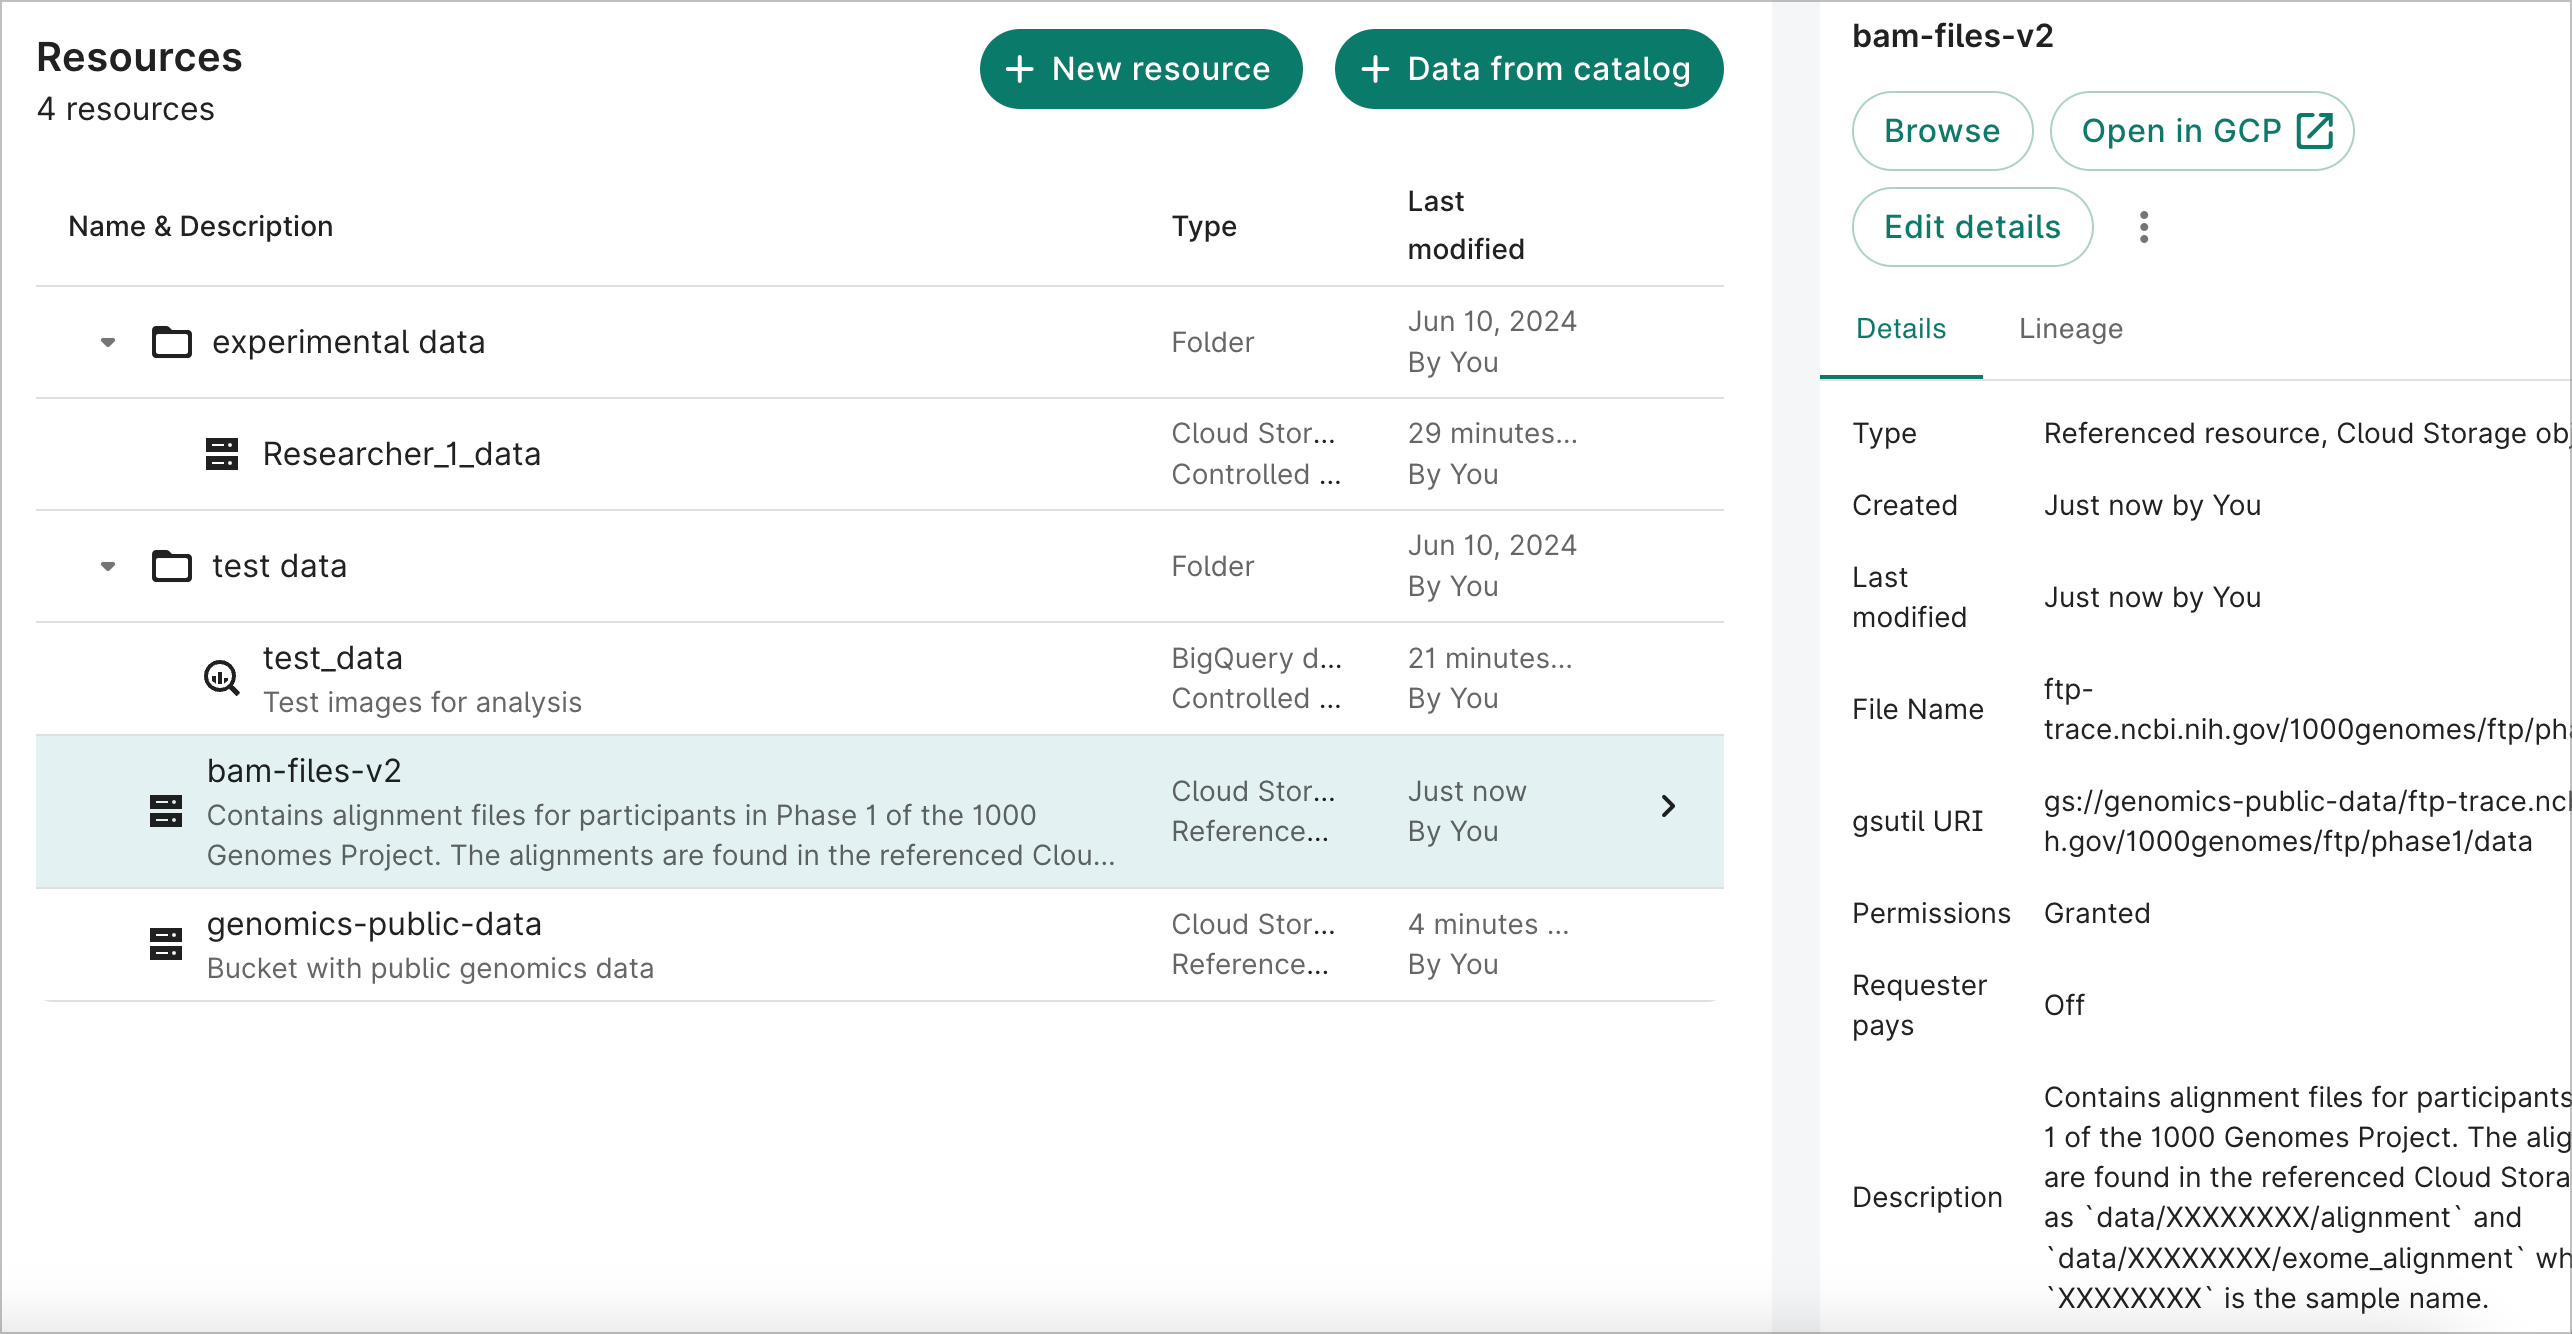
Once created, the resource should look similar to the following:
A Cloud Storage bucket folder reference.
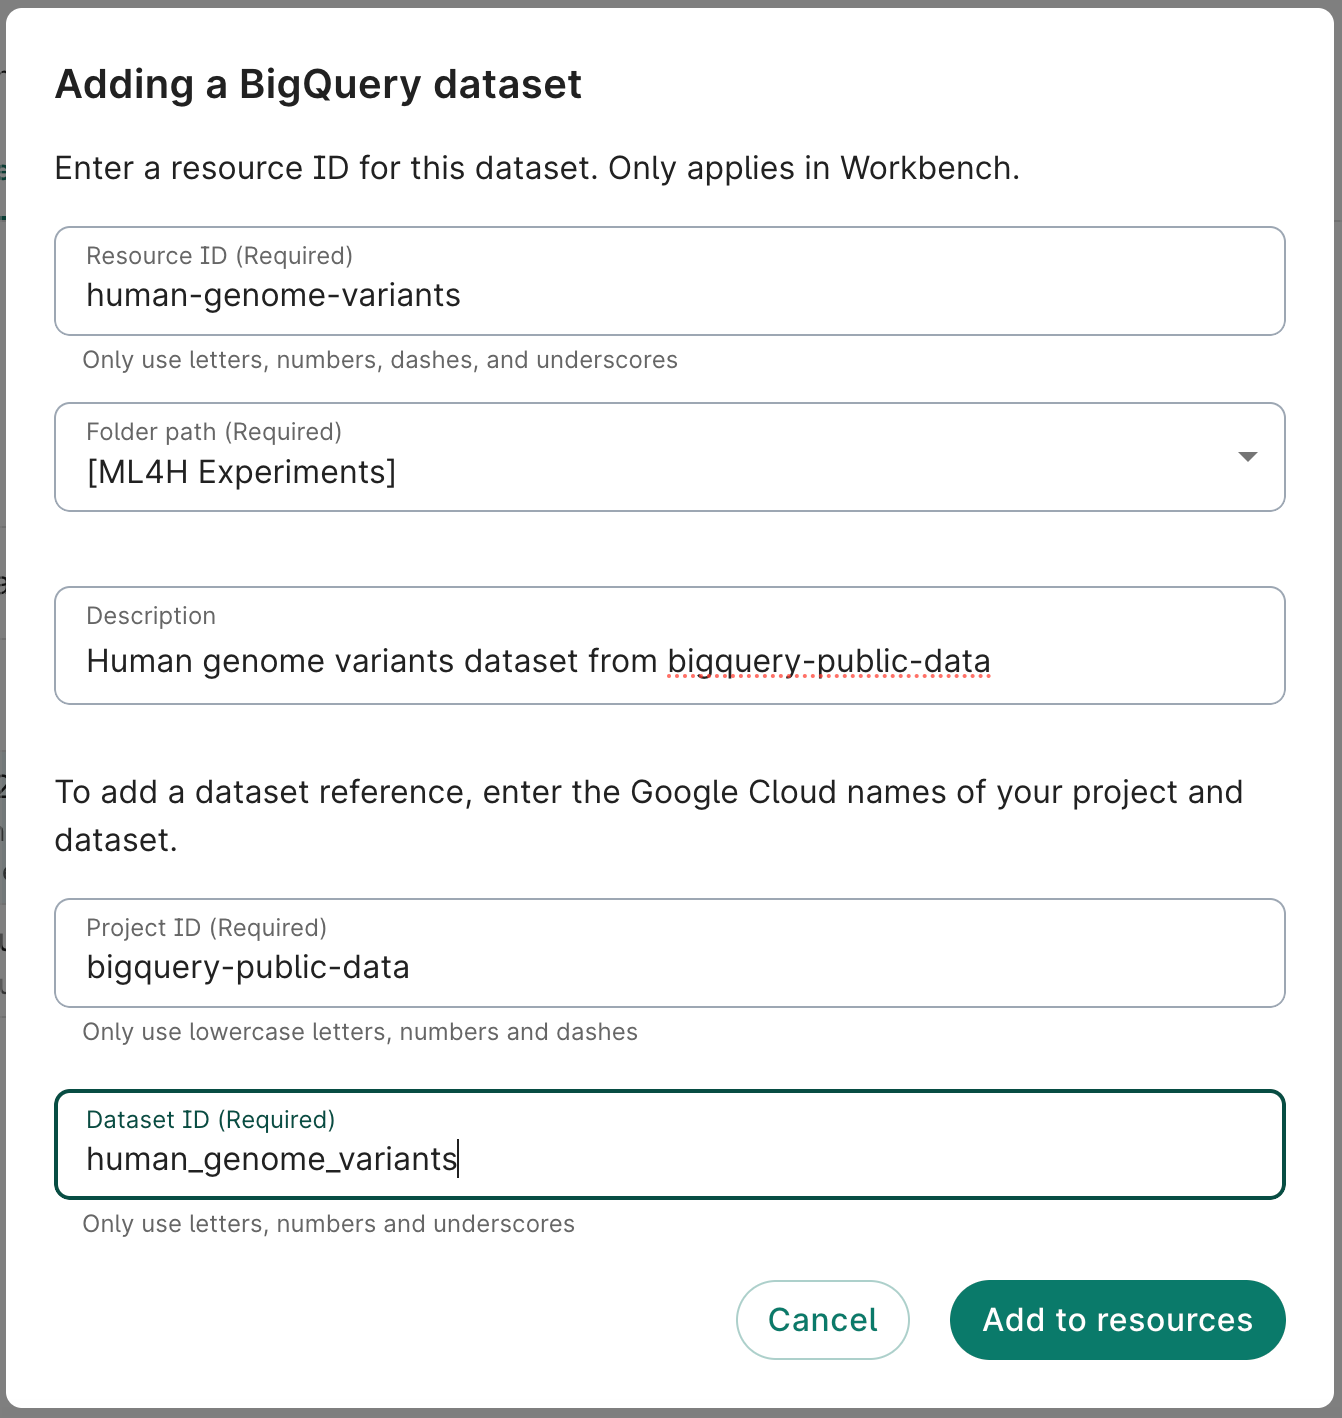
Reference a BigQuery dataset
To reference an existing BigQuery dataset via the Workbench UI, click the + New resource
button in the Resources pane and select Reference BigQuery dataset. This will open a
resource addition dialog; fill it out as detailed below.
Enter an ID for your resource. This will be the ID displayed when you list your resources in
Workbench. The resource ID must be unique within the workspace.
Use the Folder path dropdown menu to select a folder. You'll be able to move the bucket to a
different folder after creation if desired.
Provide a brief description of the resource. This is optional but highly recommended.
Enter the ID of the BigQuery dataset you want to reference. You can find this information in the
Google Cloud console.
You can find project, dataset, and table identifiers in the Google
Cloud BigQuery console.
Enter the ID of the Google Project associated with the BigQuery dataset you want to reference.
You can find this information in the Google Cloud console.
Creating a BigQuery dataset reference.
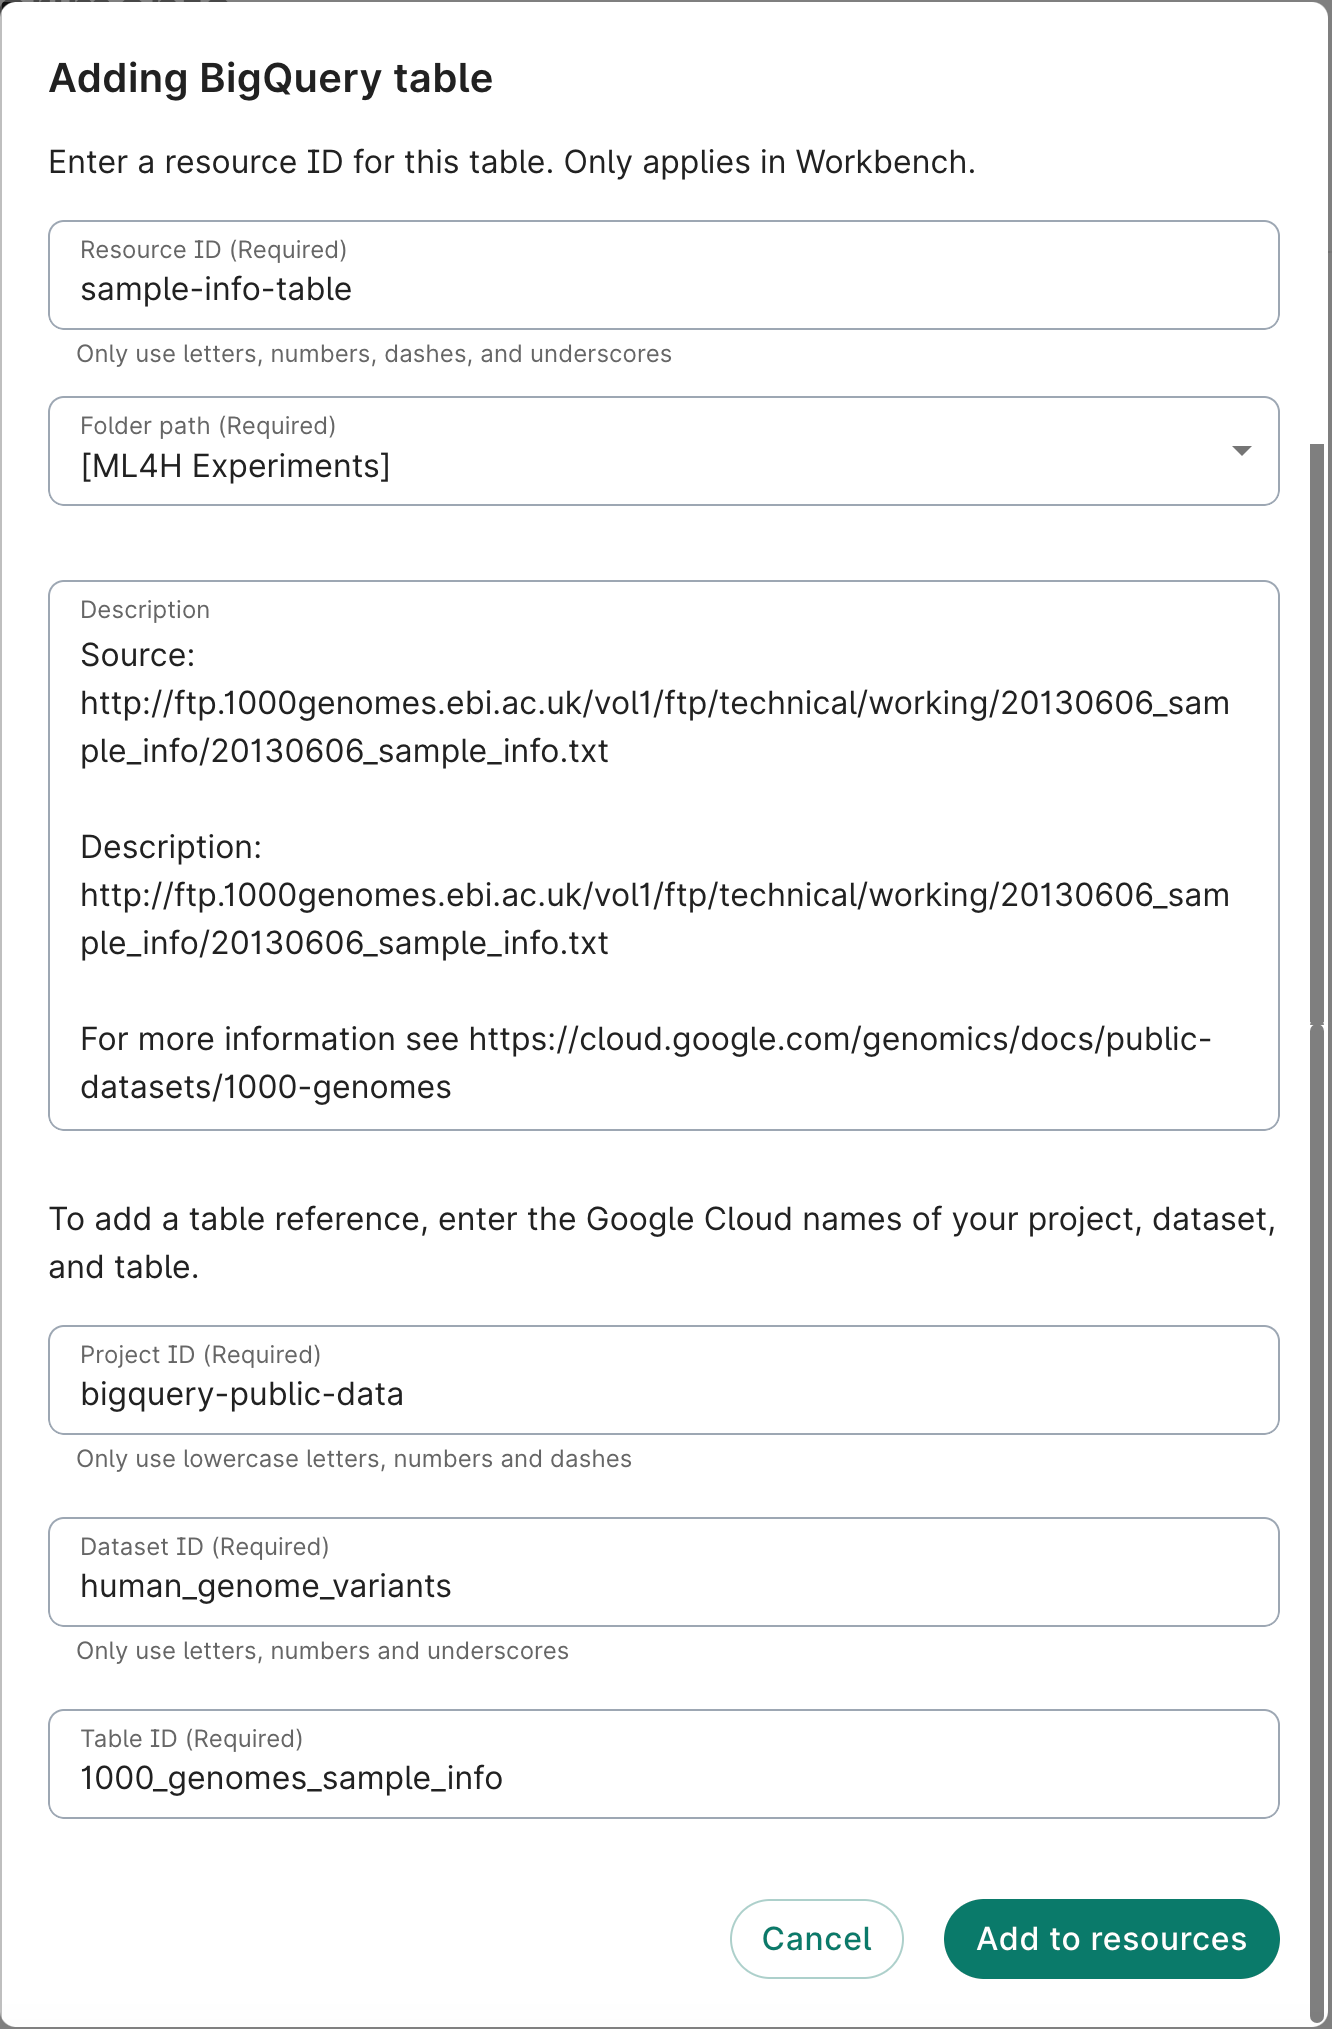
Reference a BigQuery table
To reference an existing BigQuery table via the Workbench UI, click the + New resource
button in the Resources pane and select Reference BigQuery table. This will open a resource
addition dialog; fill it out as detailed above under
Reference a BigQuery dataset for steps 1-5, then as detailed below.
Creating a BigQuery table reference.
Enter the ID of the BigQuery table you want to reference. You can find this information in the
Google Cloud BigQuery console. Click Add to resources.
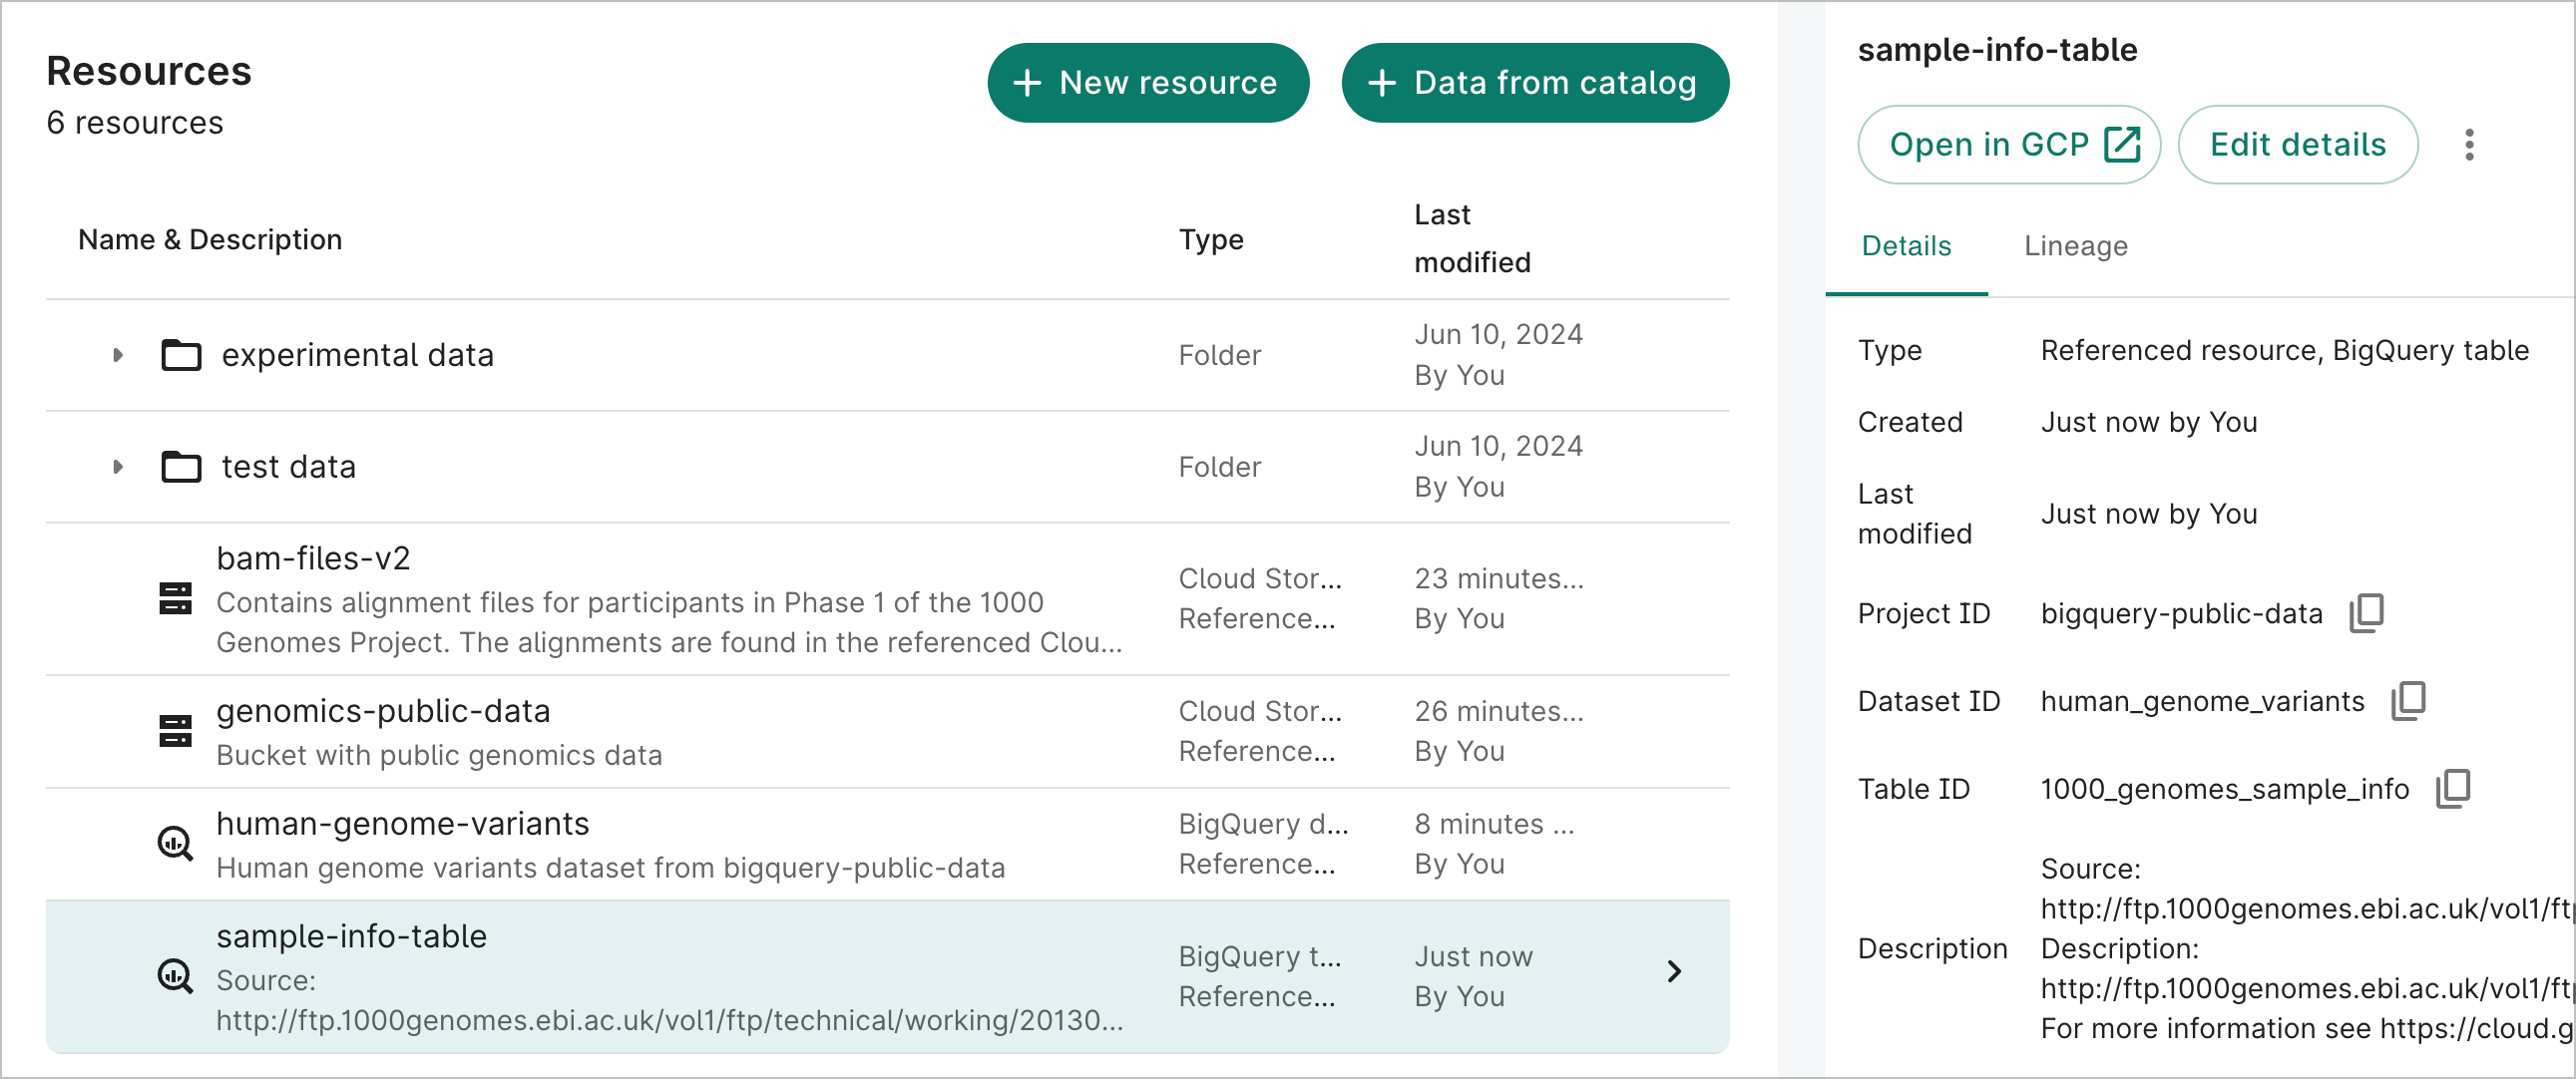
Once created, the table reference details will look like the following:
A BigQuery table reference.
Using Cloud Storage managed folders with referenced resources
If you have a non-Workbench-managed Cloud Storage bucket that you would like to reference as
a Verily Workbench resource, but want to share only certain (sub-)folders of the bucket with
other users or groups, you may find Cloud Storage
managed folders useful.
Managed folders are a type of folder on which you can grant IAM roles, so you have more fine-grained
access control over specific groups of objects within a bucket. To use this feature, your bucket
must be set to
uniform bucket-level access.
Note
You can't make changes to IAM roles for
controlled resource buckets. Access
is controlled by the associated workspace and its policies, and can't be modified independently.
When you configure a managed folder as a resource, the Workbench UI may display some warning
notifications— depending upon bucket permissions— but users will still have access to the managed
folders via the Cloud console as well as via command-line utilities like gsutil and gcloud.
To set up managed folder access as a Workbench workspace or
data collection resource:
Create a
Workbench group,
whose members are the emails of the users, and/or other Workbench groups, for which you
want to provide managed folder access. You'll want a separate Workbench group for each
different set of users for which you'll give access to managed folder(s). Note that it is
important to use Workbench groups, instead of directly adding users' account emails,
because the groups include the users'
pet SAs
as well.
Ensure that the bucket-level permissions are set appropriately for the bucket you want to manage,
to disallow access for those users who should not be able to view full bucket contents. As
noted above, this bucket must also be set to use uniform bucket-level access.
Select the bucket you want to manage in the Cloud Console
by visiting the Cloud Storage panel, then
navigate to a folder that you want to set up as a Managed folder.
Follow the instructions
here to set
up permissions for the folder. Click the "three-dot" menu to the right of the folder name and
click Edit access. Add the Workbench group with the desired permission settings. For
example, to allow viewing, but not modifying, the folder contents, use the “Storage Object
Viewer” role.
Edit access to a Cloud Storage 'Managed Folder'.
Repeat the process for each bucket subdirectory that you want to set up as a managed folder,
giving the appropriate Workbench groups access to the folder.
Create a referenced object resource for the managed folder in your Workbench workspace or
data collection, by specifying the path to the managed folder.
Create a referenced object resource that points to the managed folder.
Note
Depending upon the bucket permissions of the user adding
the referenced resource, the error notification below may be shown.
A user could see an error
when adding the referenced resource, but this doesn't mean that the folder is inaccessible.
However, after clicking Add to resources, the user should see Permissions: Granted if
the Managed Folder permissions were set up to give access.
Share the workspace or data collection with the appropriate Workbench groups when ready.
Note that sharing a workspace or data collection does not in itself affect access to referenced
resources — only controlled resources. The access to the referenced managed folders (and other
referenced resources) is determined by the ACLs you define in the Google Cloud project that holds
the resources, e.g., as described in Step 4.
When a user selects the referenced resource for the managed folder, they will be able to view the
folder contents by selecting the Open in GCP button, and browsing the folder in the Cloud
console. Currently, the Workbench Browse button may show the following error if the
user does not have permissions to list all bucket objects, only the objects in certain folders.
The Browse button may show this error depending upon bucket
permissions, but the user can browse the folder by clicking on “Open in GCP”.
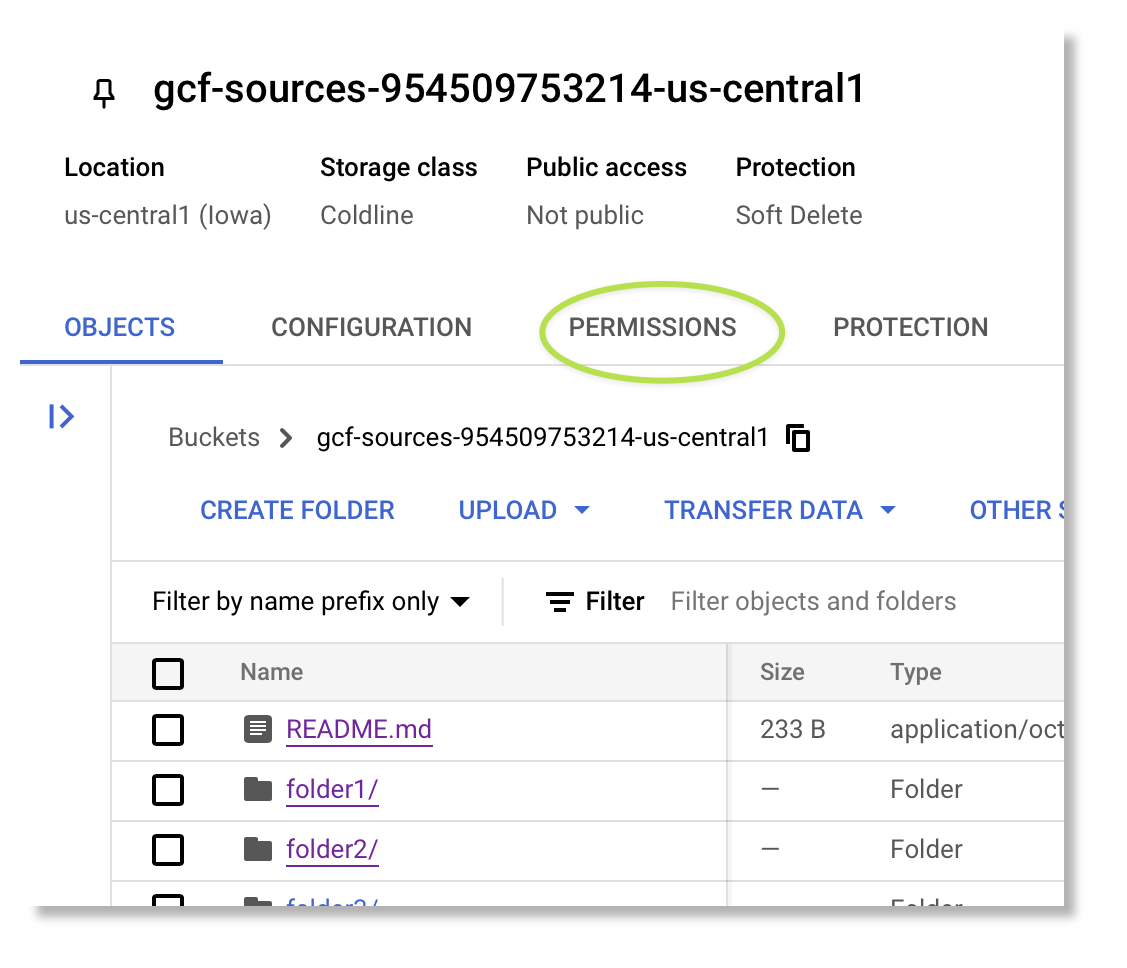
If you like, you can enable the Workbench Browse panel by giving users the Storage
Legacy Bucket Reader role at the top bucket level (in contrast to setting folder-level
access). Click on the PERMISSIONS tab for the bucket in the Cloud console, then select
GRANT ACCESS.
The Browse button for the resource may show this
error, depending on bucket permissions, but the user can browse the folder by clicking on
Open in GCP.
This role will allow those users to list all bucket objects — including those in folders to which
they don't have access — but they will not be able to view the contents of any objects not under
the folders to which they've been given access.
Add a data collection from the data catalog
Import references to resources from a data collection
To add a data collection to your
workspace via the Workbench UI, click
the + Data from catalog button in the Resources pane. This will open a resource addition
dialog; use it as detailed below.
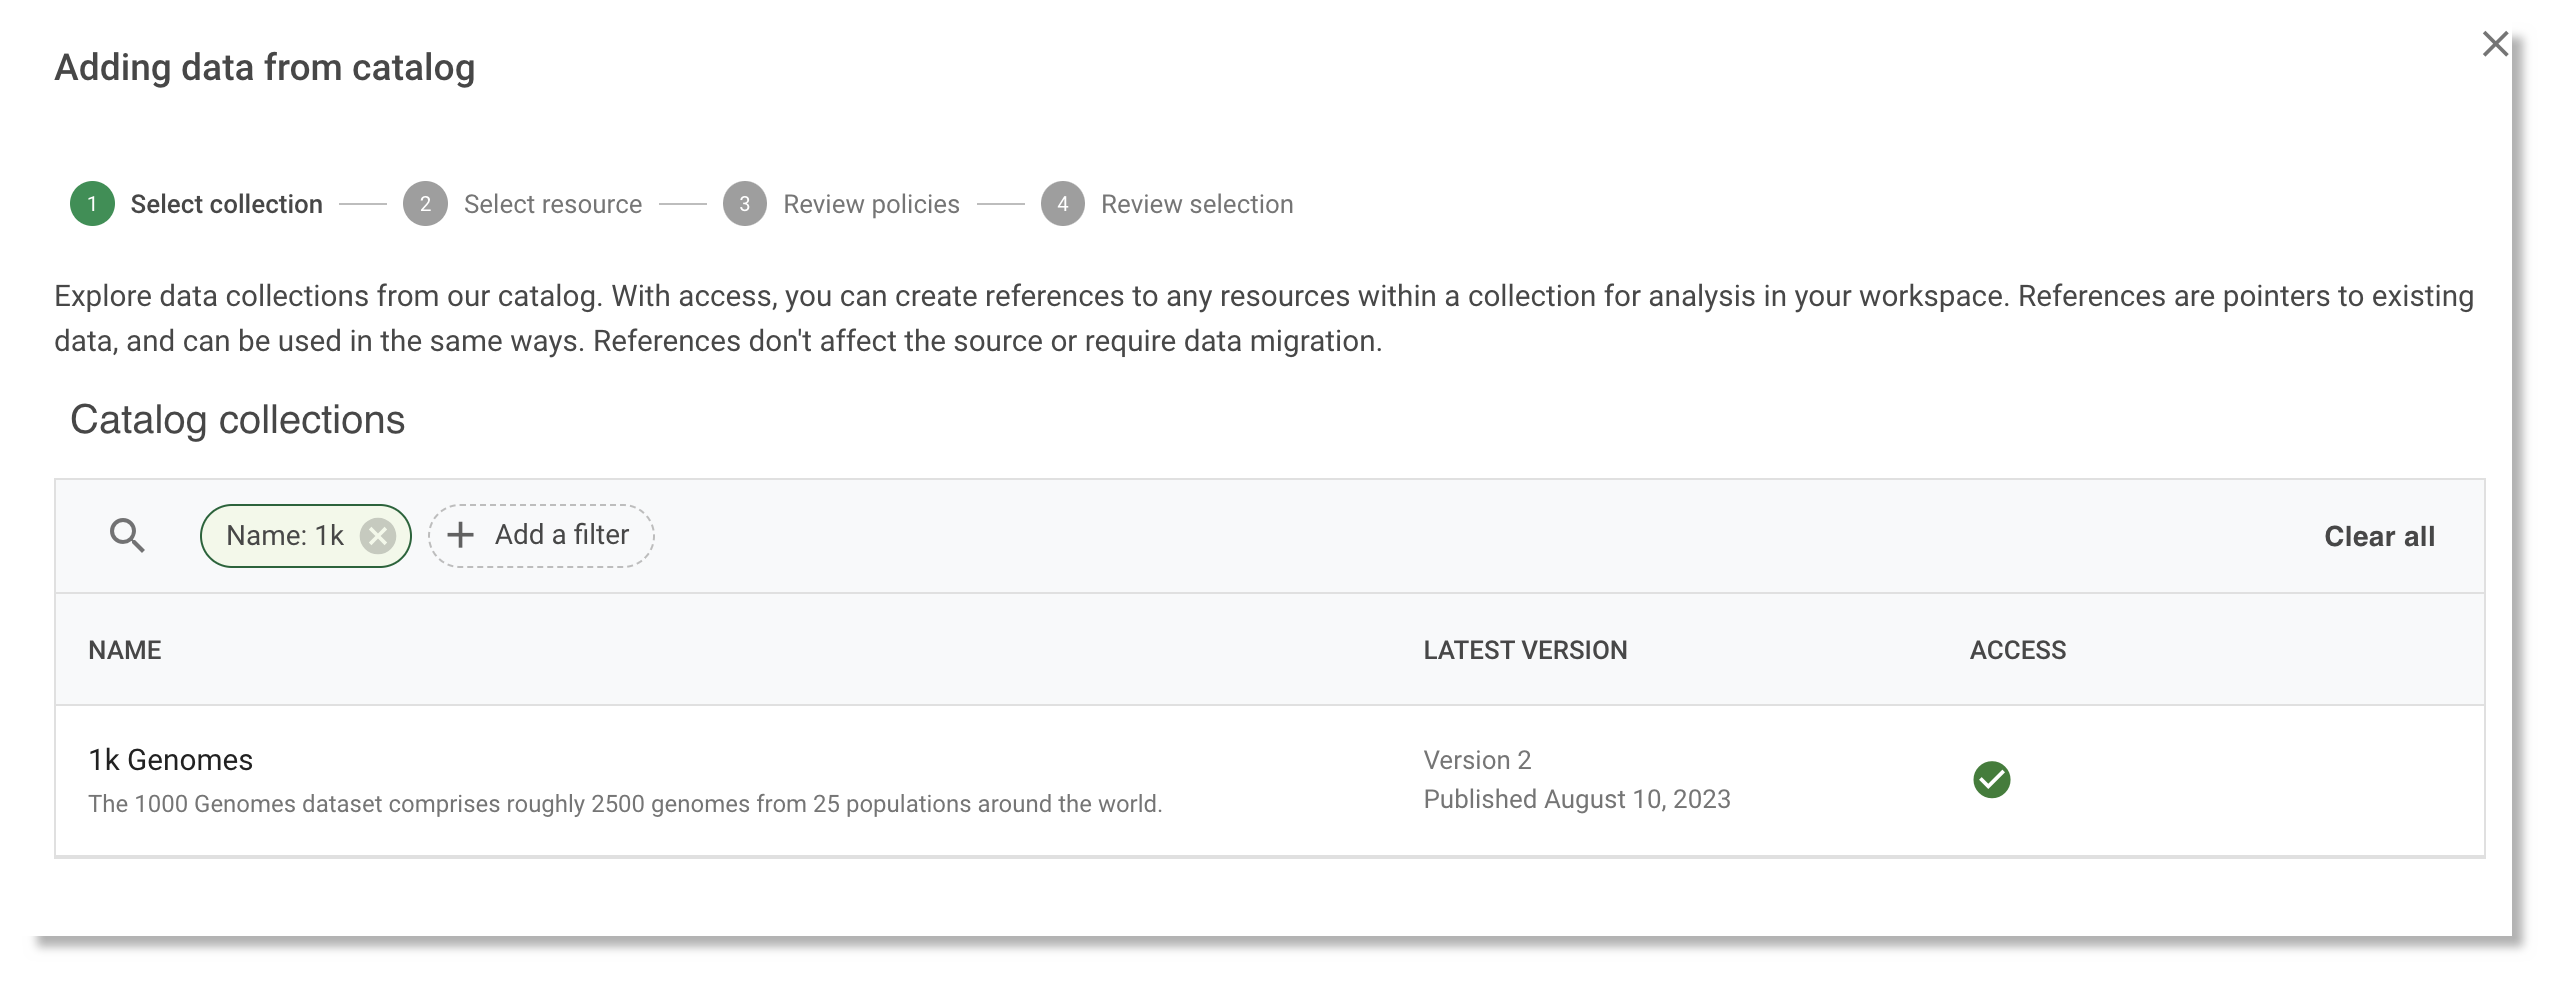
Browse the data catalog and select a data
collection of interest. You'll be able to see information about the most recent version of the
data collection and when it was published. Click Next.
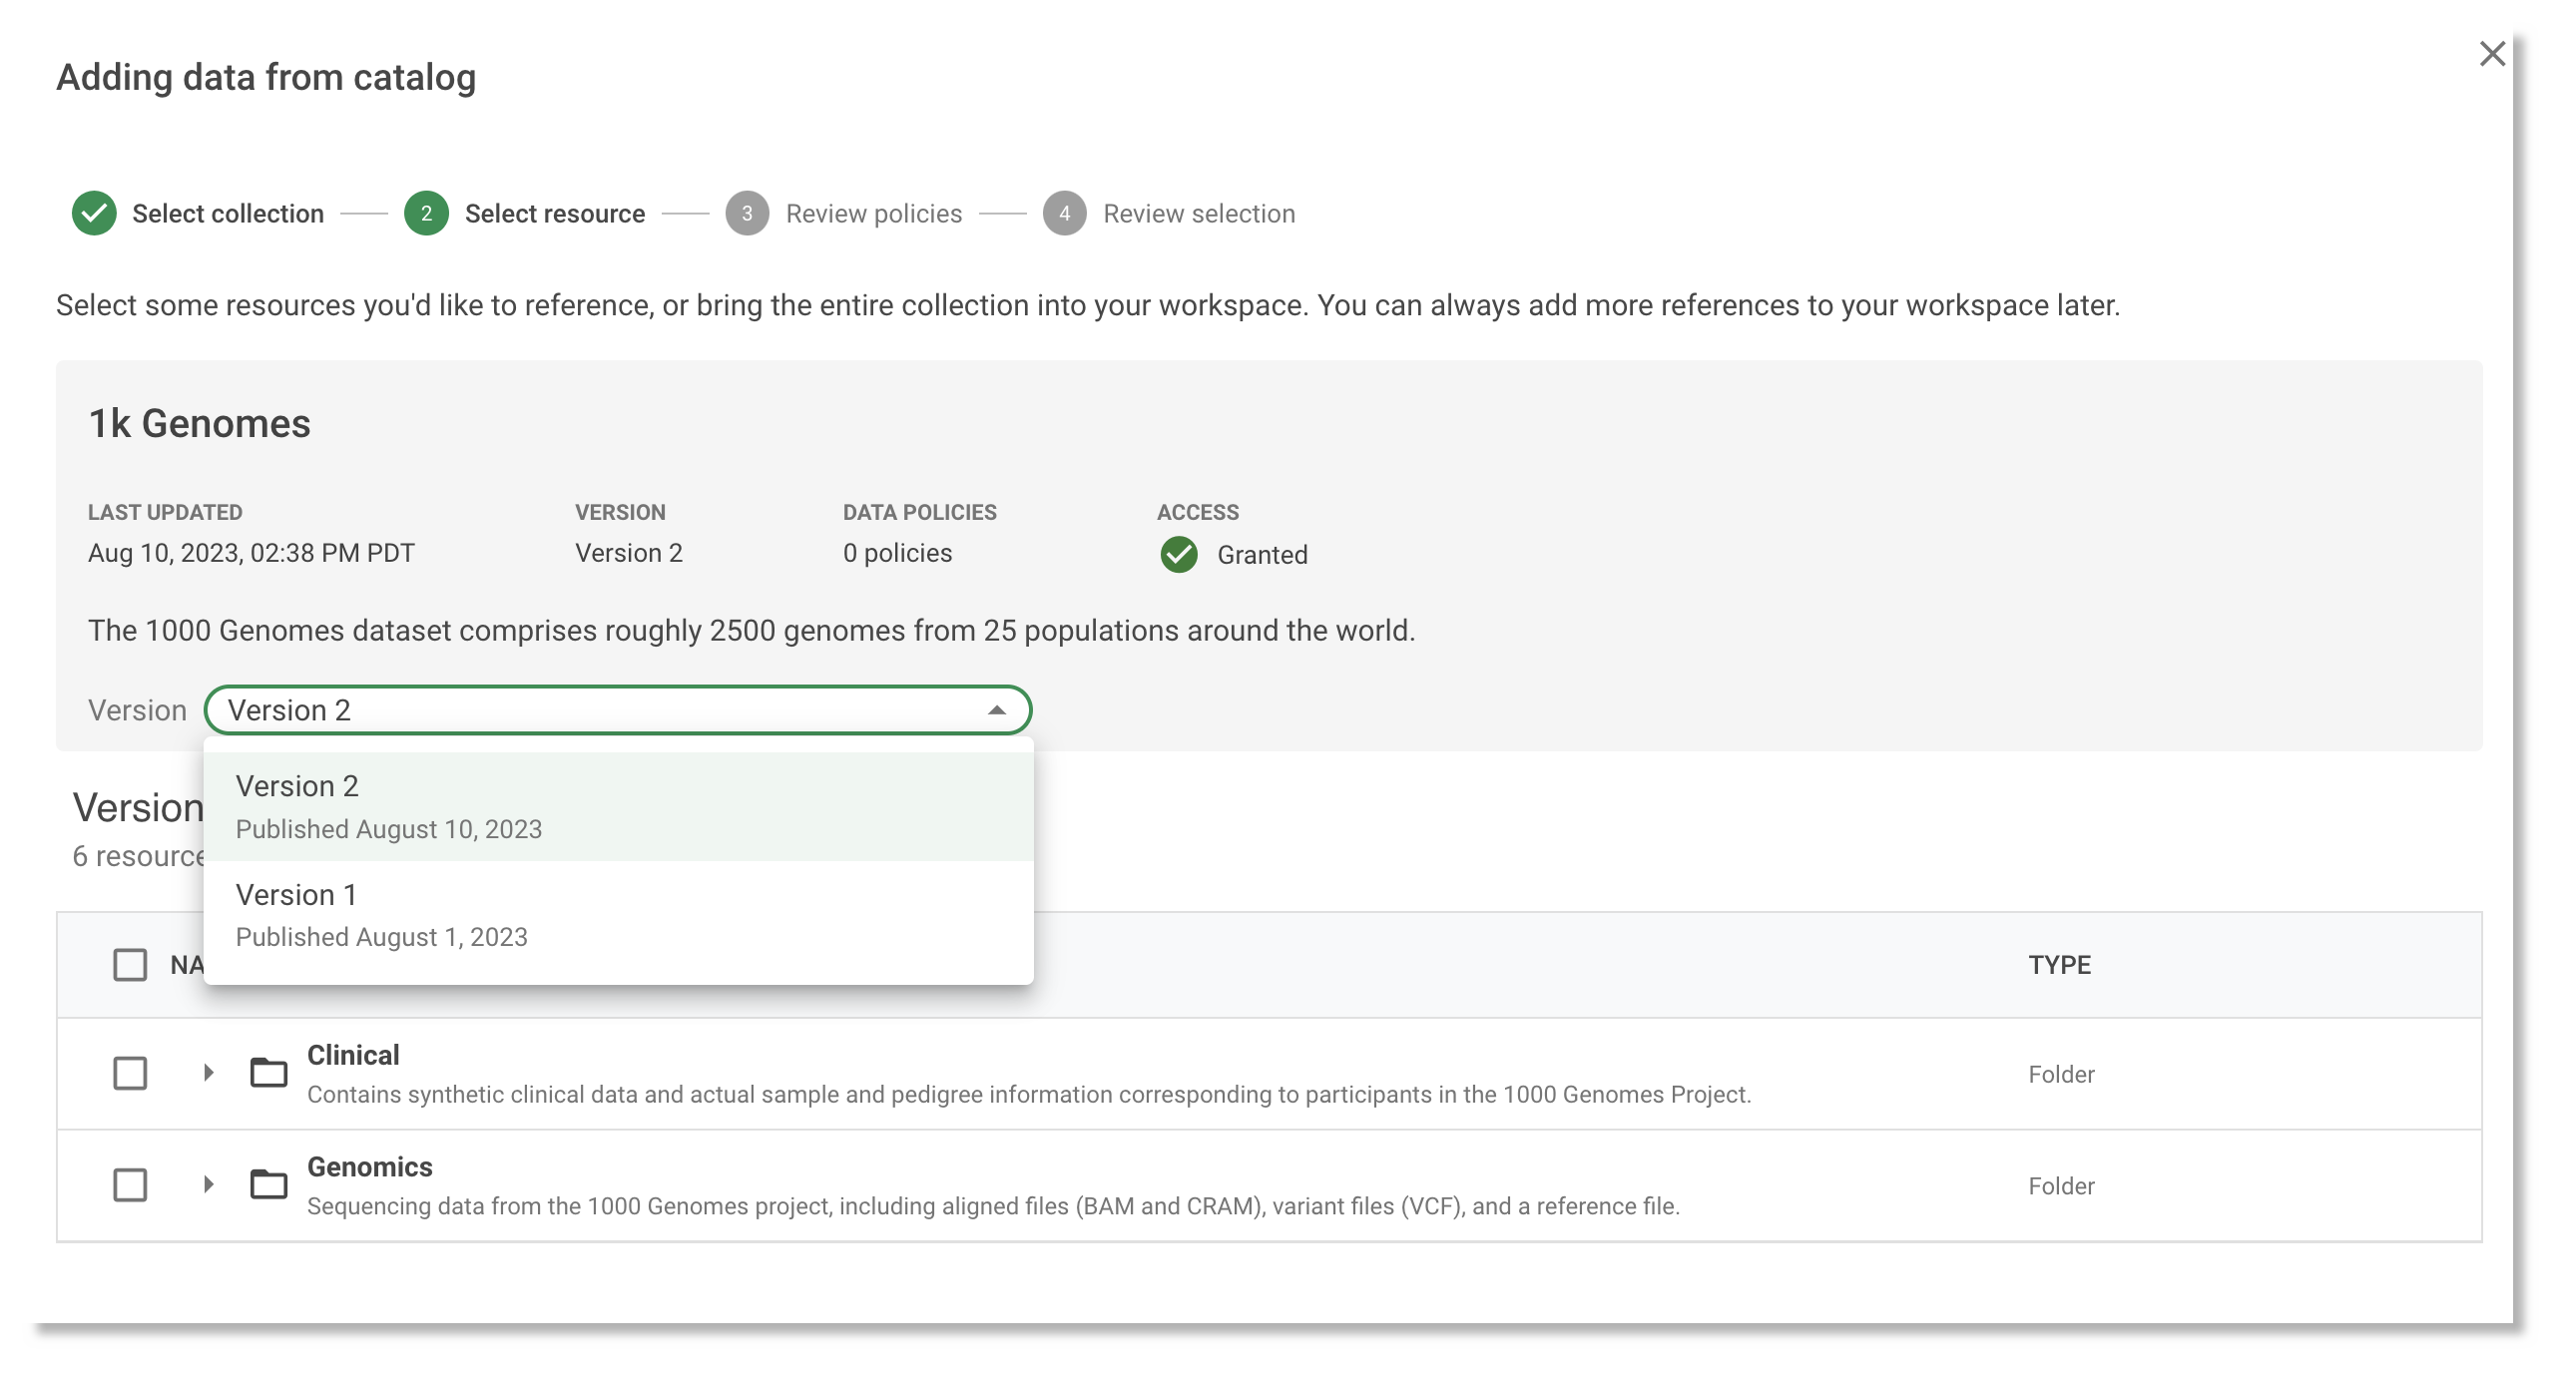
This will lead to a dialog showing the contents of the collection.
After you've clicked in to the data collection, select the version you'd like to import.
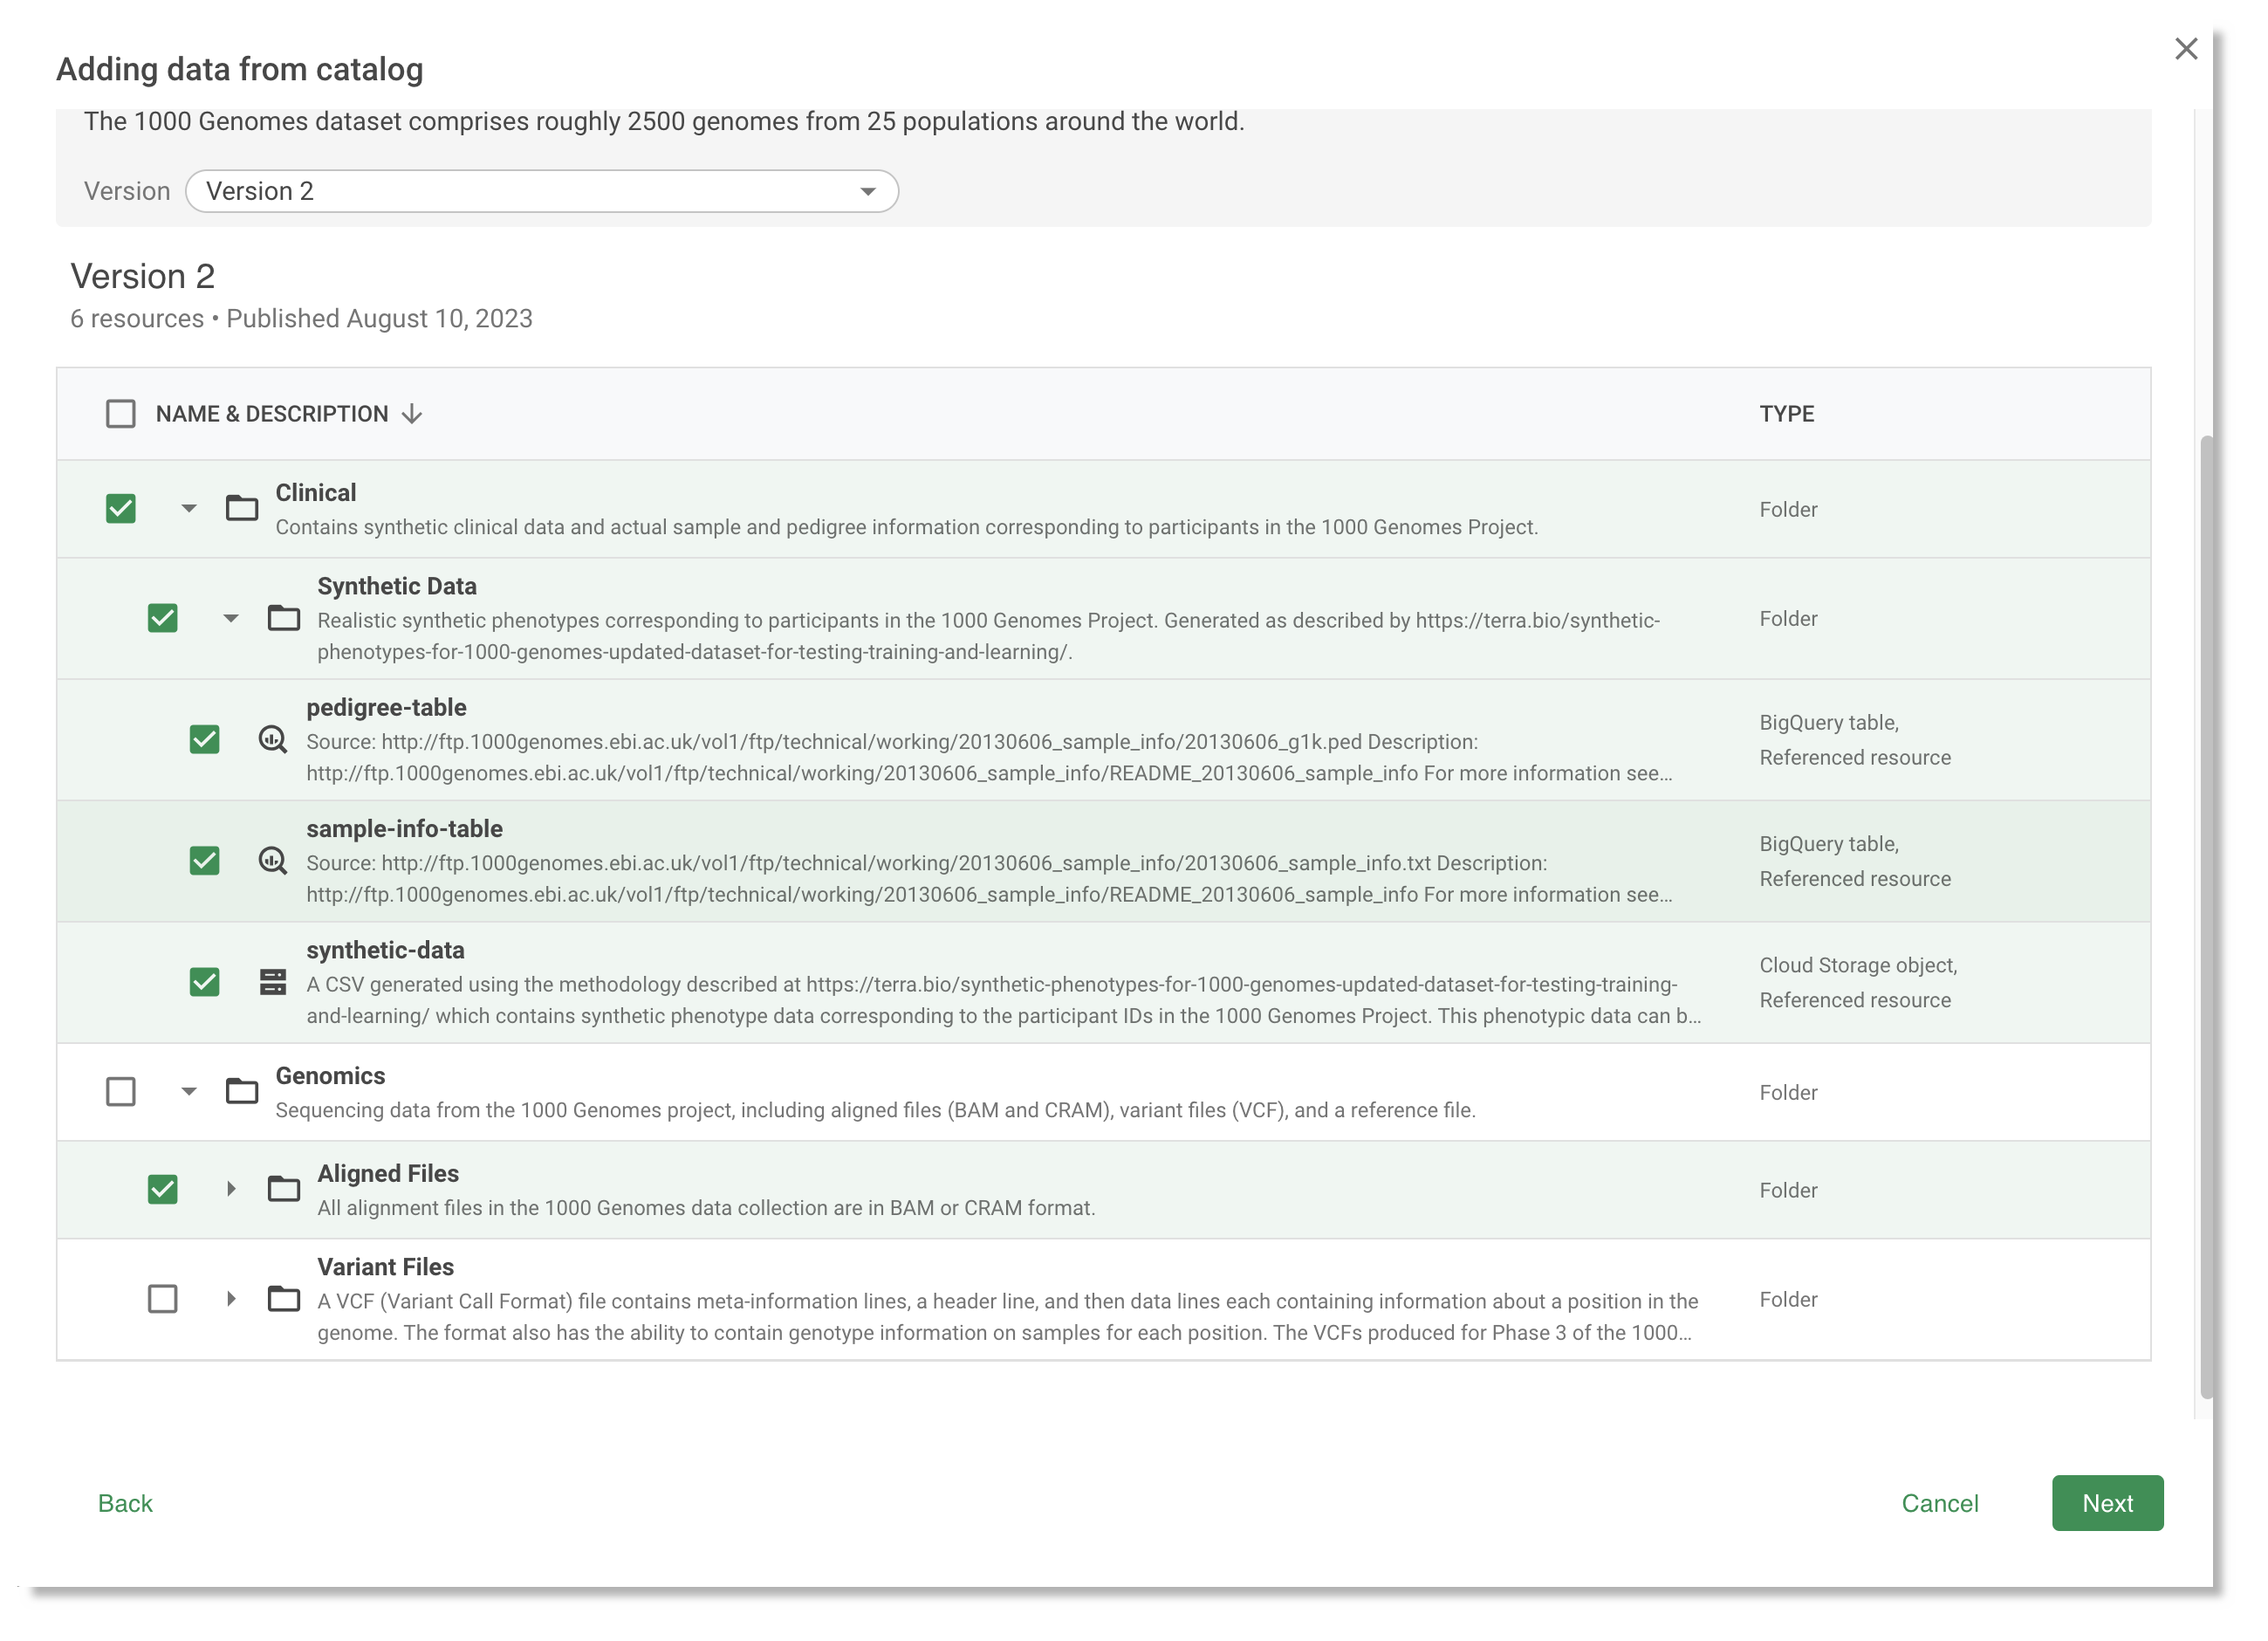
Select which resources you would like to import from the data collection version. You can expand
folders by clicking on the triangle to the left of the folder name. If you do not select all
resources in a data collection, you'll still have the option of adding them later. Once you have
finalized your selection, click Next.
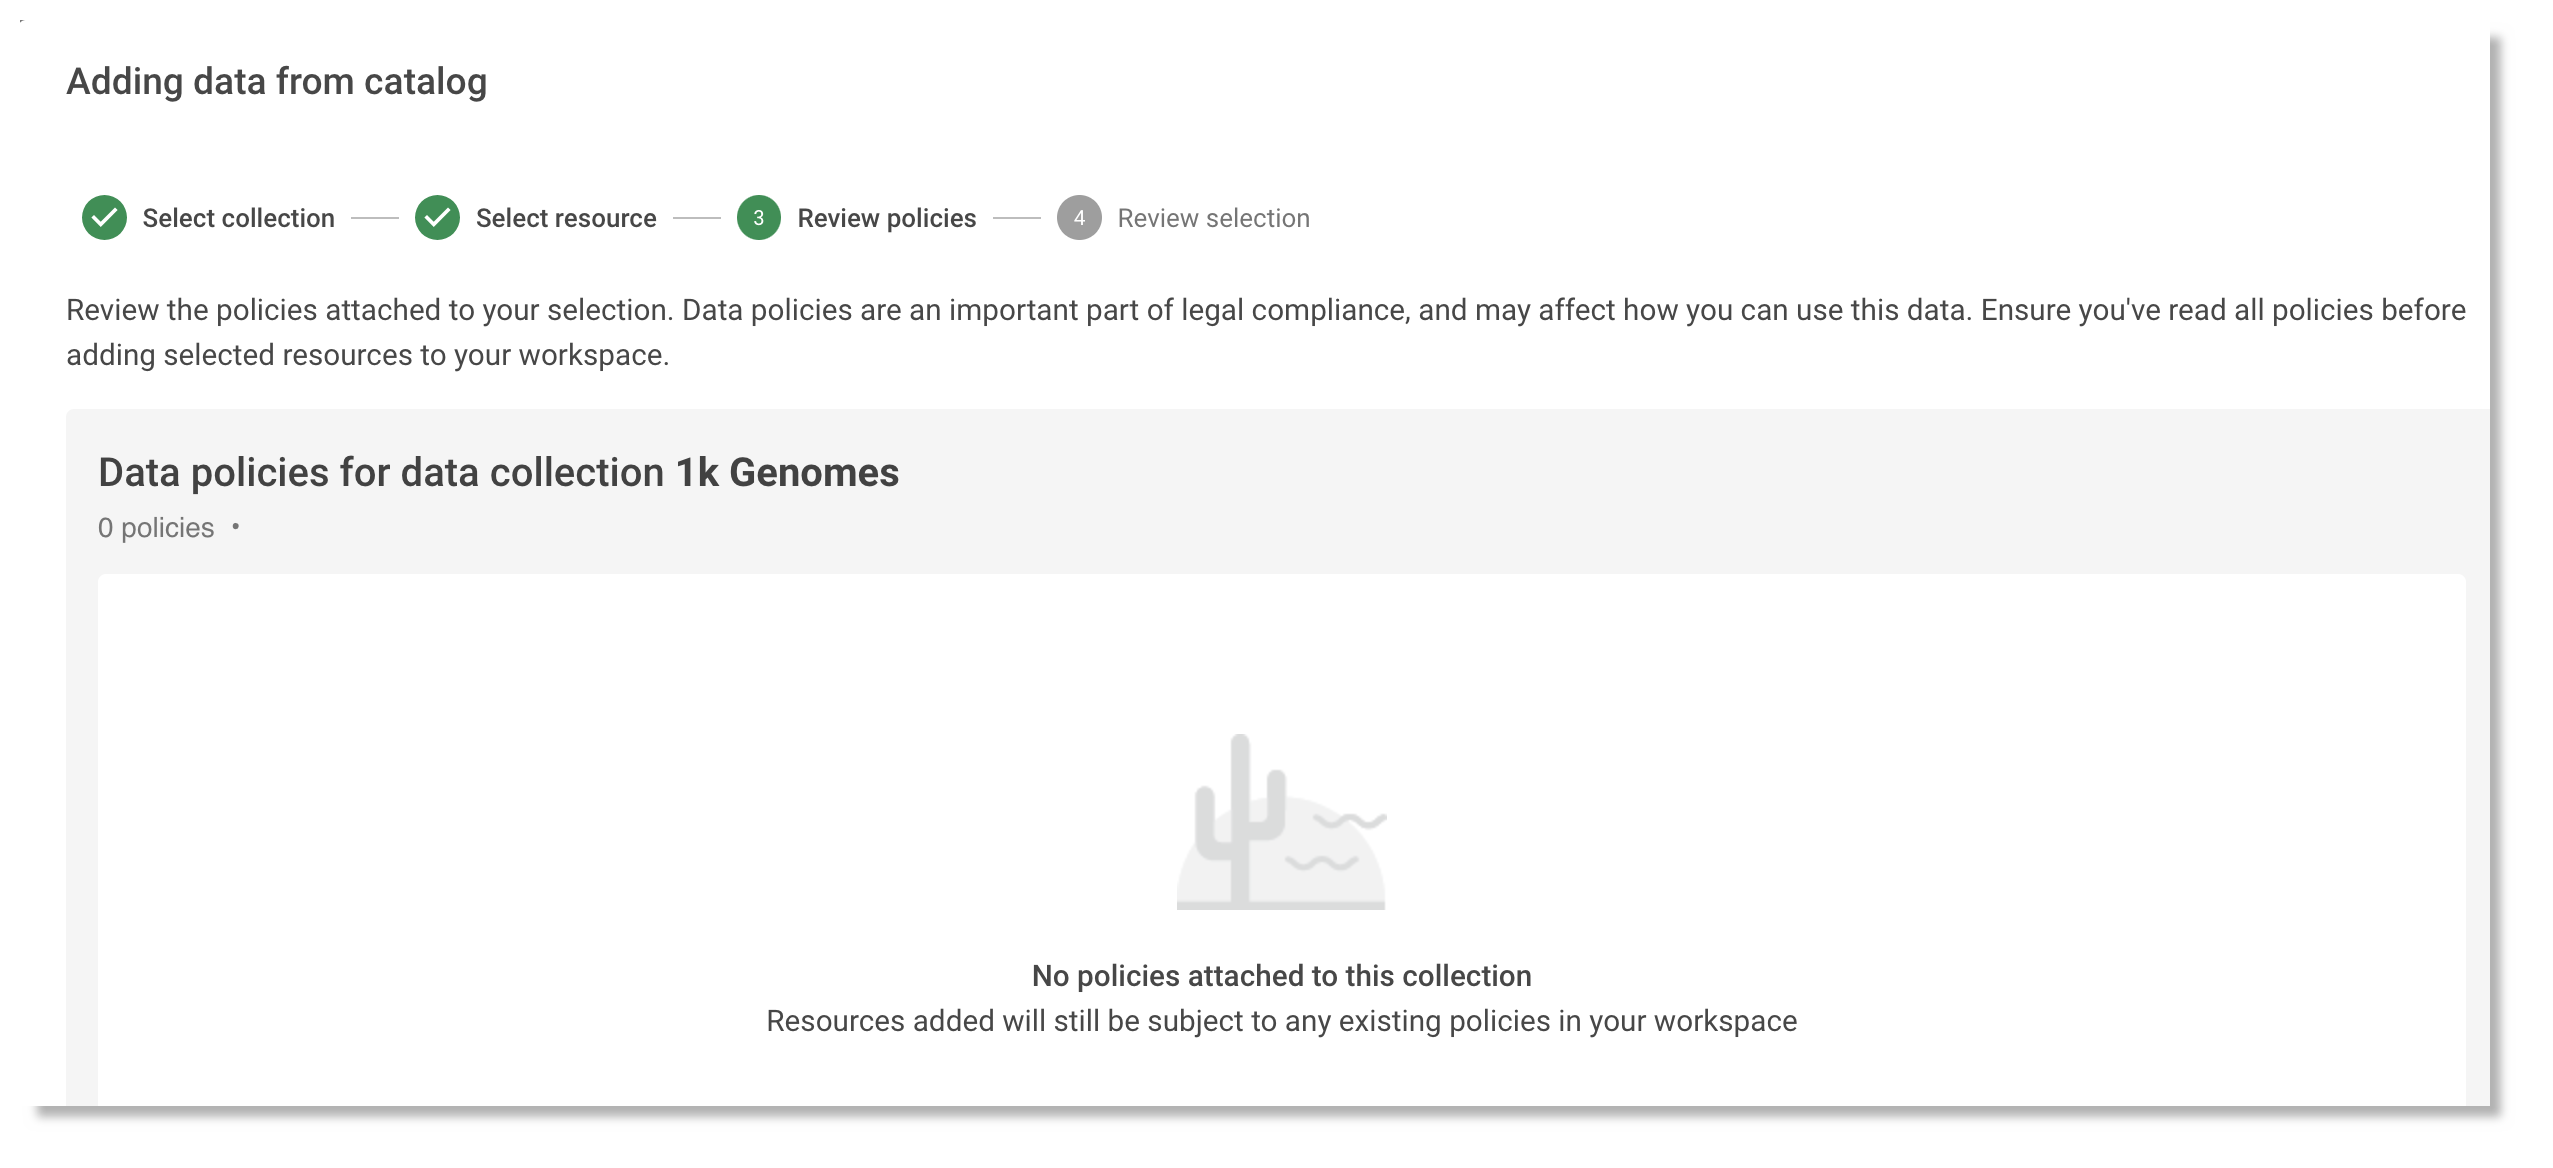
This will lead to a dialog showing the data
policies associated with the resources you have
selected.
Review the policy requirements. Click Next.
This will display a list of selected resources and destination options.
Review your selection and choose the workspace folder where you want to add them. You can select
an existing folder from the dropdown menu or create a new folder. Click Add to your
workspace.
The selected resources should now appear in your workspace resources view.
You can manage and access these resources as you would any other resource in your workspace, as
described below in Manage your data resources.
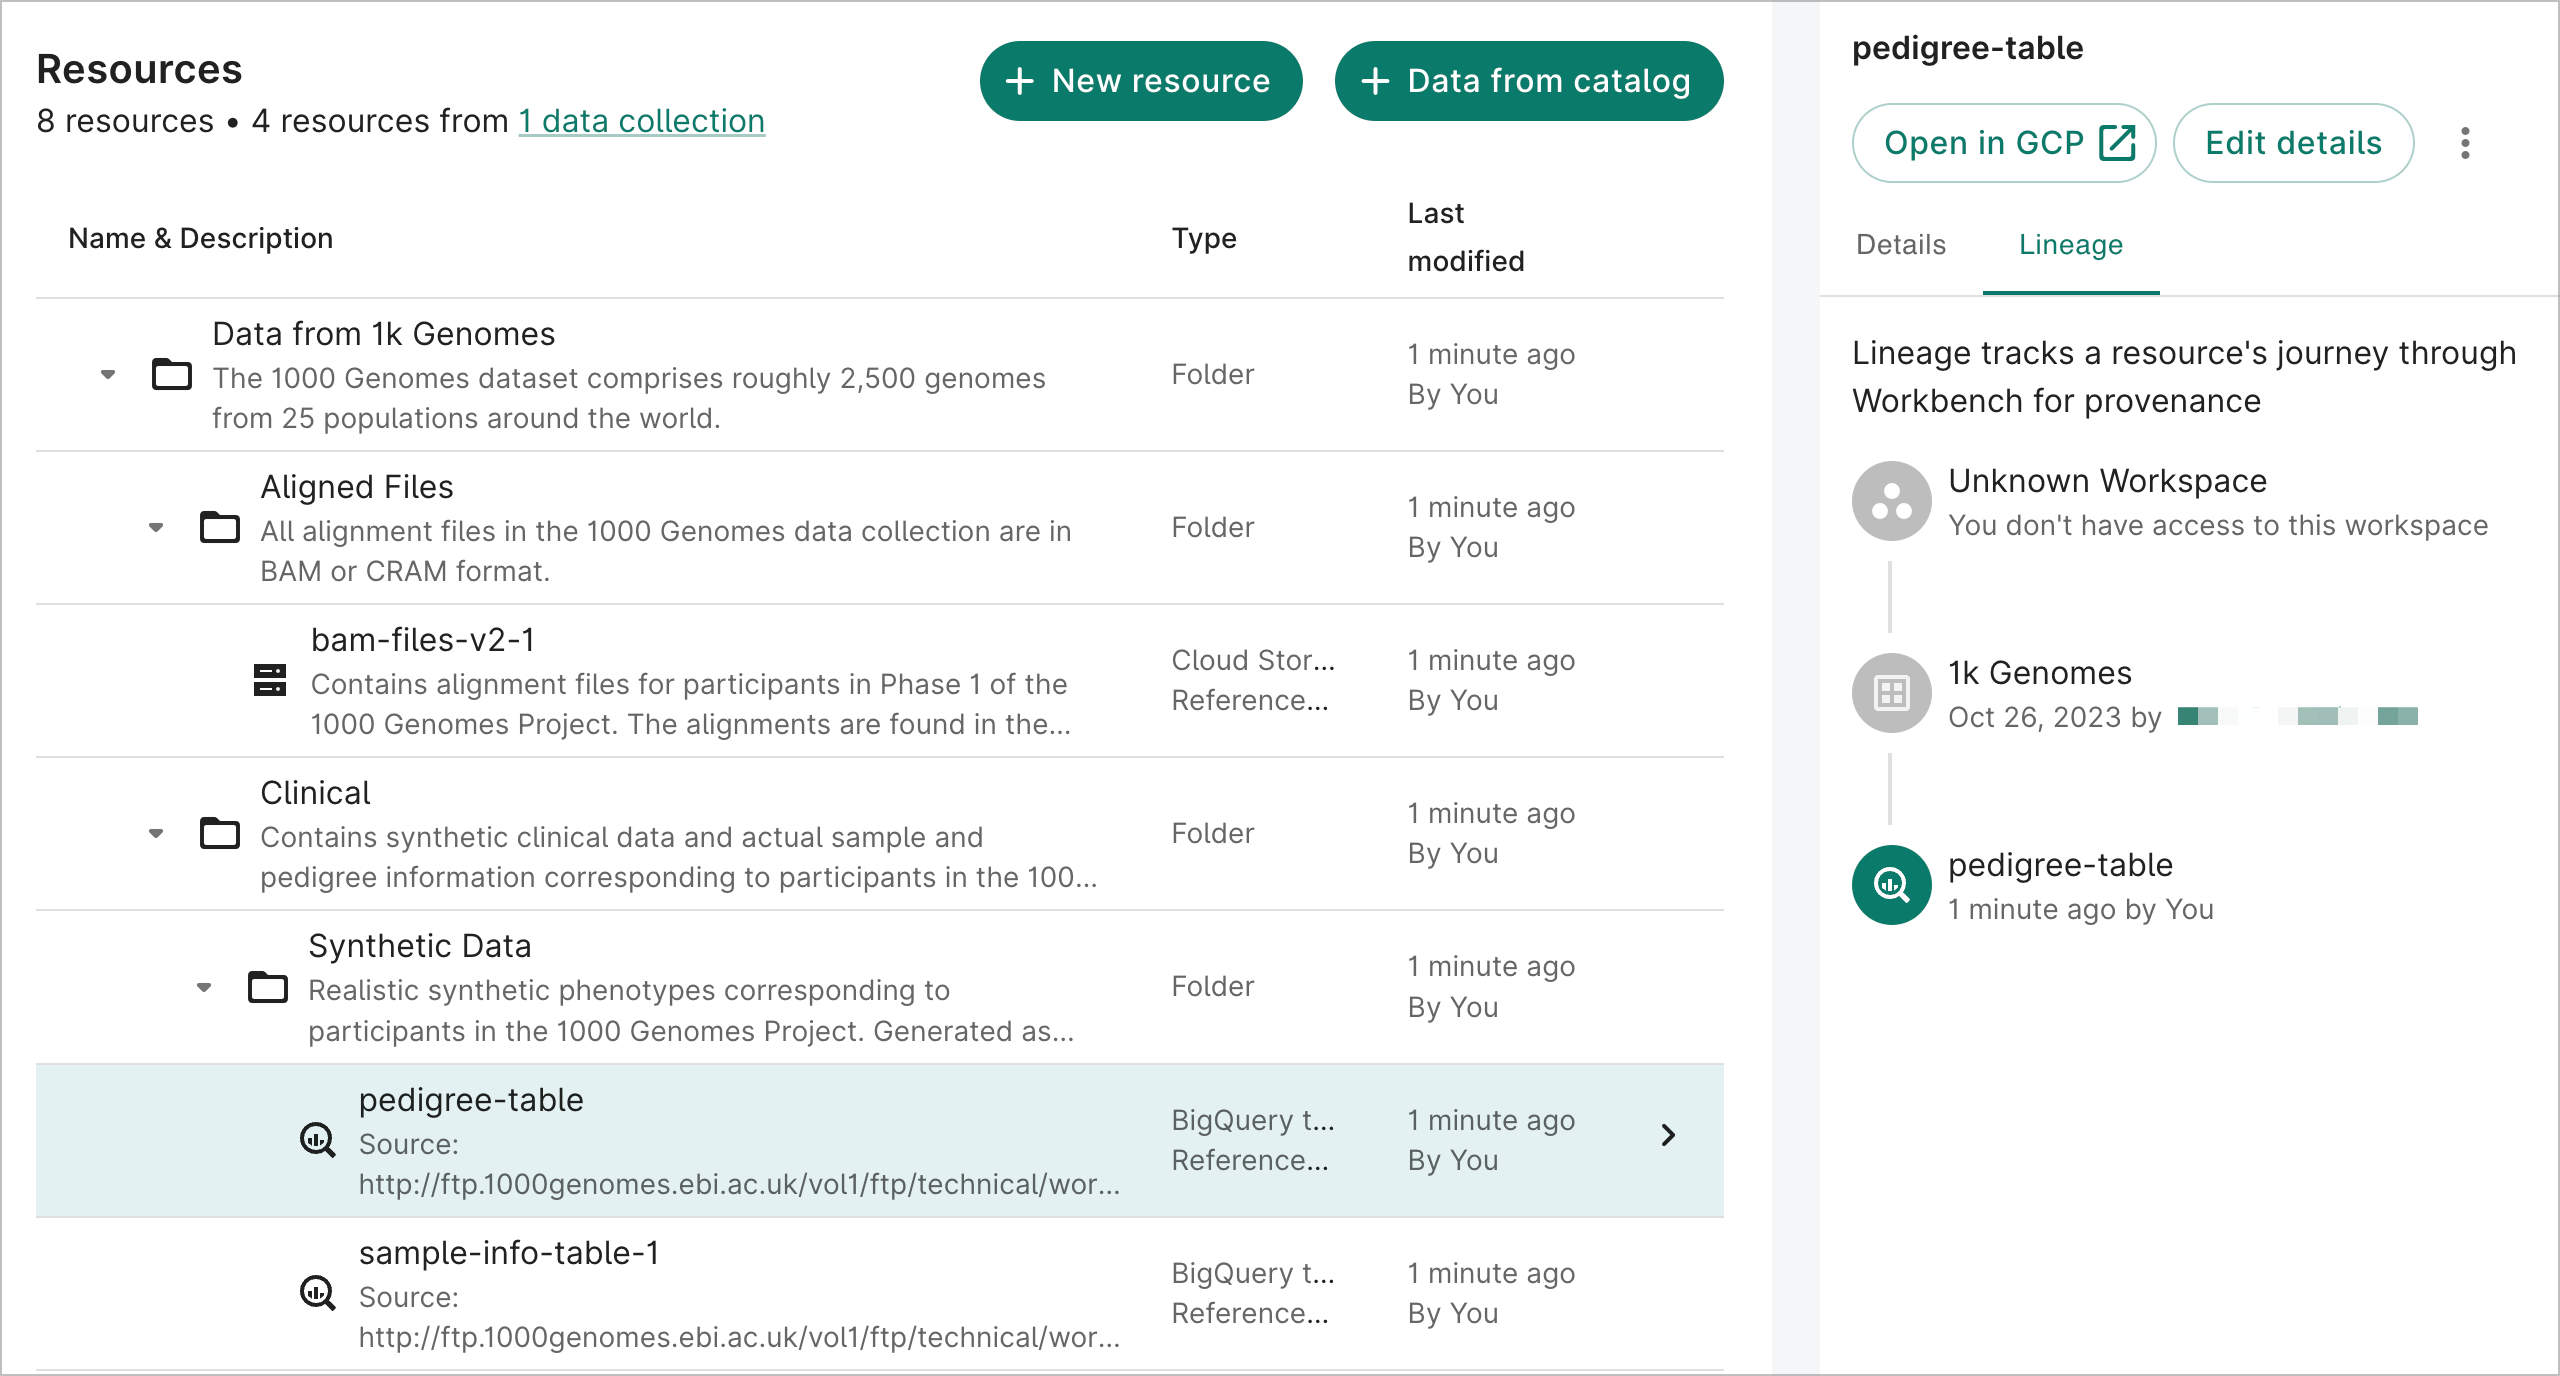
View the lineage of resources imported from a data collection
You can view the data collection lineage of each
resource. This displays provenance information, including a link to the collection of origin as well
as the time or date when the resource was added to the workspace.
To view lineage information, click on the resource you want to inspect in the Resources list,
then click on the Lineage tab in the information pane on the right.
Data lineage for a referenced resource.
AWS-backed workspaces
Create a controlled resource
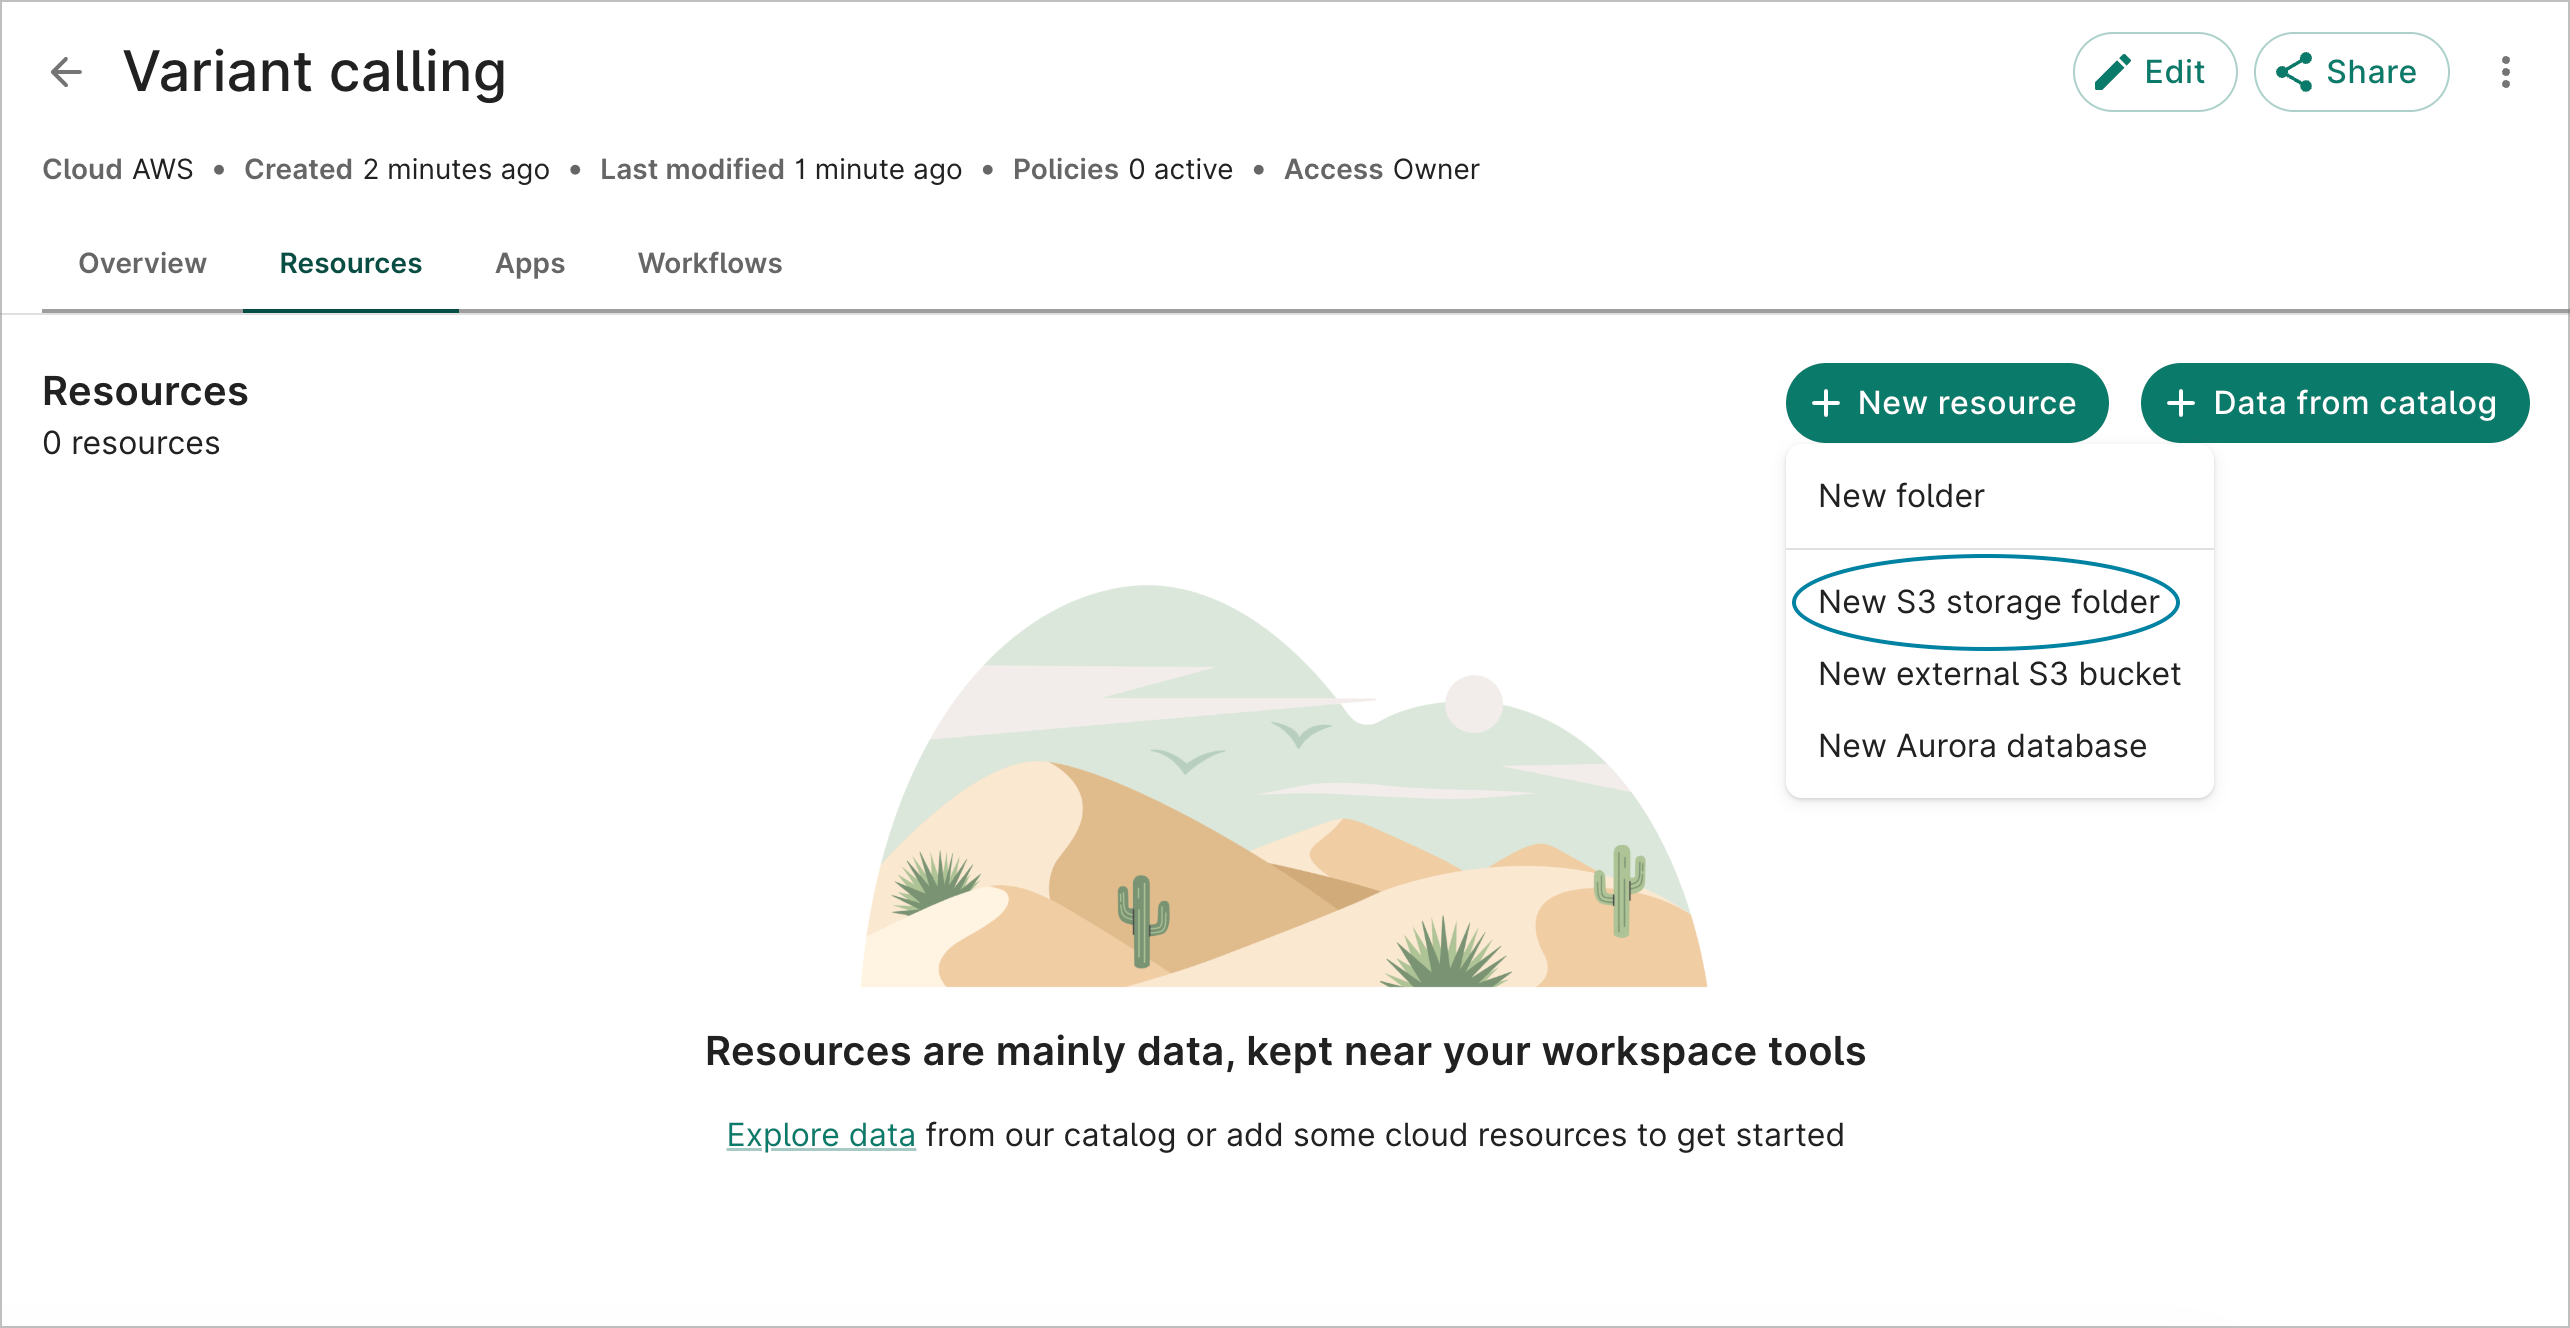
Create a S3 storage folder
Users can create S3 storage folders in a Workbench-managed S3 bucket. Access to the S3 objects
under these folders is scoped to the workspace.
To create a S3 storage folder via the Workbench UI, select the + New resource button in
the Resources pane and choose New S3 storage folder.
Create a S3 storage folder.
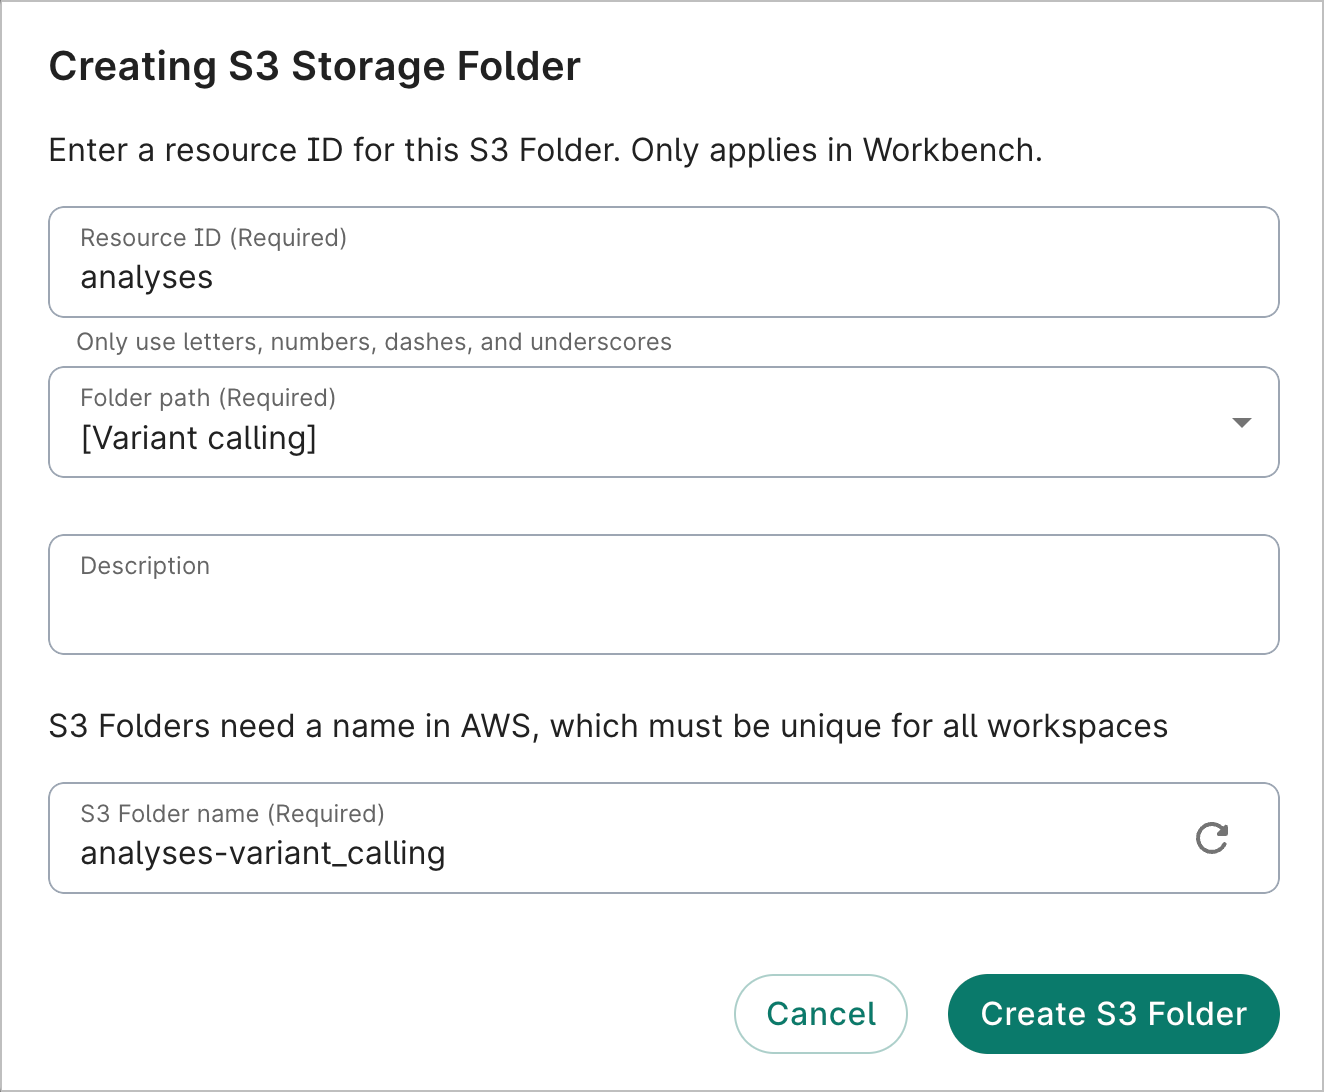
Enter an ID for your new resource. This will be the ID displayed when you list your resources in
Workbench. The resource ID must be unique within the workspace.
Use the Folder path dropdown menu to select a folder. You'll be able to move the bucket to a
different folder after creation, if desired.
Provide a brief description of the resource. This is optional but highly recommended.
The system will create a storage folder name, generated automatically based on the resource ID
and the workspace name. You can modify or replace the suggested bucket name in the creation
dialog, but note that the bucket name must be globally unique across all of Google Cloud. You
will not be able to edit the bucket name once it has been created. Select the Create S3
Folder button.
Complete the fields to create a S3 storage folder.
Create an external S3 bucket resource
You can create an external S3 bucket resource in Workbench that provides access to an existing
S3 bucket that is managed outside of Workbench. This is helpful if you have a S3 bucket that
is shared with both Workbench and non-Workbench users.
To create an external S3 bucket resource via the Workbench UI, select the + New resource
button in the Resources pane and choose New external S3 bucket.
Create an external S3 bucket.
Enter an ID for your new resource. This will be the ID displayed when you list your resources in
Workbench. The resource ID must be unique within the workspace.
Use the Folder path dropdown menu to select a folder. You'll be able to move the bucket to a
different folder after creation, if desired.
Provide a brief description of the resource. This is optional but highly recommended.
Enter your AWS account ID, along with the region and S3 URI of your S3 bucket. You can also add
an IAM tag prefix, which you can refer to in the IAM policy. Select the Create external S3
bucket button.
Complete the fields to create an external S3 bucket resource.
Note
When external S3 bucket resources are introduced in your
workspace, it doesn't result in actual cloud resources being created. Instead, it provides an IAM
mechanism for providing access to them in Workbench. The same goes for when an external S3
bucket resource is deleted; access to it is simply revoked in Workbench.
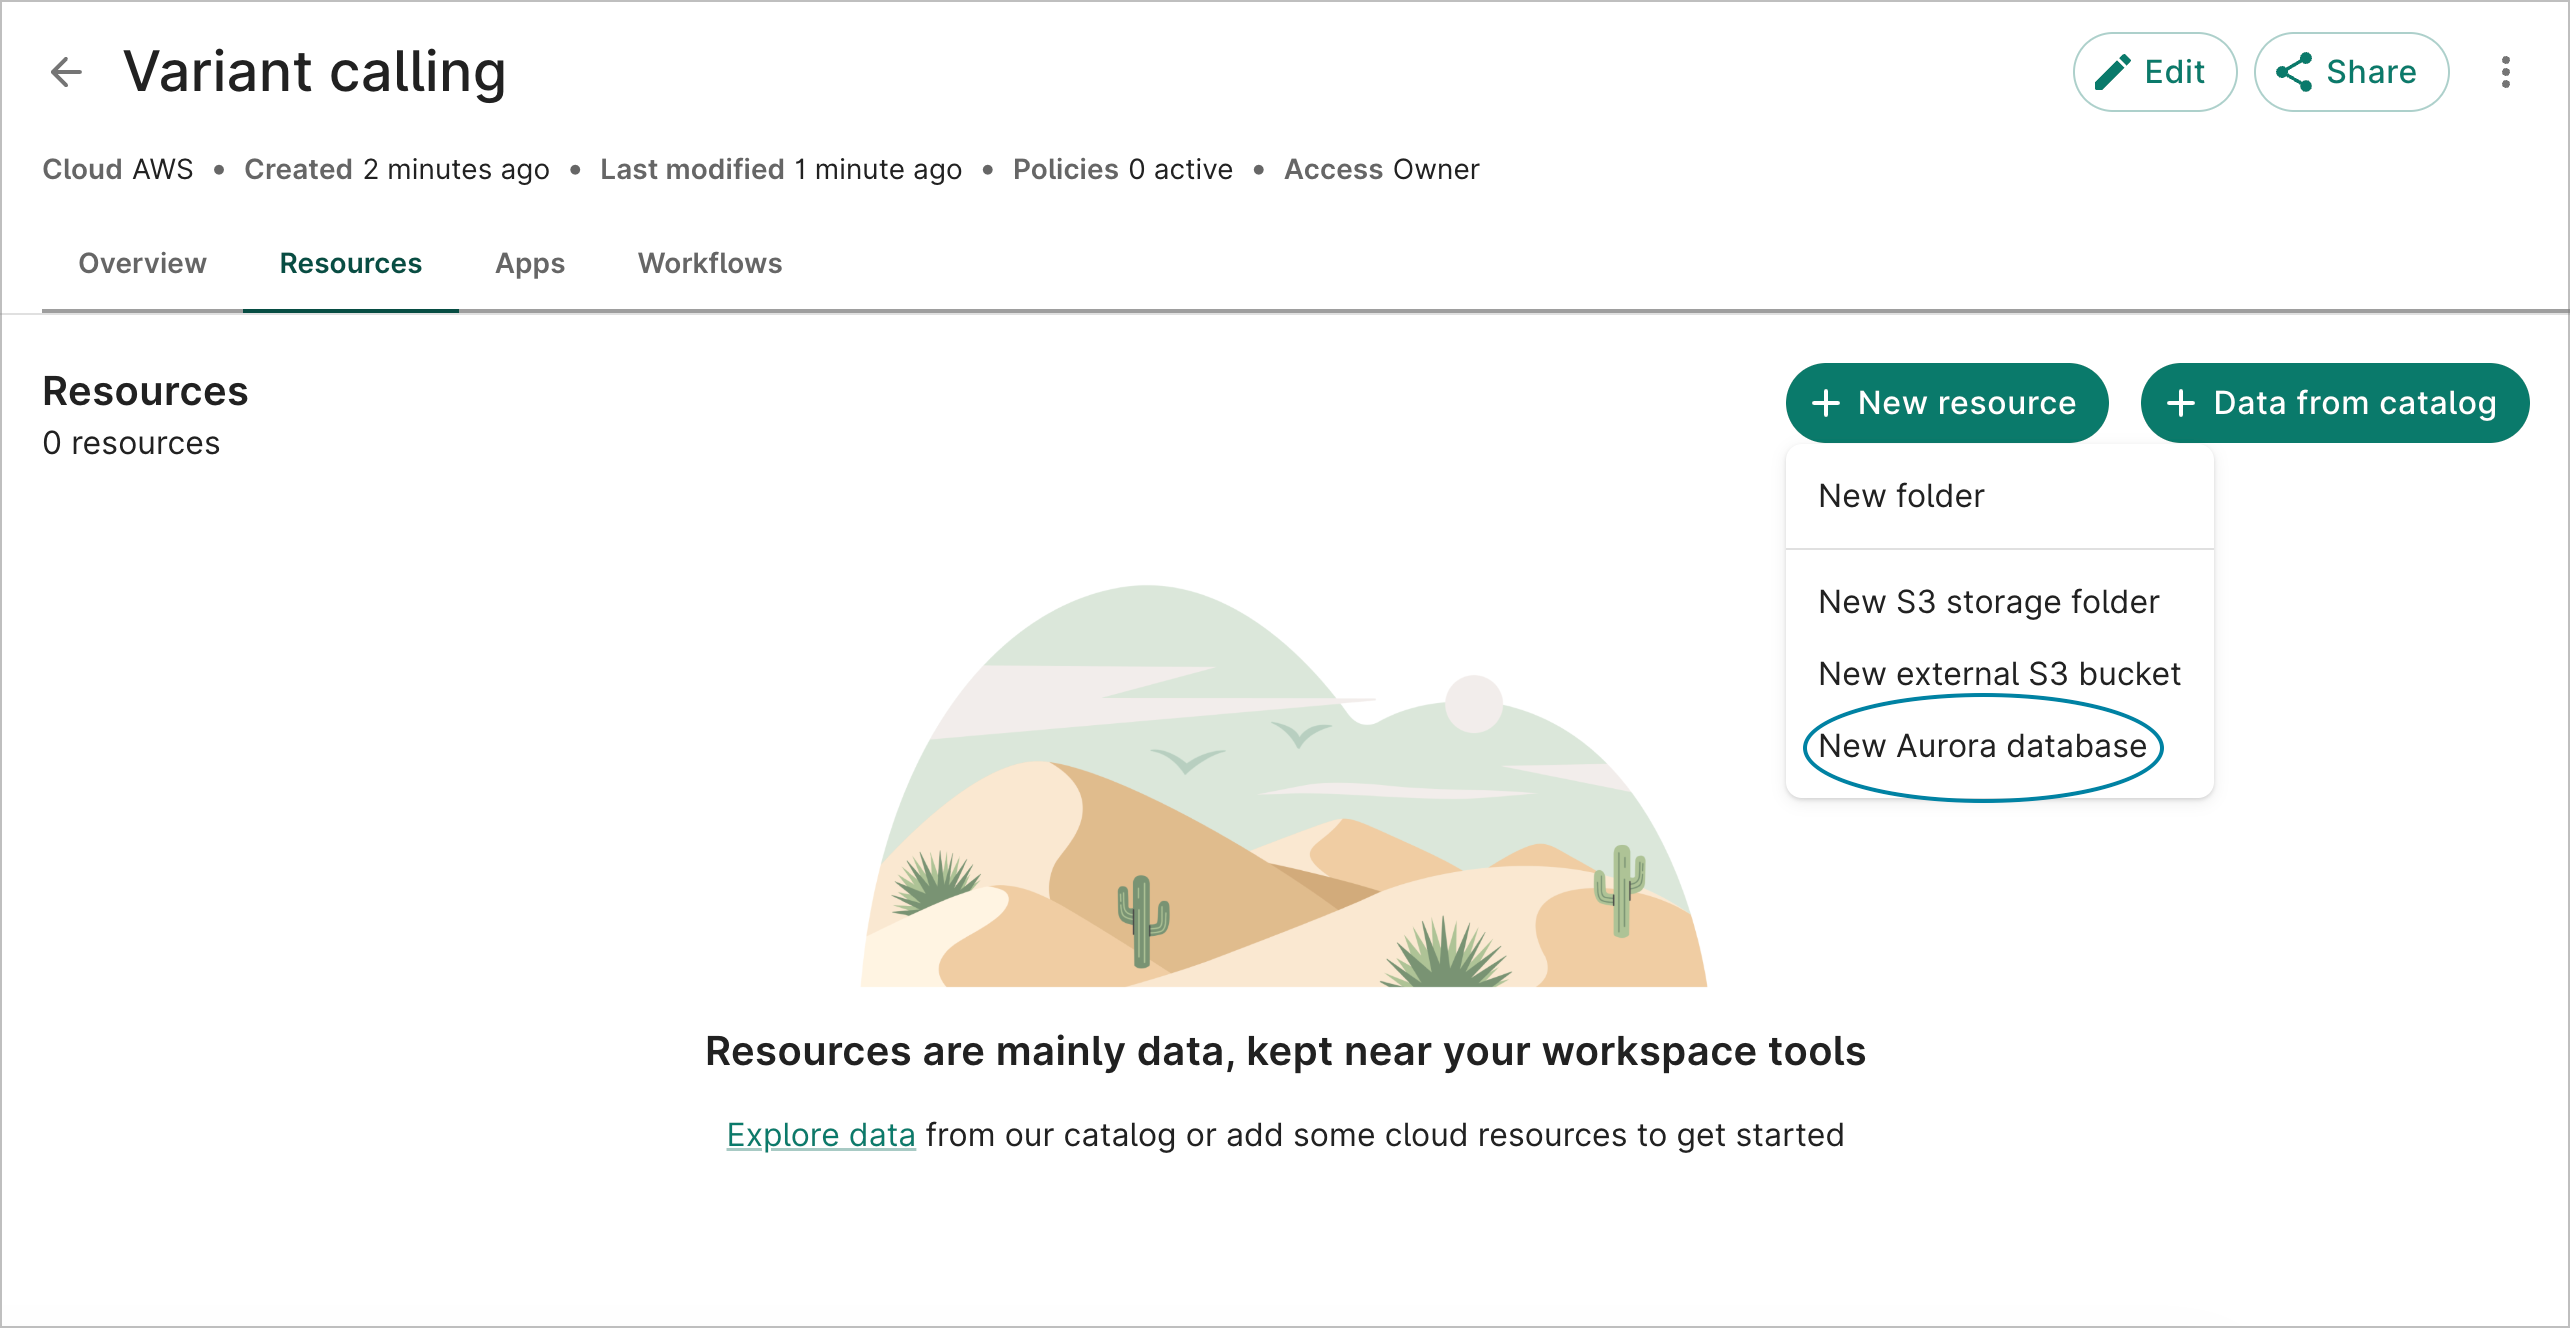
Create an Aurora database
To create an Aurora PostgreSQL database resource via the Workbench UI, select the + New
resource button in the Resources pane and choose New Aurora database.
Create an Aurora database.
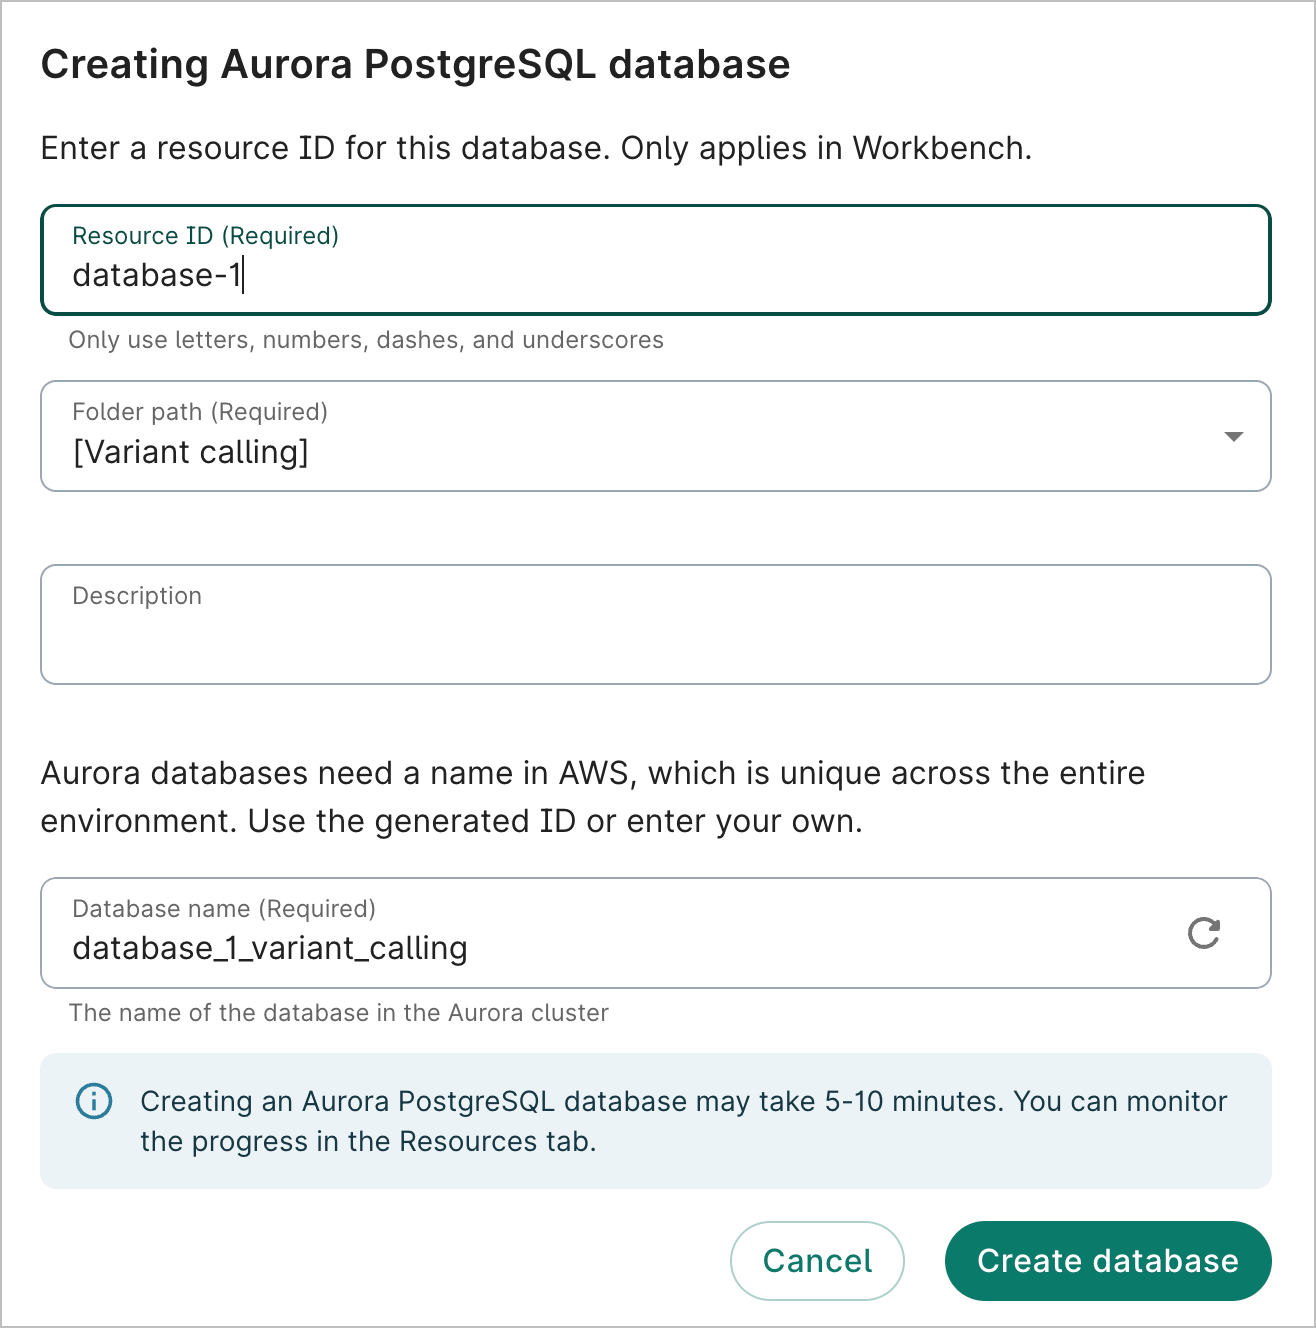
Enter a Resource ID for your database.
Select which folder you want the database to be created under.
Enter a description (optional).
A database name will automatically generate based off of your resource ID and your workspace
name, but you can change it. Note that the Aurora database name can only contain letters,
numbers, and underscores.
Select Create database. It can take 5 to 10 minutes to create.
Complete the fields to create an Aurora database.
Create a referenced resource
Create a referenced S3 storage folder, external bucket, or Aurora database
Currently, it's not possible to directly create referenced AWS resources via the
Workbench UI. However, if you clone an AWS workspace with controlled AWS resources, the
cloned workspace will include them as referenced resources. In addition, if you add an AWS-backed
data collection to a workspace, the collection's resources will be added to the workspace as
referenced resources.
Manage your data resources
Organize resources into folders
You can organize your data resources in hierarchical folders.
To create a new folder, click the + New resource button in the Resources tab and select
New folder. This will bring up a folder creation dialog.
The following screencast shows creation of a new folder, then creation of a controlled Cloud Storage
bucket resource within that folder.
To move a resource or folder to a different folder, select it and click on the Move button in
the information pane on the right. This will bring up a folder organization dialog (which also
allows you to create a new folder, if needed).
The following screencast shows moving a resource (Researcher_1_data) to a new folder, created as
part of the Move dialog. When creating a new folder, you have the option of where to place it.
In this case, we didn't place the new folder under the current one, but created it at the top level.
Edit resource details
For GCP resources, you can edit the resource name and description of any of your resources at any
time. To do so, select the resource and click on the Edit details button in the information pane
on the right. This will bring up the editing dialog.
Note that you cannot edit external identifiers such as bucket path, project ID, dataset ID or
table ID after a resource creation. If you realize you made a mistake in one of these identifiers
when you created or added the resource, you'll need to delete the erroneous entry and repeat the
process of creating or adding that resource to your
workspace as described above. For instructions
on deleting a resource, see Delete a resource below.
Note
AWS resources cannot be edited.
Browse buckets and preview file contents
You can browse the contents of buckets and preview file contents for certain file types directly in
Workbench.
Note
For workspaces enrolled in a
perimeter, bucket browsing must be enabled by
your perimeter administrator. When enabled, file previews may be restricted to specific file types
(e.g., notebooks and scripts) and subject to file size limits configured for the perimeter. File
download remains disabled in perimeter workspaces. See Perimeter
policy for details.
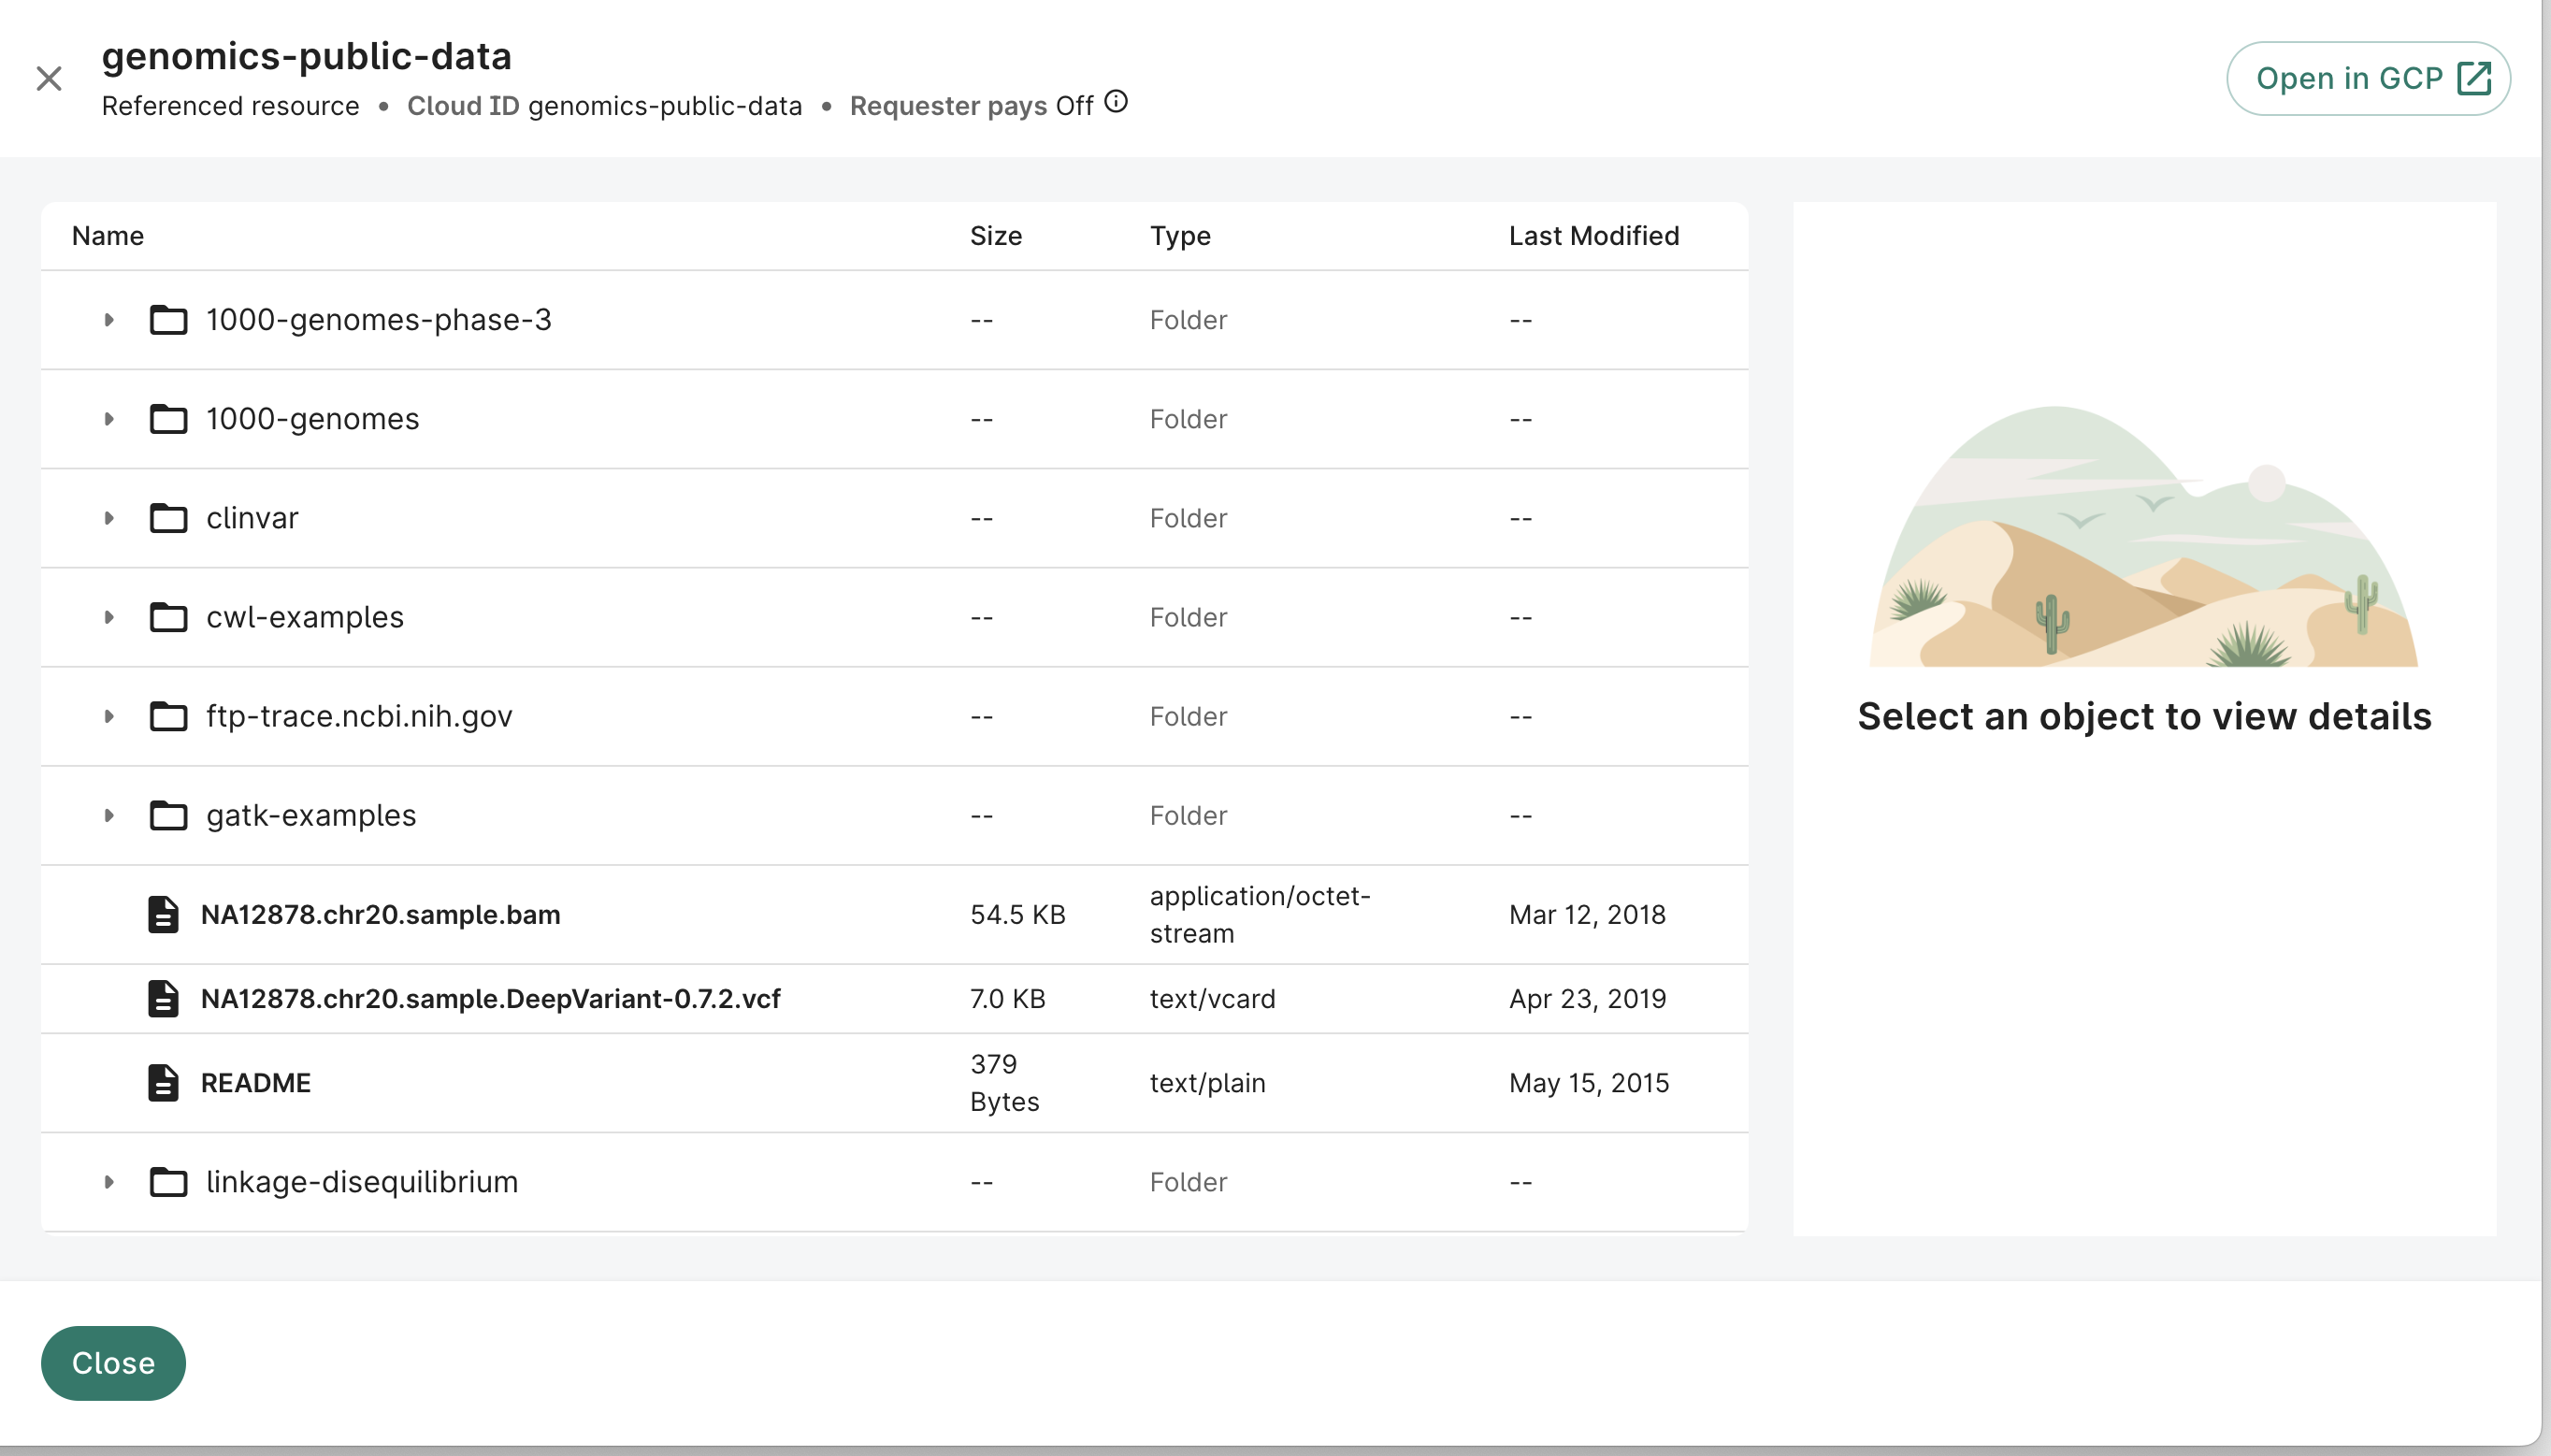
To browse the contents of a GCP bucket, select it in the list of resources and click Browse
in the information pane on the right. This will bring up a browser pane that you can use to explore
the contents of the bucket.
Browsing a referenced Cloud Storage bucket.
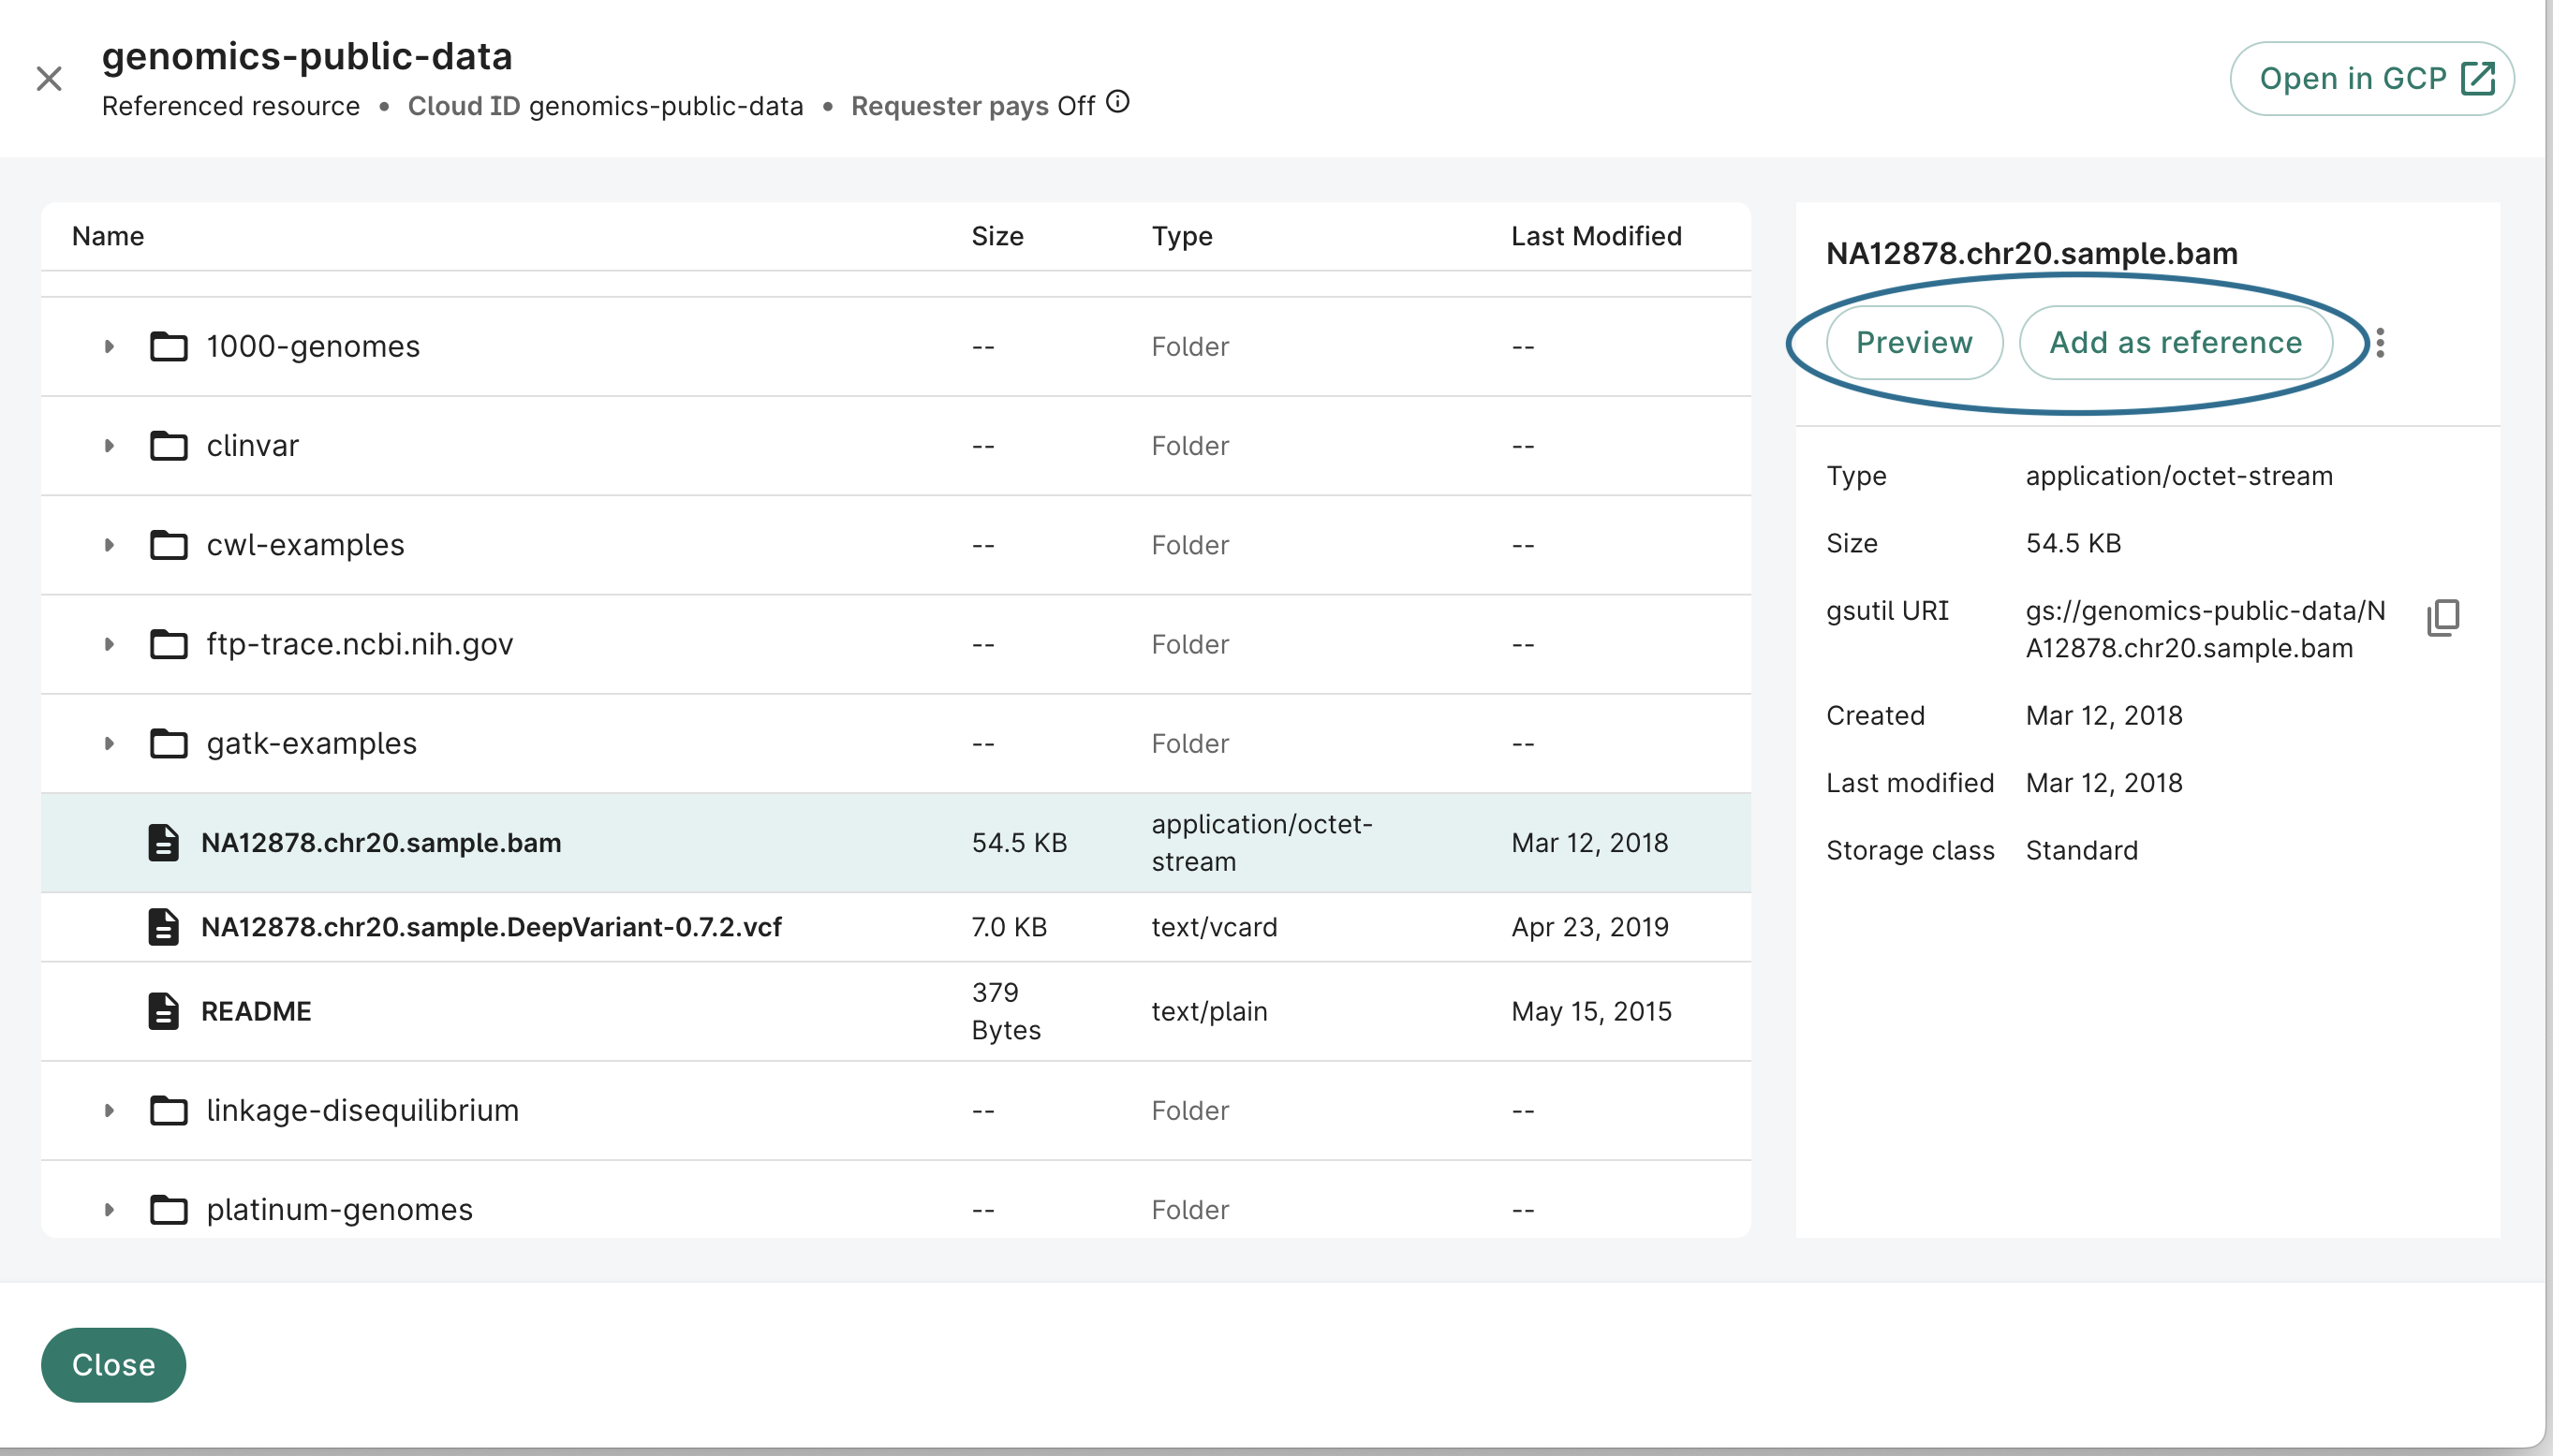
Note that you can select an object within the
bucket browser and add a direct reference to it in your resource list by clicking on Add as
reference in the information pane on the right.
File details while browsing a referenced Cloud Storage bucket.
For S3 buckets, select the Open in AWS button. This will generate a presigned URL that gives
you temporary access to your bucket in the AWS console. If you're already signed in to AWS, you'll
be prompted to sign out.
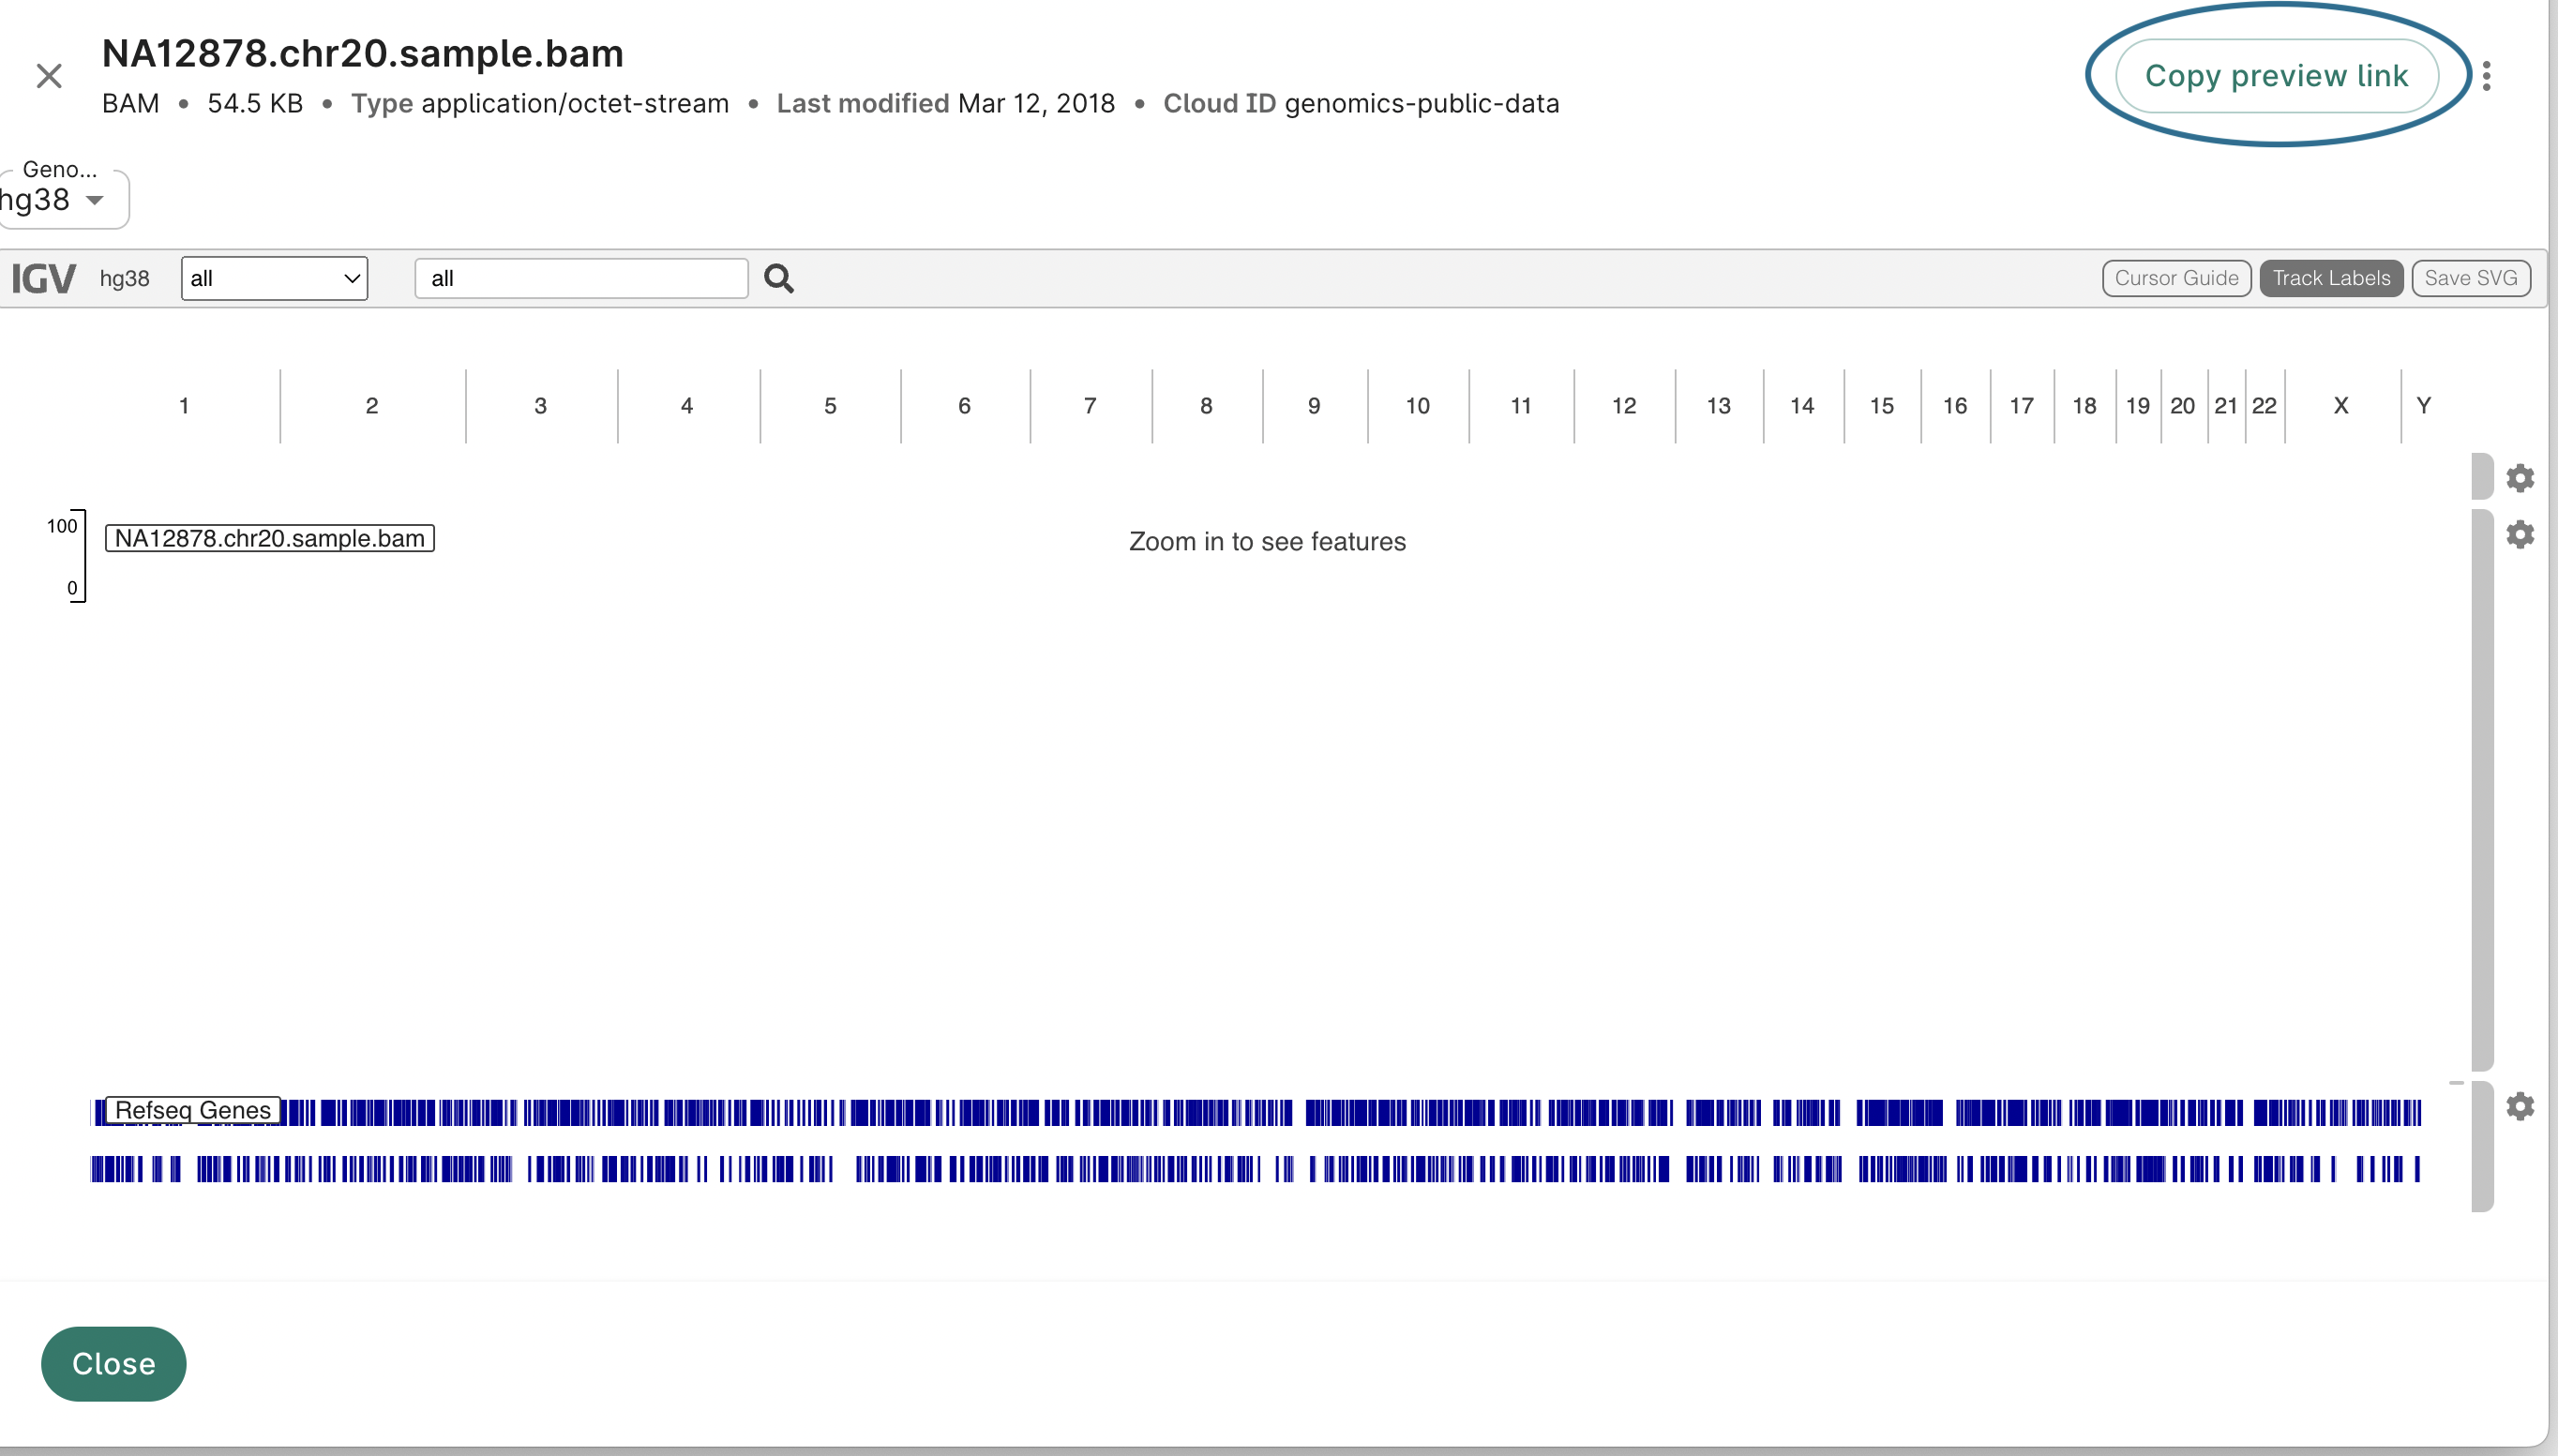
To preview a file, select the file in the list of resources or in the bucket browser and click
on the Preview button in the information pane on the right. This will display a preview of the
file contents.
Here's an example of previewing a bam file:
Preview of a bam file.
Workbench supports the below file types for preview, as identified by the file extensions:
Images: bmp, gif, jpeg, jpg, png, svg, tiff
Documents: pdf
Markup: htm, html, md
Notebooks: ipynb, rmd
Tabular: csv, tsv
Text and code: json, log, nf, rc, script, sh, stderr, stdout, txt, wdl, yaml, yml
For workspaces enrolled in a
perimeter, the perimeter administrator may
restrict which of these file types can be previewed. For example, a perimeter may allow only
analysis files such as notebooks and scripts. The allowed file types are configured when the
perimeter policy is set up.
Note that you cannot upload files into your buckets through the Workbench UI. To do so,
please use the Google Cloud console, or the
gsutil command-line utility.
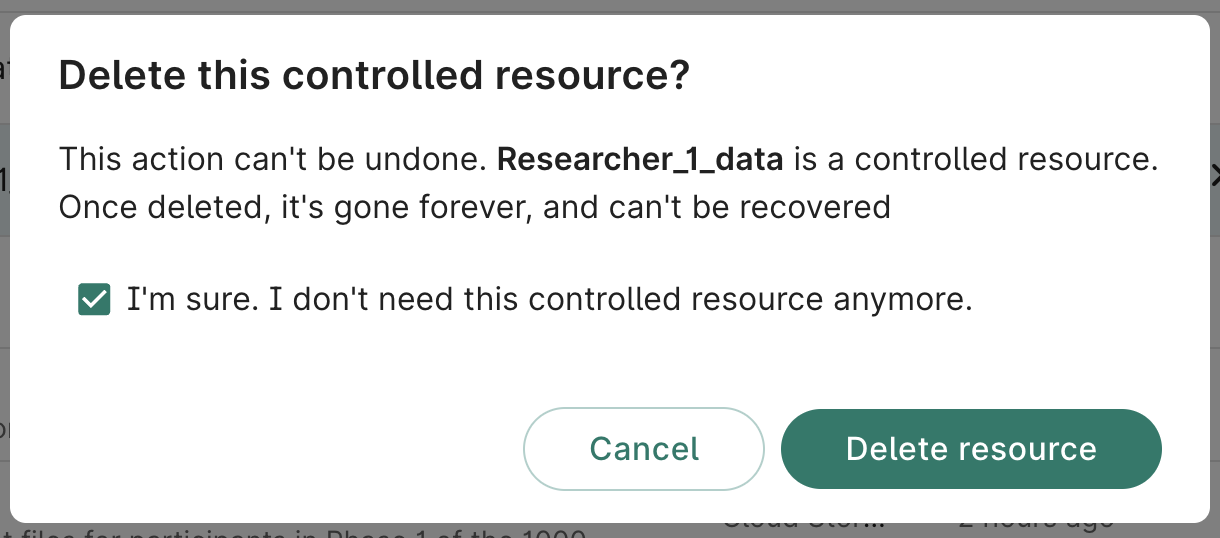
Delete a resource
When you delete a controlled resource, managed by your workspace, it will be fully deleted and is
not recoverable. Controlled external S3 bucket resources are an exception; they will be deleted
from your workspace but still available in your AWS account.
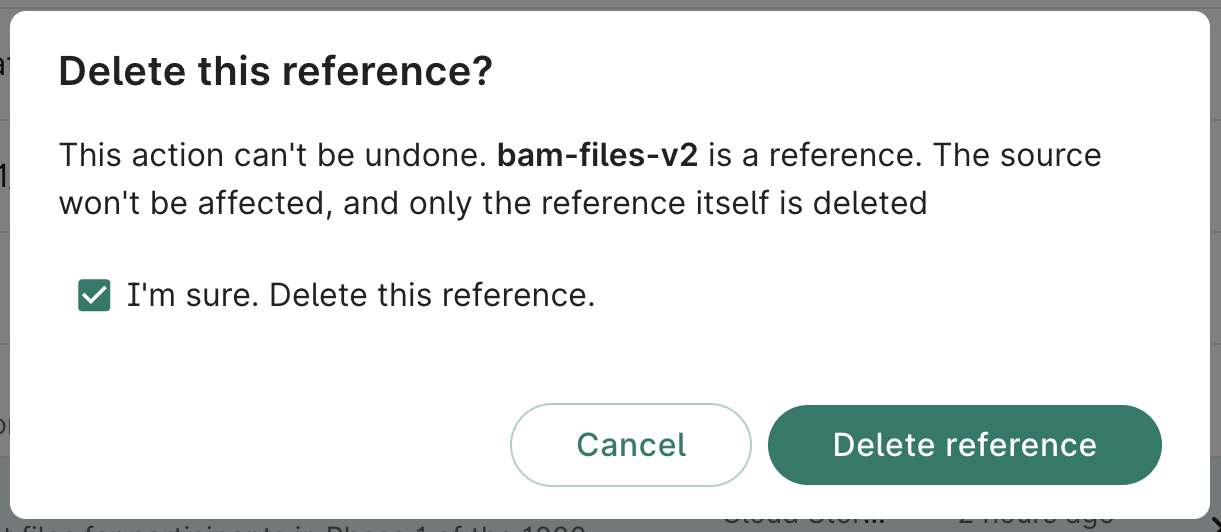
In contrast, when you delete a
referenced resource, you're removing
only the reference. The resource to which the reference pointed is not affected.
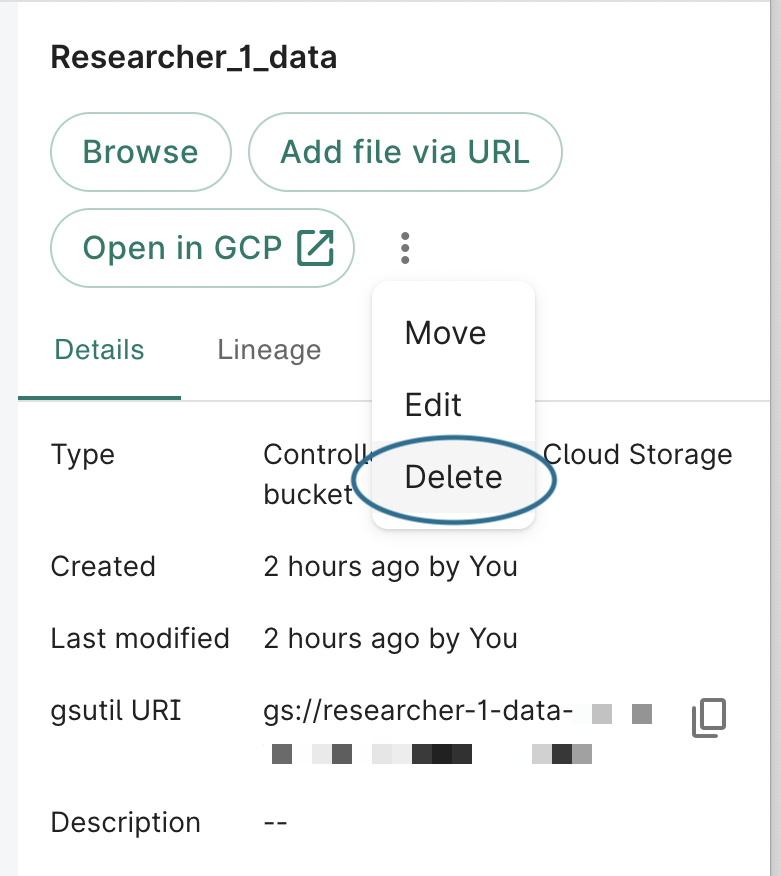
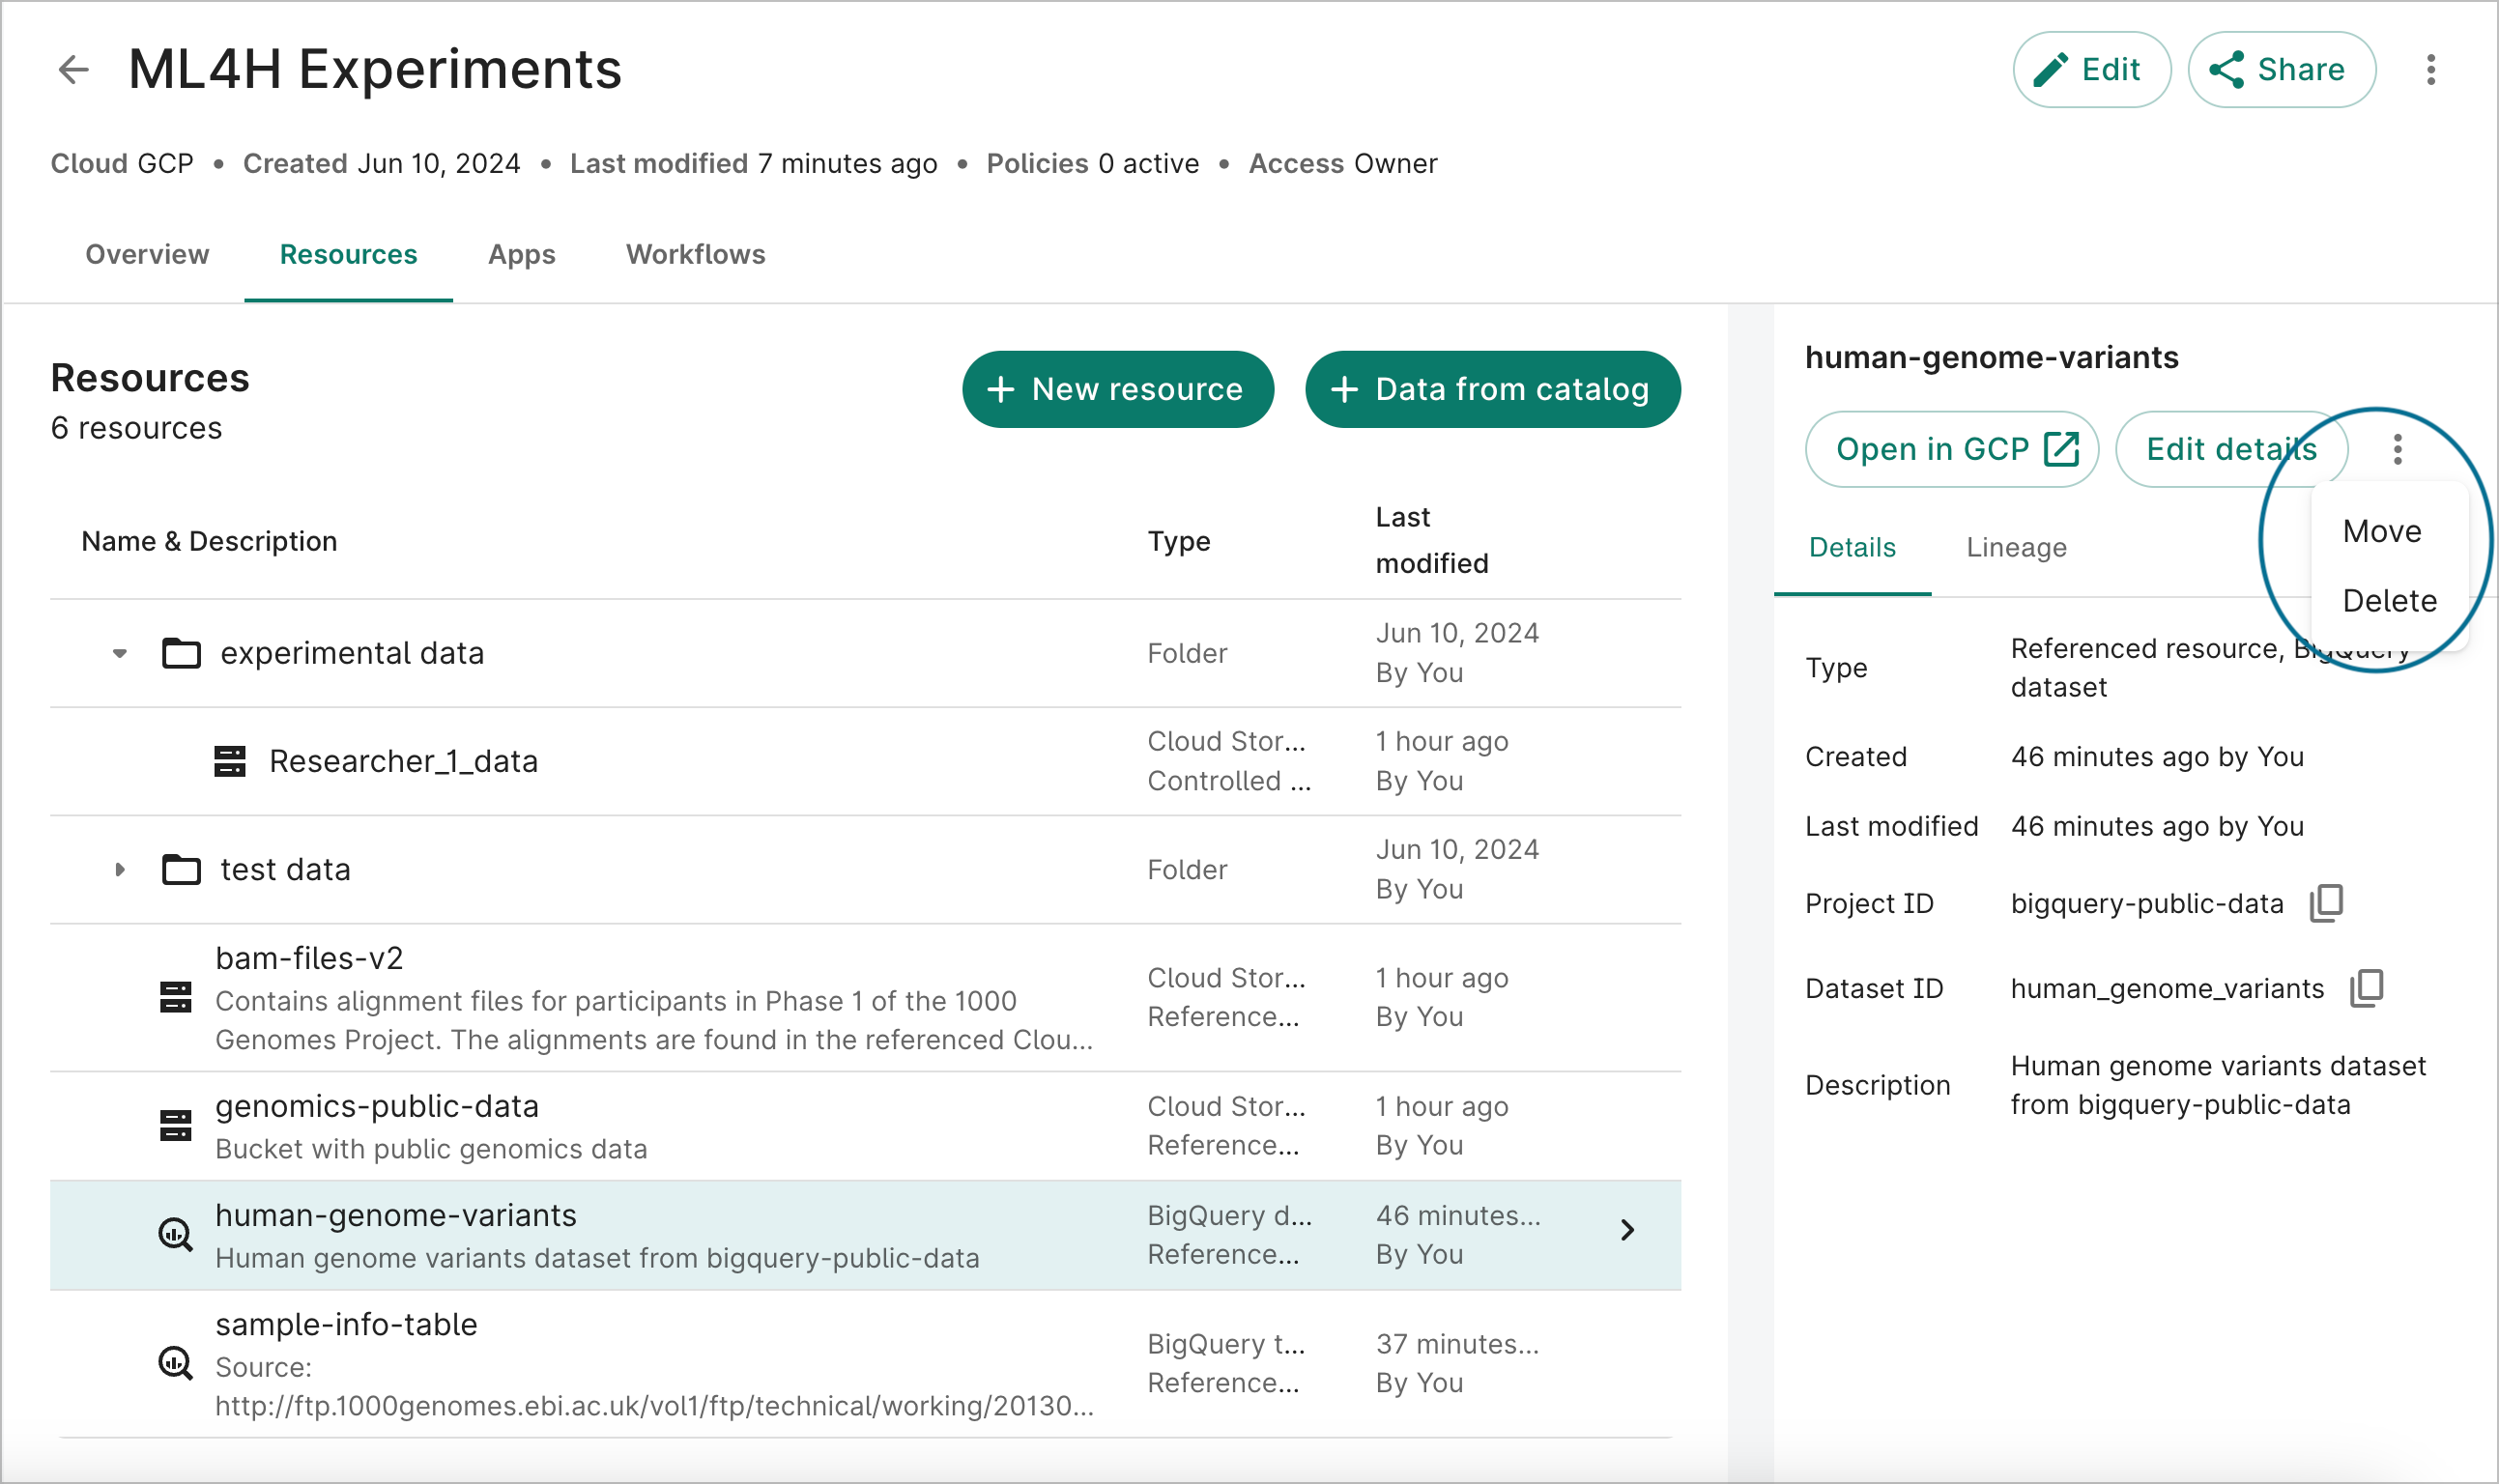
To delete a resource, select it in the list of resources and click the symbol showing three
vertically-stacked dots to display the menu of additional actions, and select Delete.
Deleting a controlled resource.
This will bring up a dialog that summarizes what will happen upon deletion. To confirm that you want
to delete the resource, click the confirmation checkbox and click Delete resource.
Deleting a controlled resource.Deleting a referenced resource.
Note that deletion of referenced resources and controlled resources has different effects as
described above; please make sure that you understand the difference before deleting any resources.
Note on button locations
The resource management operations described above are available through buttons or selector menus
located in the information pane that is displayed on the right when a resource is selected.
Move and Delete in the information pane
for a resource.
The exact layout and appearance of the information may vary with the type of resource selected. For
example, the information pane displayed for a storage
bucket will include a Browse button, while the
one displayed for a BigQuery dataset will
not.